Table of Contents
Editing and Enhancing Your Podcast
Introduction
Welcome to the online reference guide for the free walk-in workshop on GarageBand! Here you will learn a basic overview of how to construct songs and create content for a professional sounding podcast. Let’s get started!
Constructing a Song
Creating music with GarageBand is fun and easy for people of all musical skill levels. There are three different methods you can use to create your song: Apple Loops, Software Instruments, and Audio-Recording. Let’s start with Apple Loops—prerecorded pieces of music that you can arrange into your own beautiful composition!
Apple Loops
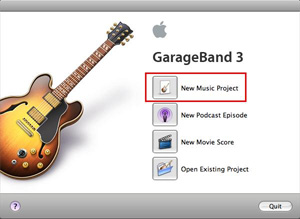
After you click on New Music Project, you will see a screen that looks like this:
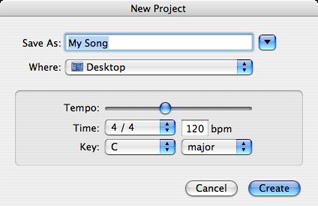
Select a tempo and key for your song (you can always change this later) and click Create. Now you will see a window with a track that uses the Grand Piano Software Instrument (ignore this for now). In the lower left-hand corner, you will see a button that looks like an eye–this is the Loop Browser button. Click on it to see the different categories of loops.

Selecting a Loop
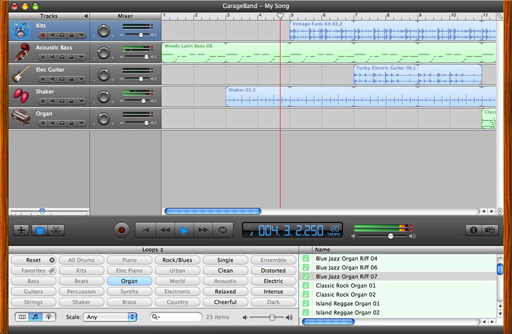
Click on a category and you will see a list of loops on the right. If you click two categories at once, the list will only include loops that match the criteria for both selected categories. By clicking Reset, the categories will be deselected. To listen to a loop, simply select it. Once you find a loop that you like, click and drag the loop to the timeline directly under the Grand Piano track. A new track with your loop will appear.
Looping the Loops
Now you can add as many tracks with different loops to your song as you would like. To listen to your first loop while you are trying out other sounds, you can click on the Cycle button (the button with two arrows making a circle) or you can stretch the loop out and push play (position the cursor in the upper right-hand corner of your loop until you see an arrow and click and drag to the right).
Editing
You can edit your song by moving the loops around, shortening and lengthening them, and changing the overall tempo (do this by clicking Temp and moving the slider around). To make editing easier, you might want to zoom out to see your entire song. You can do this by moving the zoom slider below the track headers (left-hand side above the loop browser).
Here is an example of what your song might look like:
Adjusting the Volume and Pan in Your Song
Once you have arranged your loops the way you like them, you might want to adjust the volume and panning. You can adjust these parameters for your entire song, or for each individual track.
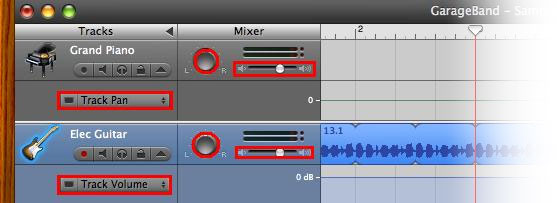
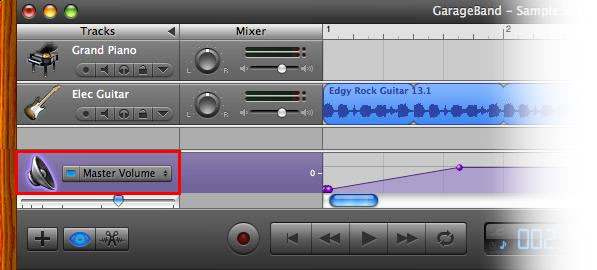
Click Play to listen to your song. You can set the track volume sliders and pan controls of each track to your liking, OR, if you’d like these parameters to change over time, click the triangle in a track header to reveal the track volume/pan curves. Then, click the volume/pan curve to create an insertion point and drag the curve up or down to change the volume/panning over time. Similarly, to change the volume/panning of your entire song, you can adjust the curves for the master track. To show the master track go to Track menu > Show Master Track.
Advanced Editing
You can also change the pitch during your song by moving the pitch curve around on the Master Track. Dragging the curve up to +7, for example, will raise the pitch a 5th. To add effects to your song such as echo and reverb, change the master track’s settings in the Track Info pane (select the Master Track and then click the “i” button on the bottom right-hand side).
Locking a Track
If you feel like you won’t make any more changes to a particular track, you can lock it by clicking the lock icon in the track heading. This will prevent unintended changes to your track and reduce the processing power required to play back your track. If you want to make changes you can always unlock the track.
Software Instruments
A software instrument is a synthesized version of a real instrument. GarageBand has a wide range of these realistic sounds that can be controlled by the onscreen keyboard, or an external keyboard or guitar.
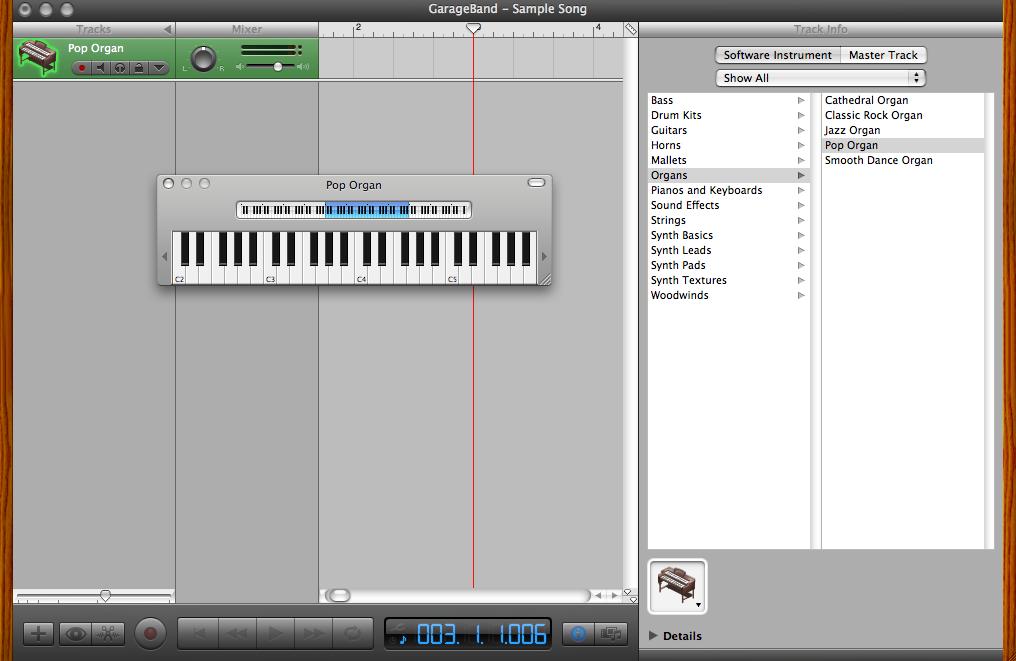
Using an Onscreen or External Keyboard
First, choose “New Track” from the Track menu. In the New Track window, choose the Software Instrument option and click “Create.” Now click the i button in the lower right-hand corner to reveal the Track Info pane. Under Track Info, select an instrument type and instrument. Try playing the keyboard to see if you like the sound. Now to record yourself playing, simply click the record button (red dot) and push the play button to stop.
Using a Guitar
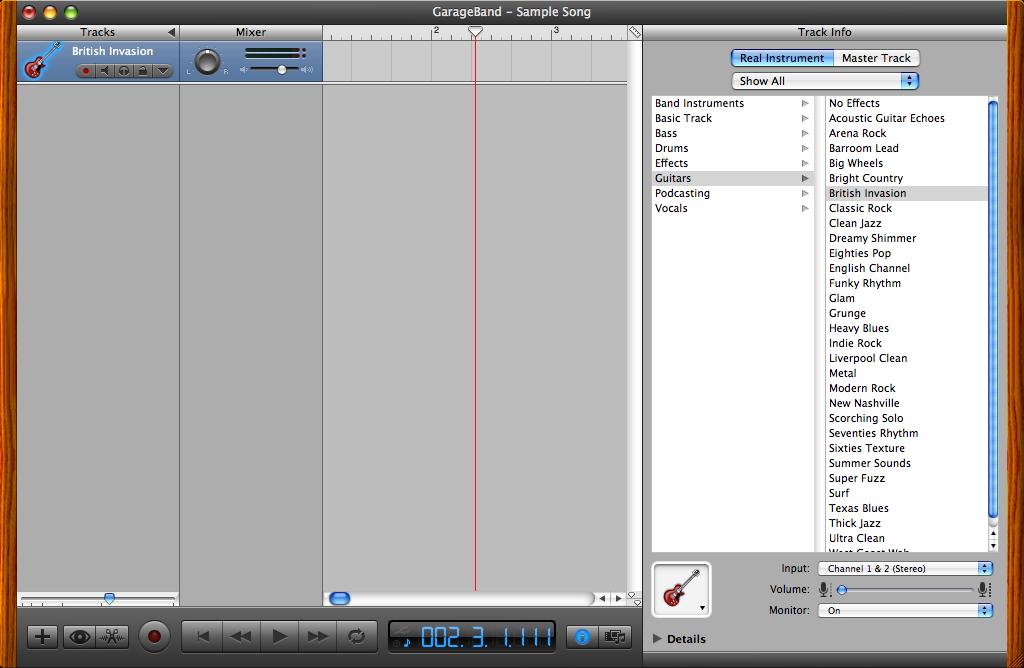
First, make sure that your guitar is correctly plugged into the audio input of your computer. Then in GarageBand, choose New Track from the Track menu. This time, choose the Real Instrument option and click “Create.” In the Track Info pane, select “Guitars” and then choose the type of guitar sound you want in the right column. Next, select the “Monitor On” option and try playing your guitar. You should hear it through your Mac. Now you can record the guitar to a track.
Editing Software Instrument Midi Data
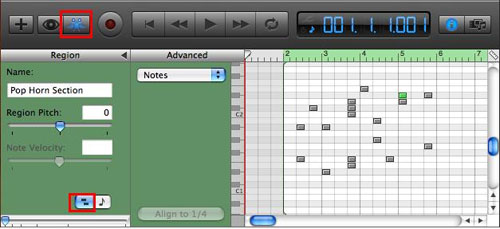
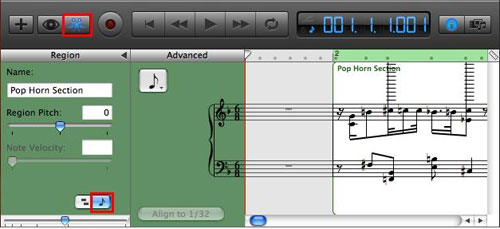
To carefully edit what you have played in using a software instrument, or to even compose music without playing, open up the edit window by clicking on the scissors symbol in the bottom left-hand corner. In this window, you can choose to edit in the standard MIDI data edit mode (little blocks in a grid) or in the musical notation mode. To draw notes in, hold down the Command key (the cursor will turn into a pencil) and click the mouse wherever you’d like the notes to be.
Real Instruments
To record yourself singing over your song or playing an acoustic instrument, you will need a microphone. If you don’t have a built in microphone on your Mac, you will need to find an external one. Once you have the microphone set up, create a Real Instrument Track by going to ‘New Track’ under the Track Menu. Then click the track header of the Real Instrument track you want to record on, and click the Record button (the red dot). When you’re finished, click the play button to stop recording.
Exporting Your Song
Archiving
If you want to work on your song later, you should save your project as an archive. Go to File > Save as Archive. This creates a file in the GarageBand folder that contains all of the loops in your song, as well as your Real and Software Instrument recordings.
Exporting
To export your song as an audio file, go to the Share menu and choose Send Song to iTunes. iTunes will open and start playing your song. You can then burn it to a CD or move it to the desktop by clicking and dragging.
Creating a Podcast
With GarageBand you can create professional sounding audio content for your podcast without a professional recording studio. Start by making a clear recording and then improving it with speech enhancement, noise reduction, audio effects and jingles.
Recording Your Podcast
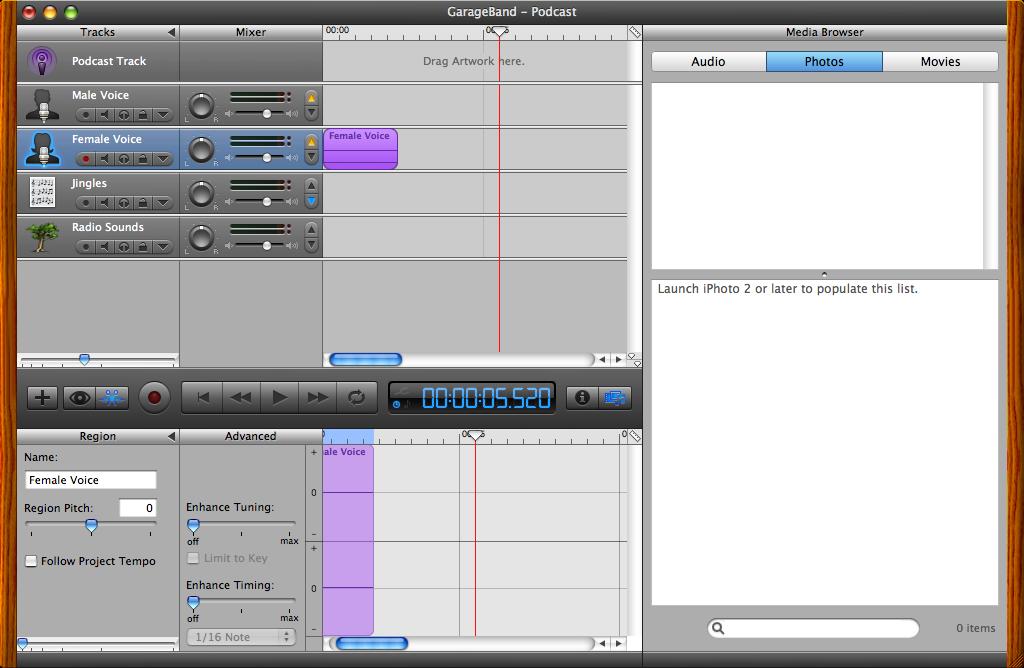
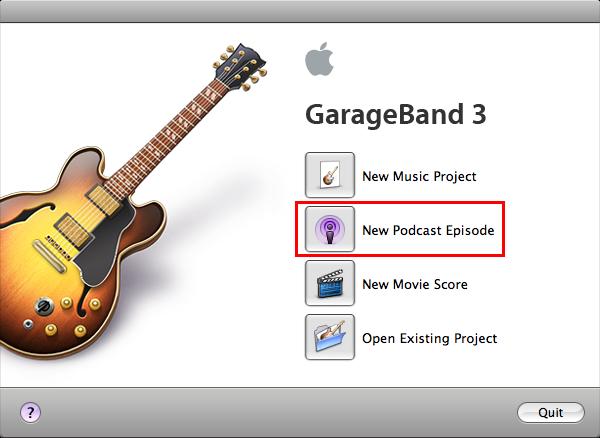
Open GarageBand and click “New Podcast Episode.” Then enter a name for your podcast episode, choose a place to save it to and click Create. Now you will see a window with several tracks already created for you. Select one of the vocal tracks to record yourself on. Click the record button to start recording and click it again when you are finished. To listen to your recording, click rewind and then play.
Editing and Enhancing Your Podcast
Isolating and Deleting Mistakes
To delete pauses, coughs and other mistakes, you must isolate the problem regions. First, drag the playhead to the position right before the part you want to remove. Then go to Edit > Split to divide the audio file into two sections. Drag the playhead to the position right after the part you want to remove and Split again. Select the region that has the mistake and press the delete key. Finally, click and drag the second region next to the first region so that there is no gap.
Applying Effects to Your Voice
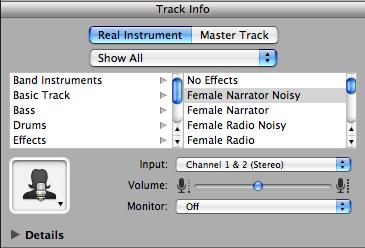
Select the track you would like to add effects to and click the track info button (the i button in the lower right-hand corner). Then click Real Instrument and select an effect. Play back your recording to see if you like the effect.
Adding Jingles
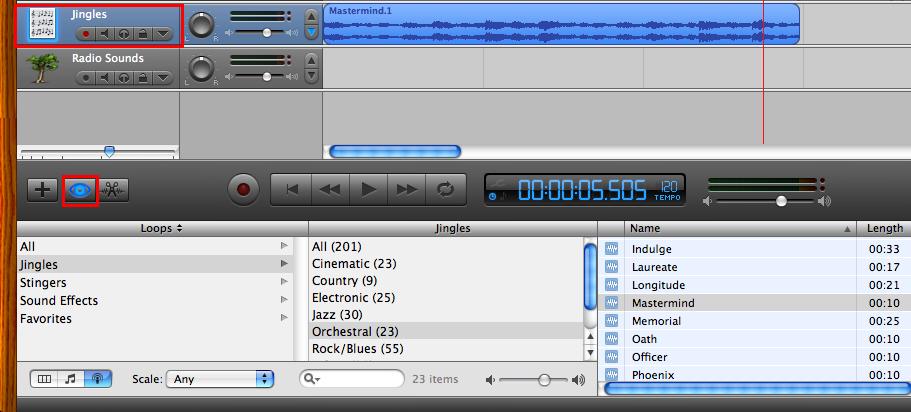
Professional podcasts (and radio shows) often have little jingles that break up the episodes into segments. GarageBand includes a great selection of musical samples just for this purpose. To browse through the podcast audio loops, click the Podcast Audio button in the Loop Browser (the button that looks like an eye). Once you find a jingle that you like, click and drag it up to the jingle track and position it where you would like it. In addition to jingles, there are sound effects such as the sound of doors closing or glass breaking.
Adding Chapter Markers to Your Podcast
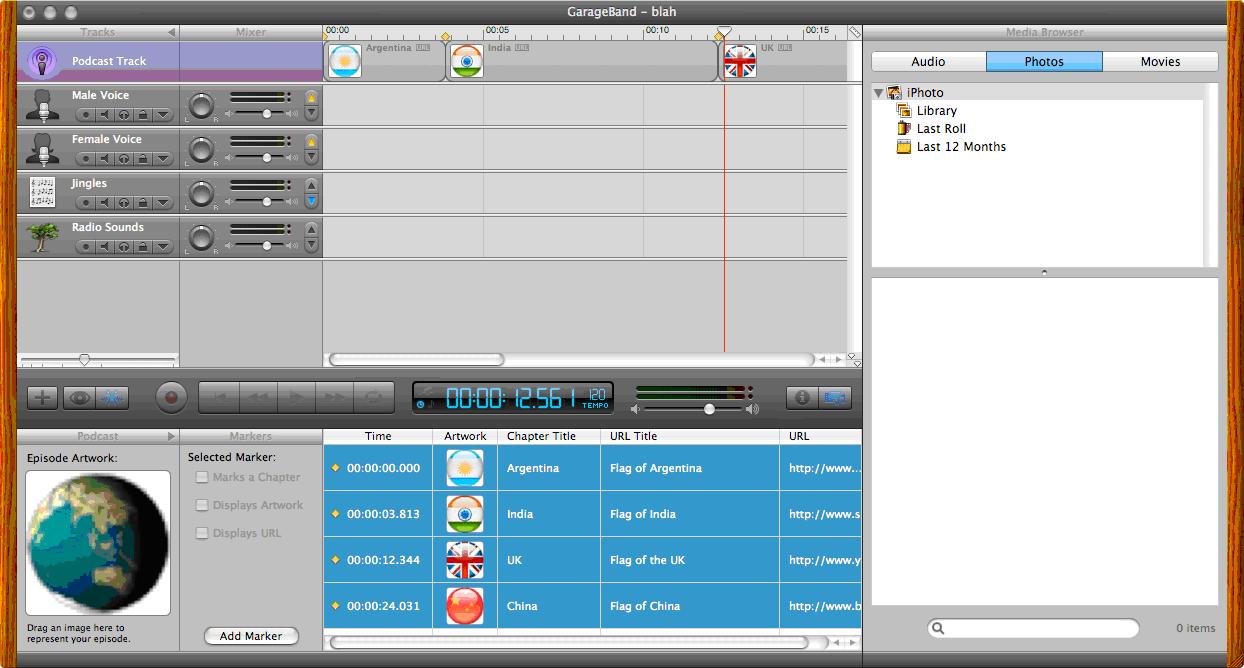
To create chapters so that your audience can move between sections in your podcast, simply drag an image that you associate with a particular section to the Podcast Track on the top. Position the image so that it starts right when you want it to. In the window below, you can add a chapter title and a link to a website. When someone listens to your podcast on iTunes or on an iPod, they will be able to navigate through the chapters.
Exporting Your Podcast
There are two ways you can export your podcast. If you would like to put your podcast online using iWeb, go to Share menu > Export as Podcast. To put your podcast online another way, go to the Share menu and select Export Song to iTunes to save the audio file. To learn how to distribute your podcast, please attend our free walk-in Podcasting/Vodcasting workshop.