Currently all MWS Staff are working remotely to help curb the spread of COVID-19. We offer instructions on how to temporarily setup your computer to work off-domain here: COVID-19: Off-Campus Computer Setup.
Once you receive your new computer or if you need to have your computer imaged, you will do one of the following:
- Install the Managed Workstation Image yourself or request that MWS Support perform the work with a supplied budget.
- If you wish to re-image the computer yourself, you can build a Windows computer using the OSD Image Installation (formerly Lite-touch) or by using Windows 10 Enterprise software, available from Software Licensing (UWARE).
After the computer has been imaged, follow these instructions below to join the workstation to the NETID domain.
Joining Your Managed Workstation to the Domain
-
- At the login screen, log into the established administrator-level account that was created in the initial setup before the re-image started.
- Make sure you are connected to a working Ethernet port, or connect to the University of Washington wireless network.
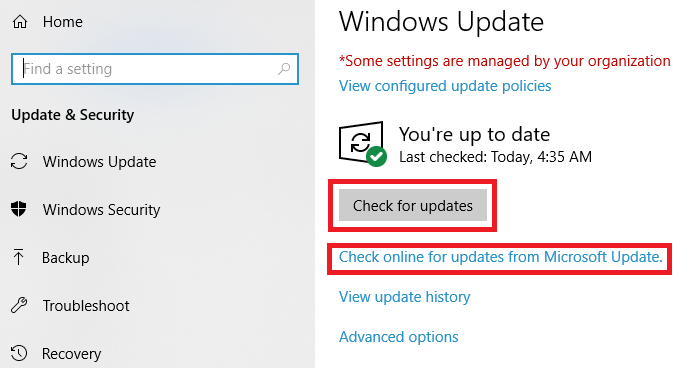
- Get all Windows Updates installed by clicking on the Start tile/button in the lower left hand side of the screen, then clicking on the ‘Gear’ icon. This will open the ‘Settings’ window. Click on ‘Update and Security’, then click on the ‘Check for updates’ button. If no updates are available, then click on the link ‘Check online for updates from Microsoft Updates’ download and install any updates if available.
- In the Search box in the lower left hand corner of your desktop, type in: Control Panel >> System and Security >> System >> Change Settings then click the ‘Change’ button. Make sure your computer has the desired “Computer name” you wish to use (The computer serial number is the default name of the computer) DO NOT JOIN NETID at this time, leave the computer in a ‘Workgroup’ for now. You will join the workstation to the NETID domain later.
- At the login screen, log into the established administrator-level account that was created in the initial setup before the re-image started.
- Create a request using the Enable Computer for MWS services form and wait for confirmation the workstation/computer account has been created. If you don’t wait for confirmation before joining your workstation to the NETID domain, the workstation will end up in an unusable state which will require assistance. If you’d like to request that specific UW NetIDs be added to the Local Administrator Group, include the NETID’s that need administrator permissions in the request follow-up.
- Once you have confirmation the computer account has been created, return to Control Panel >> System and Security >> System >> Change Settings >> Change
- Double-check that “Computer name” is what you want it to be
- Click on the “Domain” button under Member of
- Enter: netid.washington.edu
- Click “OK” – if you are connected on Campus networking as required, you will be prompted for an account to connect to the NETID domain.
- Enter: netid\your uw netid for the username and your netid password
- Restart the workstation.
- Log in using your UW NetID credentials: netid\your uw netid.
- Allow a few hours or overnight for Managed Workstation settings to complete. Restarting the computer a couple of times to ensure settings are applied correctly is strongly encouraged. Alternatively, you can use this command line prompt to force the settings update and reboot: gpupdate /force /boot
- After this, you can use the myIT page to make these further changes:
- the primary user
- the technical contact
- your note in the inventory field