Microsoft Forms is part of the Microsoft Office 365 family of products available to the UW community, and can be used to create custom surveys, polls, and quizzes.
Note: If you need to restrict survey respondents to specific people, you can do so by using a UW Group that you have enabled to work with Microsoft Exchange. This functionality is not available for hidden Exchange-enabled groups, such as course lists.
Features of Microsoft Forms include:
- Survey responses in a data-friendly format (Excel sheet)
- Quick creation, sending, and sharing of surveys
- Questionnaire options to build survey are simple to understand but allow for higher complexity forms/surveys
- Useful data on response details
- Supports for multilingual options
- Ability to preview surveys in desktop and mobile views
Getting Started
IMPORTANT: Microsoft offers three different ways to create surveys. UW-IT strongly recommends following the Excel for the Web method for the best access to and retention of responses.
For collection and collaboration on departmental data, we recommend requesting and using a Microsoft Team, which offers productivity, collaboration, communication, and file storage capabilities for groups of people.
Please see Microsoft’s Get Started page for more information on using Microsoft Forms.
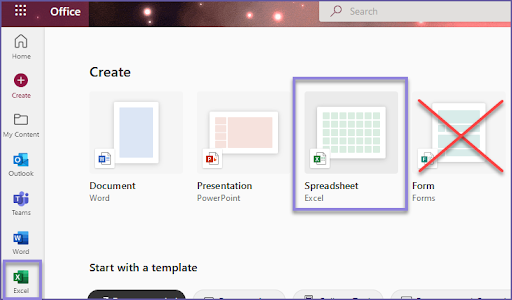
Creating a Survey using Microsoft Forms via Excel for the Web
Start a new Form using Excel for the Web
- Sign into UW Microsoft Office 365 using your UW NetID.
- Create a new or open an existing Excel worksheet that will collect and store the survey data.
Important: Do not click the Forms icon in the menu options.
- Click the Insert menu, click Forms, and then click New Form.
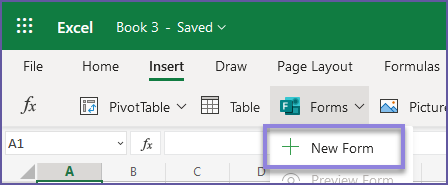
- A new blank Microsoft Form will open in a new browser tab or window. Type or enter a name for the survey.
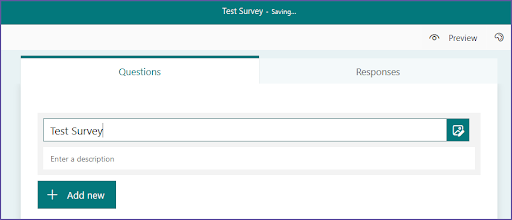
- Continue by adding questions to the survey.
Sending a Survey via Microsoft Forms
Adjusting your form’s settings
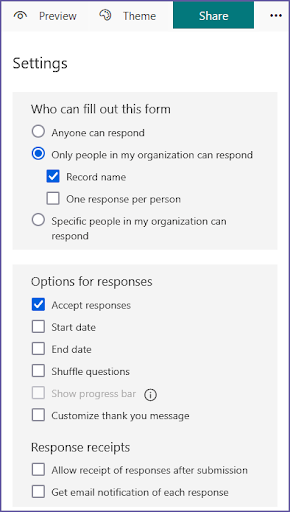
To ensure the survey goes only to the intended recipient(s), along with other customization options, click on the dots next to the Share button, then select Settings:
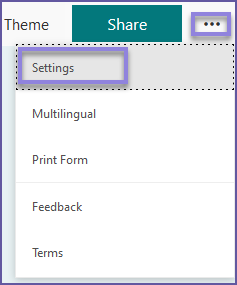
After choosing your options the Settings menu, click Share button to return to the previous panel. Learn more about how to adjust your form settings in Microsoft Forms.
Send Options
Lastly, Microsoft provides several options for sending a survey via Microsoft Forms. Learn more about the different send options available. Note that the option to restrict the form to only “Specific people in my organization can respond” requires you to enter each name, group, or email address into the field before you click the Share button. This option will not work for groups that are not Exchange-enabled, or are Exchange-enabled but hidden. Example: Course groups are hidden for privacy reasons.
Collaboration
Microsoft Forms supports collaboration with varying levels of customizable access. Due to the complexity of the features, and the dependency on existing library and/or group permissions, it is important to understand what each level of access entails:
- Full Access: If you allow full editing access to the Excel spreadsheet, a collaborator can edit the form as well. If the Excel spreadsheet is located in a shared folder on OneDrive, Microsoft Teams, or a SharePoint Document Library, the existing permissions applied to the shared folder apply also to the Excel spreadsheet and the form.
- Read-Only Access: If you allow read-only access to the Excel spreadsheet, a collaborator cannot access the form at all (except to respond to the form as a participant). Read-Only members can see the raw data in Excel online, but cannot see summary statistics available on the form itself.
- Share to Collaborate: You can select “Share to collaborate” on the form itself which allows a collaborator to view and edit the form. This also allows them to see the data summaries for the form, but it does not allow access to the raw data in Excel. Forms shared in this manner show up in the list of Forms that can be accessed from the Forms application under Microsoft Office 365.
For more information on how to collaborate on a Microsoft Form, please see the following guides provided by Microsoft: