- On this page
- Protect student privacy
- Select appropriate access level
- Add students
- Add teaching assistants, observers, designers, librarians or guest teachers
- Add people by using UW Groups
Protect student privacy
When adding people to your course, and any time you engage in any course-related activity that may expose student information, it is critical to be aware of FERPA guidelines. The Family Educational Rights and Privacy Act (FERPA) of 1974 protects the privacy of students’ education records. Generally, the guidelines mean that the University and its employees may not release or share a student’s educational records, or information from a student’s education records, unless it has the student’s written consent to do so. Some exceptions to this general rule can be found at FERPA for Faculty and Staff. It is important that you understand when it is appropriate and allowable to release information from students’ education records to third parties, such as guest lecturers, teaching assistants or advisors.
Select appropriate access level
When giving access to your course, it is important to select the appropriate level of access in order to protect students’ privacy rights. For course guests who do not have a clear educational purpose for having access to student data (names or grades), choose from the more restricted roles of guest teacher, librarian or observer. Note: Designers and guest teachers are not listed in the course People page.
|
Role Permission |
Student | Teacher | TA* | Designer | Guest Teacher | Librarian | Observer |
| View Unpublished Course | |||||||
| View Discussion / Wiki Pages | |||||||
| View Student Submissions | only their own |
||||||
| View Course Content | |||||||
| Manage Course Content | |||||||
| View Grades | only their own |
||||||
| Manage Grades |
*Note: Teaching Assistants cannot
- add/remove other teachers, TAs, or designers
- publish or unpublish the course
- manage sections
- moderate grades
Add students
Registered students are automatically enrolled in courses based on the official time schedule. If student names that you expect to see in your Canvas course are missing, the delay may be due to a hold or an issue with registration. Please contact Learning Technologies at help@uw.edu about your course enrollments. If students require immediate access, you can manually add students to your course, as long as they have a UW NetID.
To add students to your course, follow these steps:
- StepsActions
- From within your Canvas course, in the course navigation, click People.
- Near the top of the page, click +People.

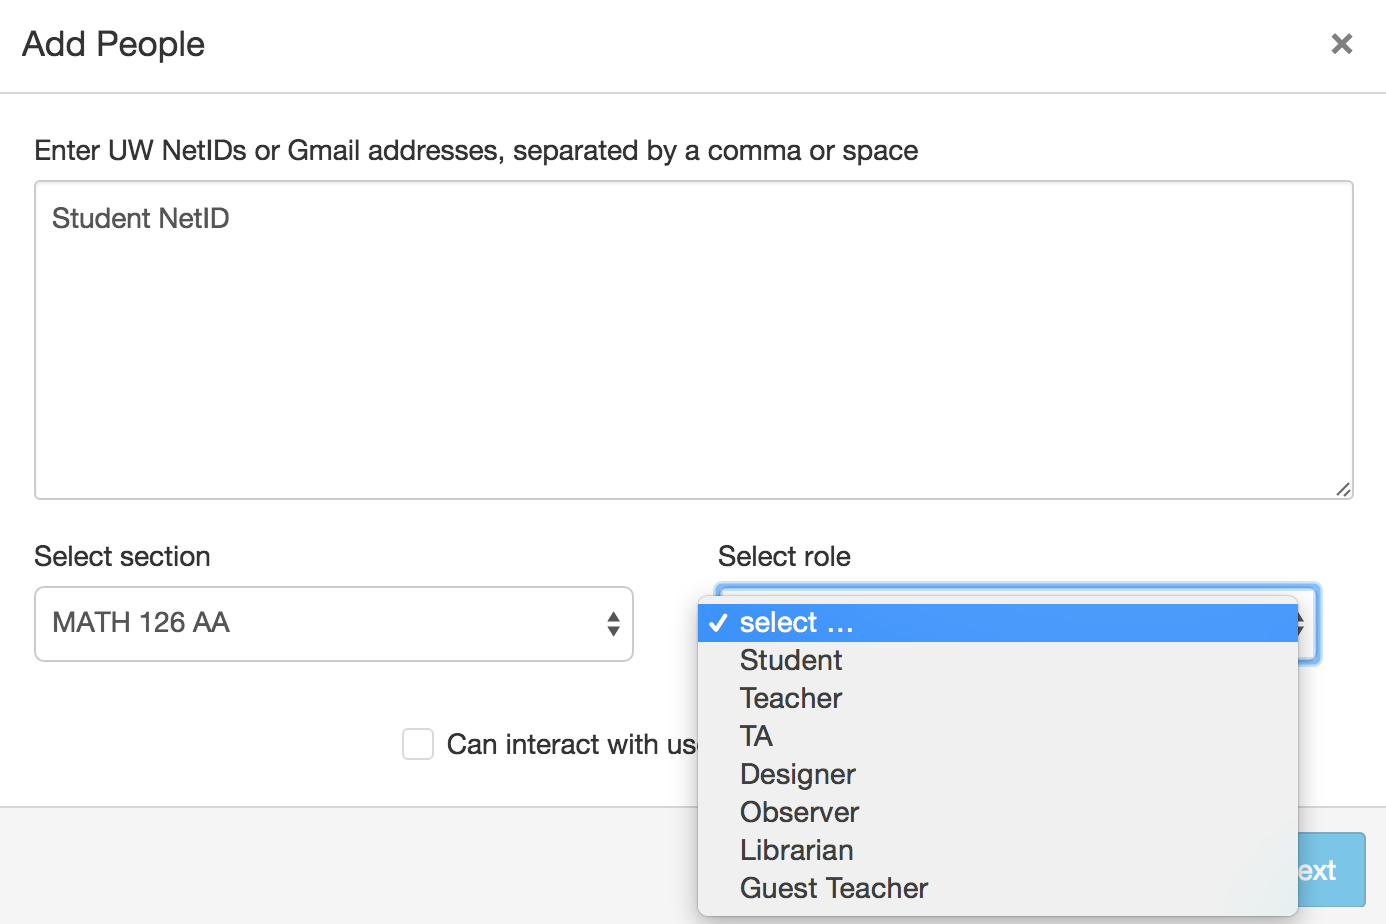
- In the dialog box that appears, enter a student’s UW NetID (not their email address). You can add multiple students at the same time, separated by commas.
- Choose the correct course section and make sure the role is set to Student.

- Optional. If you want to restrict activity so that students only interact with classmates in their section, select the Can interact with users in their section only checkbox.
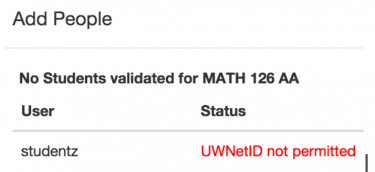
- Click Next. Check the status message to make sure that the ID you entered is accepted. If the ID is not accepted, a status message in red will appear.

- If you are done, click Add 1 User. If you want to add more people who will have the same role, click Start Over. After you click Add X User(s), you will see a status bar. When the student has been added to the course, you will be returned to the list of students and a confirmation message will briefly appear at the top of the screen.

Add teaching assistants, observers, designers, librarians or guest teachers
All official instructors of record are automatically enrolled in Canvas courses based on the time schedule. If you want to have additional instructors or TAs added to the course as official instructors of record, please contact your department’s Time Schedule Coordinator and request that they be added.
You can manually add other guests, such as faculty, TAs, librarians, industry experts or observers, to your Canvas course when they have a UW NetID.
- StepsActions
- From within your Canvas course, in the course navigation, click People.
- Near the top of the page, click +People.
- In the dialog box that appears, enter the person’s UW NetID (not their email address). You can add multiple people with the same role at the same time.
- Select the appropriate role (Student, Guest Teacher, TA, Designer, or Observer).
- Click Next. If you are done, click Add 1 User (or Add X Users). If you want to add more people who will have the same role, click Start Over.
- The FERPA acknowledgement will appear. Review the terms, then select the I Understand check box and then click Confirm. A status bar will appear. When the guest has been added to the course, you will be returned to the list of people in the course and a green confirmation message will appear briefly at the top of the screen.
Add people via UW Groups
People with a UW NetID can also be added to a Canvas course with a UW Group. If you have a group of instructors or cohort of students that are not officially registered for a course, but you would like them to be able to observe or participate, you can grant this access with a UW Group.
To add a UW Group to your Canvas course, follow these steps:
- StepsActions
- From within your Canvas course, in the course navigation, click People.
- On the right side of the screen, above the +Group Set button, click the gear icon and then click Add & Manage UW Groups.
- Enter or paste the UW Group you want to add.
- Select a role for the UW Group (Student, Teacher, TA, Designer, Observer, Librarian, Designer).
- Click Save.
Note: In case of role conflicts between registrations and UW Groups, roles coming from the student information system will be preserved over roles assigned to individuals or UW Groups in Canvas. In other words, a registered student will not be given an additional role in the course, such as TA or Observer, if they are a member of a UW Group assigned that role.
All of the individuals from the selected UW group are added to the course, and listed on the People page with the role assigned. Group members with valid, personal UW NetIDs can be added to Canvas. Please note that shared UW NetIDs cannot access Canvas.
To add or remove users from your UW group, use the UW Groups service, found at https://groups.uw.edu/. This is where you can create and manage UW Groups, edit the membership of the group or find institutionally maintained groups that you can use.
Changes made in Canvas will have no effect on the membership of your UW group. In your Canvas course you can remove members of any UW group you have added using the People page, but the next time the systems are synced (changes to membership update within 5 minutes, and are also reconciled nightly) the members of that group will reappear. To remove or add an individual from the group, you must use the UW Groups service to change the group membership.
