Objective
- To create a fairly complex object from simple shapes such as circles, rectangles, and polygons.
- To learn to use the Pathfinder palette to create advanced shapes.
- To gain familiarity creating, manipulating, and combining shapes.
- To gain familiarity selecting and moving objects.

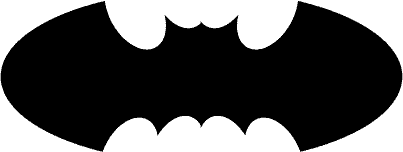
In this lesson, you will be creating a bat logo from simple shapes and basic Illustrator commands. There are many different ways to accomplish the same task. As you get more comfortable with Illustrator, you may develop a certain style through either menus or shortcut keys.
Complex objects are often composed of less complex shapes. Although the bat logo isn’t very complex, the process of creating it can be applied to other objects. When creating objects, analyze the structure, look for basic shapes, and tackle one section at a time.
First, enable the grid, if it isn’t already: View > Show Grid, ‘ (Windows) or‘ (Mac OS). Showing the grid by itself does us no good, so select View > Snap To Grid, ‘ (Windows) or <Shift>’ (Mac OS). This “snaps” objects, points, lines, etc., to the grid. It also makes it easier to align objects as well as to make “perfect” and proportional shapes.
Note: You can change the grid size by selecting Edit > Preferences > Guides & Grid….


- StepsActions
- Select the Ellipse tool (L) and click on the artboard. Use “350 pt” for the width and “150 pt” for the height, and click OK.
- Select black as the fill color in the Color Picker, and the ellipse should turn black.
- Use the Direct Selection tool (A) to select the right half of the ellipse by drawing a box that intersects with the top and the bottom of the right side of the ellipse. Press to delete the right half of the ellipse.
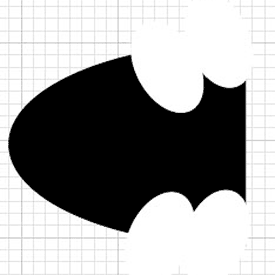
- Select the Ellipse tool again and draw another, smaller, ellipse on the artboard by clicking and dragging the mouse. Give the new ellipse a white fill and stroke color, so that it looks like the ellipse in the first example picture.
- Use the Selection tool (V) to select the white ellipse. Without clicking the mouse, slowly move the mouse cursor outside of the selected ellipse and towards the upper-left corner until the cursor changes to look like a curved arrow. Slightly rotate the ellipse to the left by clicking the mouse and dragging to the left.
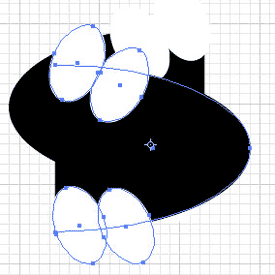
- Copy and paste the white ellipse so that you have two white ellipses. Move the second ellipse with the Selection tool so that the two white ellipses slightly overlap.
- Copy and paste the white ellipse two more times to make a total of four white ellipses. Note that Illustrator always pastes objects in exactly the same spot, so your two pasted ellipses will be directly over one another.
- Arrange the two new white ellipses as shown in the third picture of the example. Using the Selection tool, move them to the bottom half of the black half-ellipse, and this time rotate the bottom left corners slightly to the left.
- Use the Direct Selection tool to select the entire object by drawing a box around it. Then copy and paste the entire object so that there are two halves of the bat.
- Hold the mouse down on the Rotate tool icon in the toolbox to be able to select the Reflection tool (O). Press , and the Reflect dialog should appear. Choose a 90 degree reflection along the vertical axis, and click OK. You should now have two bat-halves, each facing an opposite direction.
- Select Window > Pathfinder. Merge all of the shapes in the right-hand bat half selecting the four white ellipses and the large black ellipse (hold down and select each one in turn with the mouse) and then click the Merge button on the Pathfinder palette. Illustrator will now recognize this half as one single object. Click on any section, and see how the entire object is selected instead of the individual ellipse.
- Move the right half of the bat out of the way using the Selection tool, and repeat the step above for the left half.
- Line up the two halves so that they form the bat logo. Select both objects by holding down the as you click on them. In the Pathfinder palette, select the Align tab and click the Vertical Align Center.
- Once the objects are aligned vertically, deselect the View > Hide Grid > Snap to Grid option. Then use select only the right half of the bat and use the arrow keys move it until it joins with the left half.
- The logo looks done, but Illustrator still does not recognize it as one object. Try moving it around or applying a style to it, and you will see that it does not keep the bat shape. To fix this problem, first ungroup the objects by selecting Edit > Ungroup. Each ellipse should now be selectable as its own object.
- Select all of the white ellipses by holding down the key as you click on them. On the Pathfinder tab, click Subtract from shape area. Then select both black halves and use the Merge button again.
- Done!

Using simple shapes, commands such as Rotate, and the Pathfinder and Align palettes, we are able to create a fairly complex object.
Remember, similar concepts can be applied to other complex objects! Analyze the object, look for simple shapes, and work on one section at a time.
