- What is it
- What can I do with it?
- Can non-advisers see or use this feature?
- How can I share a link to a sample plan I’ve created?
- Where do I find it?
- Plan Management page
- Creating a new plan
- Adding courses to the sample plan
- Giving colleagues access to view and/or edit your new sample plan
- Sharing with UW Groups Service
- Understanding visibility settings: Public vs Private (BETA version)
- Deleting a plan
- Duplicating a plan
- When will students be able to use my sample plan as part of their academic planning in MyPlan?
- Feedback
Have some feedback? We want to hear it! You can provide any feedback you have on this Google form, or by emailing help@uw.edu and directing the feedback to the MyPlan team.
What is it?
Adviser sample plans (Plan Impex for Import-Export) is a new feature that has been developed with input from stakeholders who use academic planning tools such as degree plans or maps. Eventually students will be able to import these sample plans directly into their MyPlan academic plan, however we want to give advisers the chance to use this new feature and provide feedback first.
What can I do with it?
In the current beta version, this feature is only available to advisers. Advisers will have the ability to create sample plans, share these sample plans with advising colleagues and work on them collaboratively, and even publish sample plans they would like students to be able to view.
Can non-advisers see or use this feature?
No, currently only users with some kind of adviser role (if you have access to EARS, you should have this role). Some non-advising staff may also have this status if they have access to certain advising tools.
How can I share a link to a sample plan I’ve created?
After creating a sample plan if your ‘Plan Visibility’ is set to Public and you share the URL link, anyone will be able to view the sample plan in a read-only view. See “Understanding visibility settings: Public vs Private” at the bottom of this guide.
Where do I find it?
You can find a link under the Manage section on either the side navigation or the MyPlan home page. The link is ‘Adviser Sample Plans (Beta). You can also navigate to the sample plan feature directly using this link: https://myplan.uw.edu/impex/.
Plan Management page (Your home page for managing sample plans in MyPlan)

The Plan Manager page is your home page for finding any sample plans you have created, or that a colleague has shared with you. The All Plans tab (1) will show you both plans you have created, and that have been shared with you. The Created By You (2) & Created by Others(3) will filter to only plans you created, or that have been shared with you, respectively.
You will be able to see the Plan Name, the number of years with courses added (1-8), any Area of Study tags added, and the plans visibility setting. To open a plan click on the plan name.
Creating a new plan


To create a new plan from scratch, click the Create New Plan button in the upper right corner of the plan manager page.
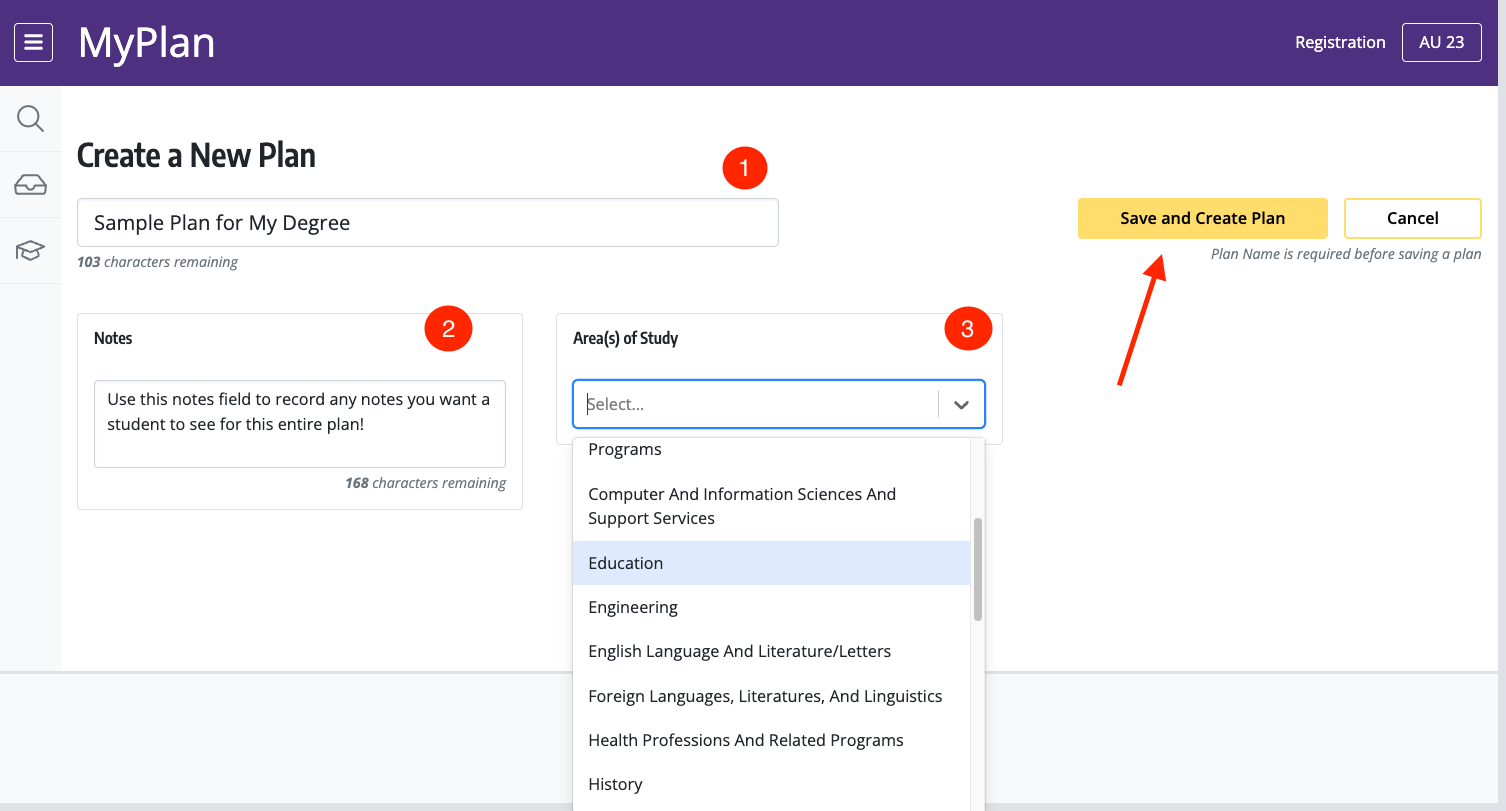
You will then land on a blank Create New Plan page. You must enter a name for your sample plan (1) before you can create your sample plan and start adding courses. You can also add any general notes you’d like students to see (2) and add an Area of Study tag (3). Areas of Study are broad groupings of programs that students can search by in Find Programs feature in MyPlan. Follow this link to see what Area of Study a degree or credential falls under.
Once you have entered a plan name, click Save and Create Plan.
Adding courses to the sample plan
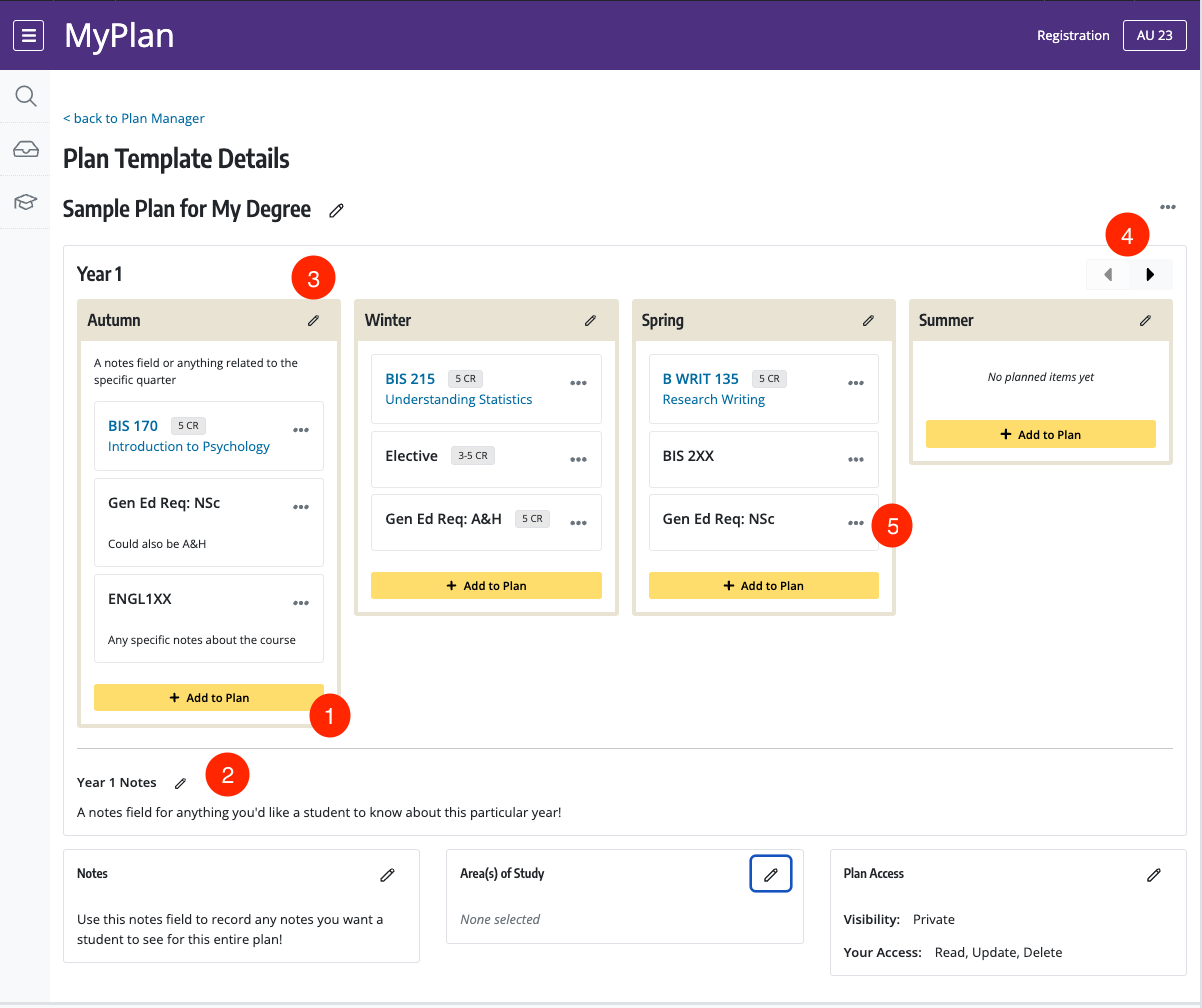
After saving and creating your new sample plan you are ready to start adding courses and other information. To add a new course or placeholder item click the add to plan button (1) at the bottom of the desired quarter. Notes can be added to specific years (2) of the plan or quarters (3) by clicking on the pencil icon where you would like to leave notes. You can navigate through years of the plan using the arrow icons in the upper right (4), any years you do not add courses to will not count towards the number of years in the plan. If you need to edit or delete a course you can do so with the … icon next to the course (5).
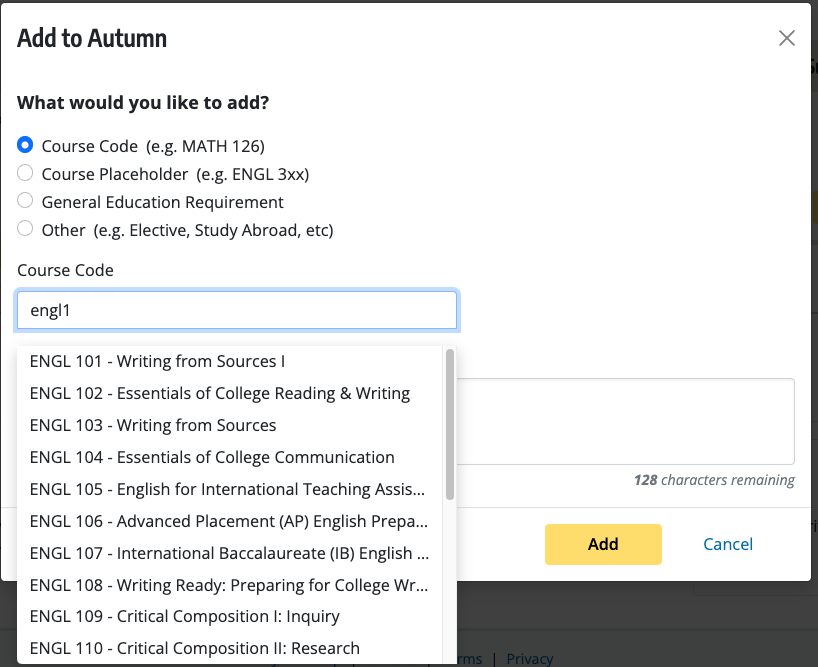
After clicking Add Course you will get this widget, which is the same as the Course Add widget from Advisor Recommendations via EARS. You can add 4 different types of courses & placeholders:
- Course Code: Used when adding a specific course to the plan, as you type a list of courses available in MyPlan will appear as a guide. You can either type the course code completely or select from the list.
- Course Placeholder: This can be any valid curriculum code + the first digit of the course level code (followed by xx). Credits can be set to a specific number, a variable range (eg. 3-5), or left blank.
- General Education Requirement: Choose from a list of Basic Skills and Areas of Inquiry that compose the current set of General Education requirements. Credits can be set to a specific number, a variable range (eg. 3-5), or left blank.
- Other: Free text entry to cover any academic activities not covered by the above options such as study abroad, internships, or a generic placeholder for an elective course. Credits can be set to a specific number, a variable range (eg. 3-5), or left blank.
You can also add some short notes to any course or placeholder to give students more context. After you have finished click Add to add the plan item to your sample plan.
Giving colleagues access to view and/or edit your new sample plan

To start sharing a sample plan you would like to collaborate with other team members on, first click the pencil icon on the `Plan Access` panel to unlock editing, then click the `Manage Access` button.
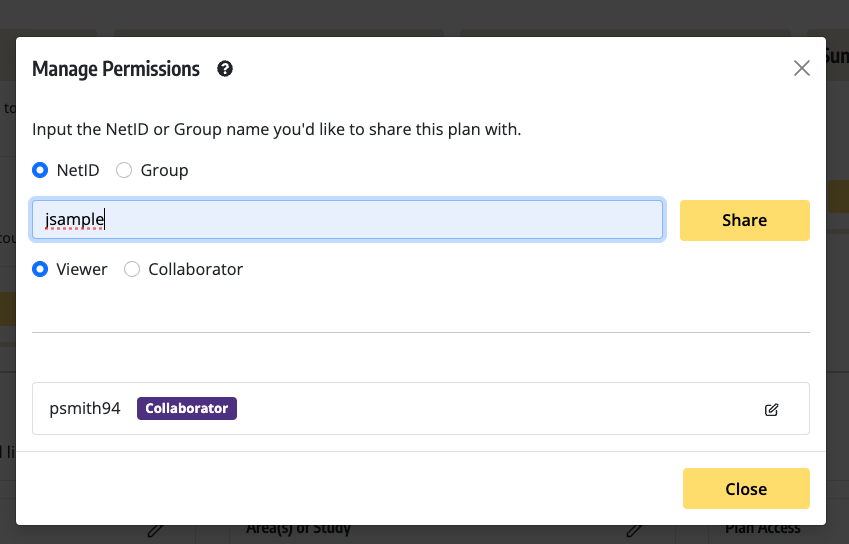
The easiest way to share a sample plan is by using their netID. There are two levels of access you can grant:
- Viewer: The plan will appear on this persons ‘Plan Manager’ page, they can view but cannot add courses or make any other changes.
- Collaborator: This user will have full editing access, and will be able to add/delete courses, add notes, and change the sharing settings.
You can share with as many users as you’d like, just enter netIDs one by one. When you have finished click Close or the X icon in the upper right corner.
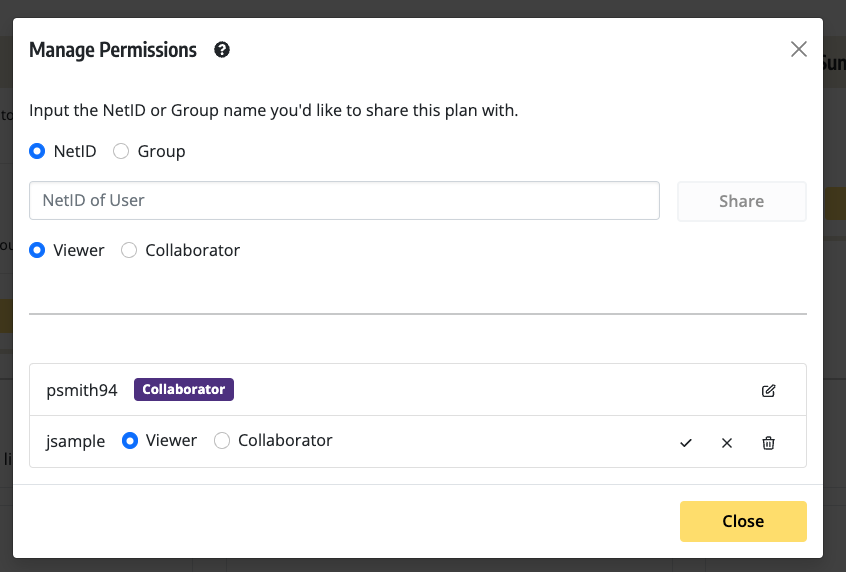
If you need to update or delete any existing permissions, find the netID or group and click the Pencil icon next to their name. To remove access for a netID or group click the trashcan icon next to their name. If updating the level of access make sure to click the checkmark icon to save your change.

Make sure to click the checkmark icon on the Plan Settings panel to ensure your latest changes are saved.
Sharing with UW Groups Service

You also have the ability to share the plan with a group using the UW Groups service. This may be easier than granting access using a netID if you need to share lots of plans with a large group of people. The only requirement is that the group name must contain the word impex. You can either create your own group and add people manually, or you can set the group to use the membership of an existing group, please see this ITConnect article for a step by step guide of how to create a UW Group and add members.
Understanding visibility settings: Public vs Private (BETA version)
In addition to direct sharing with other advisors there are 2 Visibility settings that control what anyone with the link or URL sees when they try and view your sample plan:
- Private: Only you and anyone you have shared the plan with will be able to view the plan, if a student or an advisor without Viewer or Collaborator access tries to view the sample plan, they will get an error informing them they do not have access.
- Public: Anyone, including students, who is signed into MyPlan with a netID will be able to view a read-only version of your sample plan. When you have finalized a sample plan and are ready to link to it off of a departmental website or other location, make sure to set the visibility to Public!
To edit the Visibility settings of your sample plan, click the pencil icon on the Plan Access panel to unlock editing.

Select your preferred visibility setting. We recommend keeping sample plans set to Private until you are ready to start using them with students or linking to them from other places such as a departmental website, at which point you should change the visibility setting to Public.
After selecting your desired visibility setting make sure to save your changes by clicking the checkmark icon in the corner of the Plan Access panel.
Deleting a plan

If you need to delete a plan, select the … icon in the upper right corner, and click Delete. You will be asked to confirm before the plan is permanently deleted.
Duplicating a plan

If you would like to make a copy of the plan you are currently working on, select the … icon in the upper right corner and select Duplicate. You will then be asked to re-name the duplicate you are creating. All courses, placeholders, AoS tags, and notes will be copied; the plan access settings will be restored to default (Visibility: Private & not shared with any other users).
When will students be able to use my sample plan as part of their academic planning in MyPlan?
Following the steps in the section “Understanding visibility settings: Public vs Private” students will be able to view a read-only version of your sample plan. There are plans for future updates to allow students to import the sample plan into their MyPlan academic plan.
I’ve been using this feature and have some feedback, who should I contact?
We need your feedback to keep improving this feature! You can provide any feedback you have on this Google form, or by emailing help@uw.edu and directing the feedback to the MyPlan team.