On the Find Courses page, you can search for courses offered during a specific quarter, search all scheduled quarters, or search the course catalog. Start by selecting a quarter and checking the appropriate campuses to narrow your search results. You can filter your search to show open sections only, courses without add codes or faculty numbers, or non-Professional & Continuing Education classes (PCE). You can also filter to include only courses that meet at a specific time or day. Finally, you can find courses based on the type of learning method (In-Person, Asynchronous Online, Synchronous Online, Hybrid).
Once you have selected your preferred filters you can now search for courses by typing the General Education Requirement, course title, prefix or keyword in the search box. The auto suggest drop-down provides suggestions for searches based on your entry. You can search for any combination of General Education Requirements, course titles, prefixes, or keywords.
General Education Requirements are requirements necessary to graduate with an undergraduate degree from UW that my relate to requirements for a specific major, and include:
- Diversity (DIV)
- English Composition (C)
- Social Sciences (SSc)
- Natural Sciences (NSc)
- Reasoning (RSN)
- Arts and Humanities (A&H)
- Writing (W)
If no results are found:
All courses published in the course catalog are listed in MyPlan. Only sections for standard campus courses, ROTC, and Professional and Continuing Education Time Schedules are currently included in MyPlan. Sections offered as Early Fall Start are not listed. For more information, please visit the Early Fall Start website.
Still can’t find what you want?
Search for courses in the Course Catalog or the Time Schedule.
More information about searching for courses, including step-by-step quick guides for search filters, advanced search, and general education requirement search can be found in the Find Courses guide.
MyPlan uses DARS (Degree Audit Reporting System) to provide a report which reflects your academic progress toward the completion of a degree in your declared or proposed major. By choosing the “Audit Degree” tab within MyPlan, you’re able to run new a DARS report.
For any questions about your degree audit, please contact your adviser directly or email the DARS office at dars@uw.edu.
A plan audit compares your planned, currently registered, and completed courses with the requirements for your chosen degree or program. To run a plan audit, you must first add courses to your plan for future quarters. Once you have added courses, navigate to the “Audit your Plan” page by selecting the link located in the navigation sidebar. From there, verify that your campus is selected and choose your program from the drop-down menu. Select the “Audit Plan” button to run your report.
Remember that a plan audit is for planning purposes only, and is not an official report of progress. UW students, meet with your adviser to verify that the courses you’ve taken and those you’re planning will meet your specific degree and graduation requirements.
Adding a course placeholder like CHEM 1xx or A&H to your plan will help remind you of your goals once you’re ready to pick a specific class. On the Academic Year plan page, you have the option to add courses manually, add previously bookmarked courses, or add placeholders via the “+ Add a course” quick link. Courses with complete course numbers (i.e., CHEM 142) will be included in your plan audit. However, placeholder courses such as CHEM 1xx or A&H will not be included in your plan audit.
Audits are available for all undergraduate majors and minors at all three campuses. A limited number of graduate and professional degree programs are available for audit. Additional programs are being added as they become available.
Yes! MyPlan is linked with Notify.UW to ensure you’re notified as soon as a seat becomes available. Navigate to the Quarter view for courses already in your plan or to the Course Details page for courses of interest. Choose the menu button next to the section(s) that you want an alert, and select the action that says, “Subscribe to Section Availability Notifications”. A light box will open on-screen where you can set up your Notify.UW profile and choose between email or text notifications for the sections of interest.
You can modify your Notify.UW settings from the MyPlan header in the drop-down menu under your name.
Enrollment in a particular section of a course may be restricted for a variety of reasons:
- Key Icon: Add or Faculty Code required
- Notes Icon: Indicates there are Class, Major, or College requirements that restrict registration into this section
To display restriction details, click on the section’s Schedule Line Number (SLN) or check the section details.
While MyPlan allows you to create an academic plan, it does not currently check your eligibility for planned courses or sections.
Total enrollment and overall course enrollment limit information is updated every few minutes. Some jointly-offered courses are subject to a joint limit (not shown) which is why a course may be marked as closed even though it appears to have fewer students enrolled than the section limit.
An “E” after the limit means this is an enrollment estimate rather than a limit. A course with an enrollment estimate closes when the enrollment equals the room capacity or when the enrollment estimate limit is reached if there is no room capacity.
If a course has been suspended, it has been closed for registration but the department may open it again. While you can’t register for it right now, you might still be able to at some point. If your section has been suspended, you can check with the department to see if it will become available again during the quarter. In the meantime, you should choose a different section to add to your plan.
If a section has been withdrawn, it will not be offered for the quarter. Registration has been closed and it will not reopen for that quarter.
Since neither suspended nor withdrawn sections appear in the Time Schedule, you will want to select another section or course to take in place of your original choice.
Some UW courses are “jointly offered”, which means one course is offered under two names. An example is COM 440/POL S 461: Mass Media Law. COM 440 and POL S 461 are the same course, same times and place, same instructor. In the time schedule, these courses have the notation “J”. If you click on the SLN, you’ll see the other name under which the course is offered. You can enroll in a jointly offered course under either title. However, there may be registration restrictions under one title but not under the other, or one may be full while the other is still open. Always check under both titles!
By default, Schedule Builder only returns schedules with course sections that are open for enrollment and that do not conflict with courses you are currently registered for or blocked times that you have added to the calendar. If you receive no schedules from Schedule Builder, an error message will display with recommendations on how to fix your planned items, such as:
- Go to the current quarter Registration Preview page, which shows details for courses and will highlight common issues between planned courses or registered courses.
- Ensure you have scheduled courses in your plan.
- Review what filters have been added.
- Check your planned courses that are used to generate schedule options.
- Check the appropriate boxes in the Schedule Builder header to include courses with closed sections or that may conflict with your registered courses. You can also try included sections offered by UW PCE.
- Remove excluded block times from your schedule.
If you continue having trouble receiving schedules from Schedule Builder, consider adding a different set of courses to your plan. More information, including step-by-step instructions, can be found on the Schedule Builder guide.
For students who have taken or are planning to take courses at one of Washington State’s Community and Technical Colleges (CTC), MyPlan offers the ability to determine how those courses may transfer to the UW. Found on the Audit page within MyPlan, under the “Your Transfer Courses” tab, this feature allows students to upload their unofficial CTC transcripts of courses taken, or manually enter courses being considered. It is meant as an unofficial report only, and does not replace or supersede official transcript evaluations. CTC coursework will continue to be officially evaluated for transfer credit by the Office of Admissions.
Washington State CTC students interested in transferring to UW can add currently enrolled courses, or courses they intend to take, directly to MyPlan to see how that coursework may transfer to the University of Washington. Use this feature for planning purposes only. It is not an official evaluation of intended academic coursework. Use of this feature will have no bearing on your academic standing or prospective admission to the University of Washington.
MyPlan’s transfer course equivalency features are designed for students of Washington state Community and Technical colleges only. If you’re planning to transfer to the UW from another school, you can still use MyPlan to explore UW courses and degree programs.
You cannot register for course sections directly in MyPlan. Rather, MyPlan will package up your plan for the upcoming term and send your plan items to the Registration Tool for you.
Once an upcoming term’s time schedule is published, you can start adding specific course sections to your plan. At that point, you will see a link to your Registration Preview page for each of those published terms in the header of your MyPlan page.
![]()
You can also select/edit courses directly from the Registration Preview page.
Visit your Registration Preview page to view which of your chosen course sections are ready to send to registration and which (if any) have issues. Select the “Send to Registration” button to send your plan items to the Registration Page.
For items on your plan that are not ready to send to registration, MyPlan will display error messages. These will provide additional guidance on steps needed to resolve the issues. Most common issues can be resolved directly from the Registration Preview page.
You can also send a selected Schedule Option or Pinned Schedule to the SPS Registration tool from the Schedule Builder tool by clicking ‘View Details’ under a schedule option.
Remember that while MyPlan allows you to plan for any course or section and to send the SLNs for those associated sections to the registration system, it does not check that you have satisfied requisites or pre-requisites, nor does it guarantee that you are able to register for those sections.
The “Send to Registration” button becomes active once Period 1 Registration opens and when you have one or more course sections that are free of “issues”.
You may see one or more of the following “issues” with your plan items:
- Section has been withdrawn/is no longer available for enrollment.
- Enrollment is currently suspended for the section.
- Section is not offered for this quarter.
- Student hasn’t added sections.
- Student has added too many sections.
- Student hasn’t added a required type of section (e.g. added lecture and lab, but not quiz when all three are needed).
- Student has added too many of a required type of section (e.g. there are multiple quizzes, but correct number of lecture/lab).
- Selected sections have schedule conflict.
- Selected section has a schedule conflict with a registered section.
Once you resolve the issue listed, your course will show as ready to register, and will be included in the list of course sections ready to send to Registration.
For plan items that are not ready to be sent to registration, MyPlan will display an error message and provide additional guidance, allowing you to resolve the issue directly from the Registration Preview page.
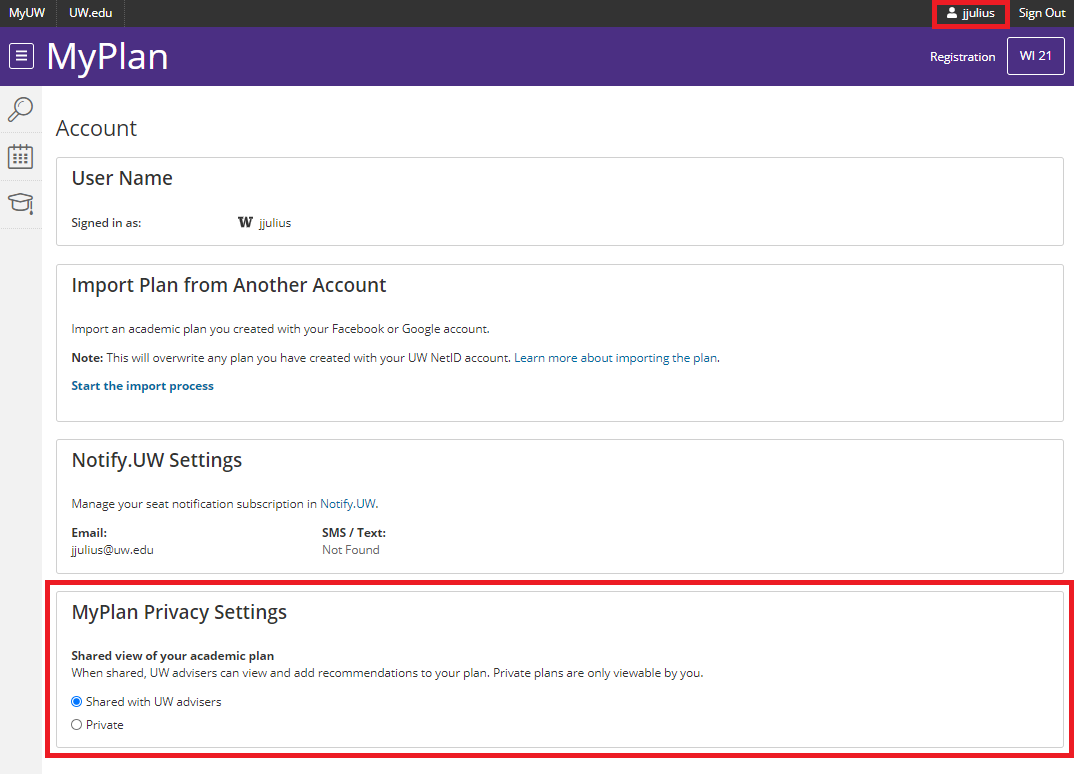
You can see if your MyPlan is shared or private by going to the top right of the screen and clicking on your NetID, which will open the MyPlan settings. This includes an options to make your MyPlan shareable or private only to yourself under the MyPlan Privacy Settings.