This document answers questions about scenarios involving trusts between domains or forests. We welcome suggestions as to additional questions that should be added to this document.
- How does a cross-forest trust work?
- What happens with global catalogs cross-forest?
- What happens with group memberships cross-forest?
- How does Group Policy and Logon Scripts work cross-forest?
- How does the Windows Address Book work cross-forest?
- Is SID Filtering relevant to forest trusts?
- For cross-forest trusts, on which DCs does auditing occur? i.e. when I log in, what security events are logged where?
- For trusts, how does the selective auth functionality work & is it useful for us?
- How do I enable the @uw.edu UPN across a forest trust to the NETID domain?
- I’ve emptied my Windows domain, except for the domain controllers. How should I remove my Windows domain?
- I want to setup a Windows-based VPN server for NETID users in my Windows domain using a trust. How do I do that?
- How do I make use of NETID groups across a trust?
- I’m having problems connecting to the NETID domain controllers (or some other system). What do you suggest?
How does a cross-forest trust work?
A cross forest trust consists primarily of a shared secret (associated with a trustedDomain object) between forests, and some mapping information which enables DCs to refer requests with certain UPN or SPN suffixes to the appropriate domain. See the section on cross forest logon for more detail. Also of note is that in addition to the information needed to issue Kerberos referrals, a forest trust can be leveraged like a downlevel trust (NTLM) when needed.
What happens with global catalogs cross-forest?
Global catalogs are used in several ways to make cross forest trusts work. Nothing that happens, though, is very exotic or even new. In a user’s forest, an authenticating DC will contact a global catalog to enumerate the user’s Universal group memberships, just as it would under normal circumstances. In the case of a forest trust where the user then wants to access a resource in the trusting domain–a Kerberos referral (containing these same groups) is passed to the client, to be passed to a KDC in the resource (trusting) domain. These groups are then combined (with or without nesting) with any Domain Local groups that the user belongs to in the resource domain and so the final service ticket issued by the resource domain KDC contains the user’s Global and Universal groups from her own domain, and any Domain Local groups from the resource domain. So we used a Global Catalog in this transaction, but not in a new or interesting way. All we did was enumerate the user�s Universal groups, which is what we always do during initial authentication.
The trustedDomain object that represents the forest trust is also replicated to Global Catalogs. This allows DCs throughout one forest to easily find routing (suffix) information to identify that a client or service principal may be located in a forest across the trust.
What happens with group memberships cross-forest?
The same rules apply as with a traditional (external) trusts as used in 2003. Global and Universal groups from the account�s domain/forest can be added to local groups (domain and/or machine local) in the resource domain. As always, you can skip the nesting and include individual users, global, and universal groups from the account domain in ACLs in the resource domain. The best practice, as it has been for years, is to add accounts to global groups (generally following user type, properties or role), combine global groups into universal if necessary, and then add those global or universal groups to local groups (domain and/or machine local) close to the resource. Therefore if the nature of Bob is that he is in the helpdesk (global group), and he is a full time employee (global group) that is all you have to manage, and those groups are members of domain local groups in any domain that they need to be to grant access to resources (“HelpDesk” is a member of “Allowed to Reset Passwords”, for example, and “Full Time Employees” is a member of “General Access to HR Portal”). Of course you could skip all that and just add users to ACLs but that gets messy. And now you’re bored. You already knew all of this.
The short answer is that groups work exactly how they worked before.
This diagram shows the valid possibilities. Lines in blue indicate group membership possibilities. Lines in red indicate ACL possibilities. Only the Forest A-Domain X (AX) column shows all intra domain possibilities, the interaction between AX and BY shows cross-domain plus cross-forest possibilities and the interaction between BY and BZ shows cross-domain, intraforest possibilities.
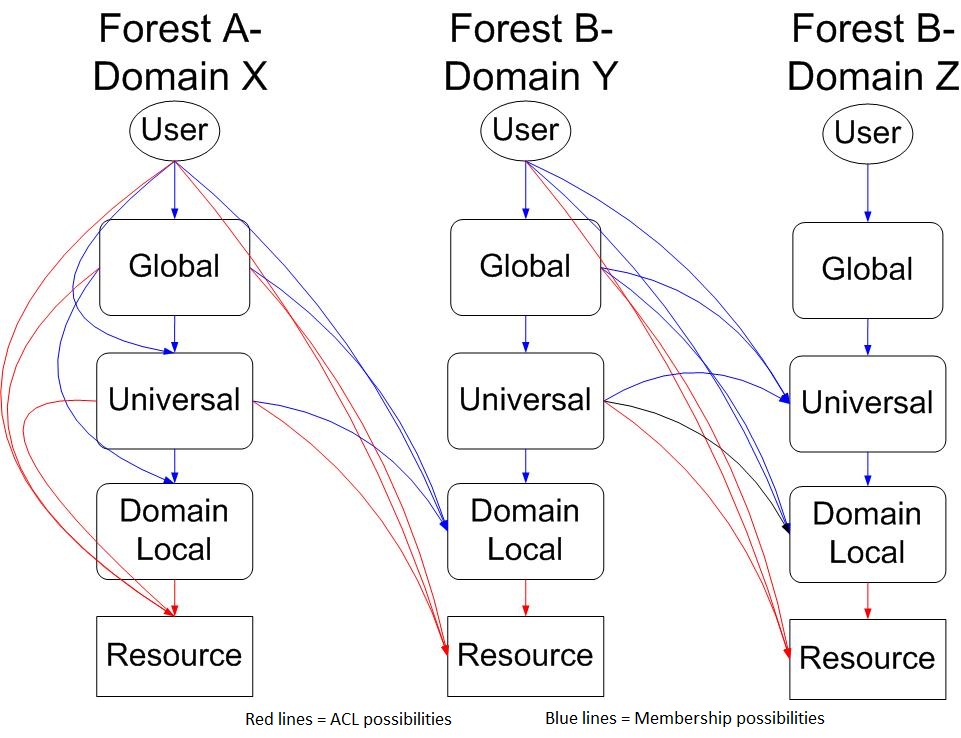
How does Group Policy and Logon Scripts work cross-forest?
Loopback processing is used by default for users in cross forest logon, but normal processing can be enabled via the (machine) Group Policy setting ‘Allow Cross Forest User Policy’. Also worth noting is that with ‘Allow Cross Forest User Policy’ set, you can still use loopback processing in either merge or replace mode, via the traditional means of enabling loopback on a GPO that applies to the machine. The setting is located at:
Computer Configuration\Administrative Templates\System\Group Policy\Allow Cross-Forest User Policy and Roaming Profiles
How does the Windows Address Book work cross-forest?
By default the Active Directory account within the Find People applet searches the workstation’s forest. This can be configured to search any arbitrary LDAP provider, including the user’s forest, by modifying the properties of the Active Directory account, or by creating a new account to search the desired directory.
These providers or accounts appear to be stored in HKEY_CURRENT_USER\Software\Microsoft\Internet Account Manager\Accounts so if you wanted to automate this configuring this, you could use a logon script to do it.
Is SID Filtering relevant to forest trusts?
Yes. SID filtering is available on forest trusts, and does not appear to be on by default. It can be configured using:
netdom trust <trustingdomain> /D:<trusteddomain> /quarantine [yes|no]
Because sid filtering allows only SIDs from the trusted domain to carry over into the trusting domain, it appears that it can break the transitivity of a forest trust.
For example, if you had two forests with a forest trust between the forest root domains, and you expected a SID from a child domain in one forest to be usable in the other forest, this fails if SID Filtering is enabled.
For cross-forest scenarios, on which DCs does auditing occur? i.e. when I log in, what security events are logged where?
The general rule, which still applies here, is that Account Logon events are logged at the authority for the account, and regard events relevant to the authority for the account (such as password verifications). One the other hand Logon events are related to creating a security context on a particular machine- by building an LSA access or impersonation token in order to access a resource, and so are logged on the target/resource machine.
For example, a bad password attempt is audited on the authenticating DC (and the PDC in the case of a bad password, since it double checks with the PDC) as an Account Logon (Failure) event. See the following screenshot:
One thing to watch out for when looking for Account Logon events in the Security log is that the User Name column in Event Viewer will generally just be SYSTEM (there is no security context for the user on the server yet), while the real username in the request is included in the data payload of the event.
A successful password verification (AS exchange, if using Kerberos), is logged on the authenticating DC as follows:
Once the initial verification has taken place, we immediately start getting service tickets in order to build LSA tokens to access the machine we are logging on interactively to, as well as network resources (for example we immediately start accessing authenticated LDAP and SMB on a DC in order to apply Group Policy).
You can audit the service tickets themselves from the KDC, and you can audit these Logon events on any machine where the user has an LSA token built. An example Logon event follows:
Note that the logon type is 3 which is a network logon (This was logged on a DC while the client was applying Group Policy). Examples of type 3 logons are SMB, LDAP, IIS with integrated auth, etc. From an administrative perspective, this corresponds to the “Access this computer from the network” user right. These logon related user rights are the first piece of authorization that happens after authentication. A special SID representing the logon type is also injected into the final token, in case the system or applications need to make authorization decisions based on the logon type, in addition to group memberships.
On the workstation being logged on to interactively, we would expect to see a Logon event with a type 2 (Normal, Interactive) and/or type 11 (Cached Interactive). On a default XP configuration with access to the domain you will actually see both type 2 and type 11 logons during an interactive logon, because XP tries to log you on asynchronously to save time. Basically XP checks your cached credentials first, and if successful it already starts to build your windows station and gets a jump start on running userinit.exe and explorer.exe. Simultaneously, it goes out to the domain for authentication and group policy, etc. This is why it is generally much faster to get to a desktop in XP than it was in 2000 Professional, and it results in the mix of type 11 and type 2 Logon audits. This “fast logon optimization” behavior can be disabled via the Group Policy: Computer Config > Adm > System > Logon > Always wait for the Network. The advantage of “fast logon” is that you may reach a Ctl+Alt+Del screen much sooner after booting, and reach a desktop sooner after providing credentials. The down side is that because of the cached credentials it can sometimes take more than one reboot and/or logon before local LSA tokens reflect changed group memberships, and for certain actions (like folder redirection) which require exclusive access to a resource to take place. Because of this, many administrators disable this behavior entirely or at least during changes and troubleshooting. This behavior is also disabled (for the user side, at least) under certain user conditions (no cached credentials present, for example). See KB article 305293.
Two of the several logon events registered when logging on interactively to an XP machine (with Logon: Success) with auditing enabled follow:
For great information about token building, logon types, and auditing, see the following:
Token Building (also see related pages in left hand pane). Note that the graphic about getting groups from the DCs is a high level abstraction, and is not specific to Kerberos. The paragraph after the graphic clears this up.
http://www.microsoft.com/technet/prodtechnol/windowsserver2003/library/TechRef/d06a5070-2a7b-4e75-b7e9-ebe51f65e34b.mspx
Logon Events and Logon types
http://www.microsoft.com/technet/prodtechnol/windowsserver2003/library/ServerHelp/e104c96f-e243-41c5-aaea-d046555a079d.mspx
Account Logon events
http://www.microsoft.com/technet/prodtechnol/windowsserver2003/library/ServerHelp/d8fc798c-1e77-4043-b59c-971b4961d85a.mspx
For error codes seen in Account Logon Failure events (675s), see the following (about a third of the way down)
http://www.microsoft.com/technet/prodtechnol/windowsserver2003/library/TechRef/b36b8071-3cc5-46fa-be13-280aa43f2fd2.mspx
You can also audit other authentication related happenings, for example the issuing of service tickets, and NTLM passthrough authentication, to customizable degrees of verbosity.
For auditing and logging options on the KDC, see the following doc. You’ll want to reference the entire registry section as there are a variety of options of Kerberos client and KDC logging to the event logs, and also sending verbose information to DbgPrint which can be captured in a debugger, or in a tool like dbgview.exe from sysinternals.
http://www.microsoft.com/technet/prodtechnol/windowsserver2003/library/TechRef/b36b8071-3cc5-46fa-be13-280aa43f2fd2.mspx
For verbose logging of Netlogon, which is responsible for NTLM passthrough authentication, see the following KB. This is useful (along with Account Logon: Failure events) for identifying hosts which are infected with worms that try to brute force account passwords, thereby locking out (potentially many) accounts.
http://support.microsoft.com/?id=109626
For trusts, how does the selective auth functionality work & is it useful for us?
Selective authentication is just a mapping, which could be thought of as an additional filter layer in the KDC’s internal logic, which limits what clients may be granted service tickets to certain resources. It is worth noting that authentication does not imply authorization, so resources are still secured in their usual manner (NTFS permissions for files, various internal authZ models for apps, etc). Selective authentication just adds an additional layer of protection and selectivity, whereby client principals aren’t even allowed to introduce themselves to service principals unless specifically allowed for in the selective authentication mapping.
How do I enable the @uw.edu UPN across a forest trust to the NETID domain?
If you have a Windows domain with a forest trust you can enable your users to log on to NETID domain users accounts via a username of uwnetid@uw.edu. In order to enable this functionality, you must create a name suffix mapping (i.e. a domain suffix authentication routing hint) on the trust. A domain admin for your domain can use the netdom.exe tool to do this. An example command would be:
netdom.exe trust yourDomainHere /d:netid.washington.edu /AddTLN:uw.edu
where yourDomainHere is replaced by the netbios (short) name for your Windows domain.
I’ve emptied my Windows domain, except for the domain controllers. How should I remove my Windows domain?
If all the computers in your Windows domain are now gone, and you have no reliance on the users/groups in your Windows domain, then you are now ready to remove your Windows domain.
The process is:
- Demote all domain controllers except for one. Sub-process for each:
- Make a copy of the netlogon.dns file from that DC.
- Run dcpromo and choose to demote the domain controller. Make note of the new local administrator password that is set during this process.
- Send netlogon.dns file to the NOC, asking them to remove all the DNS entries within the file.
- For the last DC, repeat the above, but when you contact help@uw.edu also ask them to report to you all SRV and CNAME DNS records left in your DNS domain. Review anything they report and ask them to delete anything you are not using.
- Celebrate the milestone!
I want to setup a Windows-based VPN server for NETID users in my Windows domain using a trust. How do I do that?
As noted at http://technet.microsoft.com/en-us/library/cc773711(v=ws.10).aspx, setting up a VPN server requires that it be in the ‘RAS and IAS Servers’ security group of the Windows domain(s) that you’d like to enable user authentication from.
With a 1 way trust, it is impossible to put a VPN computer from another domain in ‘NETID\RAS and IAS Servers’.
However, if you request a delegated OU, you can join the VPN server to the NETID domain, and request that we add it to this group.
How do I make use of NETID groups across a trust?
There are two ways to make use of groups in an external forest, as noted in this diagram. You can either:
- Nest the group from the external forest in a domain local group located in your domain, then use the domain local group in your authorization scenario.
- Use the group directly in your authorization scenario. There are several examples within this FAQ of this including How do I limit access to a share or folder to students in a particular course? and How do I limit access to a Web page to just faculty and staff?
The first option of nesting the group in a domain local group is the Microsoft recommended method of applying authorization that many Windows administrators will recognize from Microsoft Certified Training Curriculum. In other words, users in global or universal groups, the global/universal group in domain local or computer local groups, the domain/computer local group applied to the resource. There are many reasons for this, but the best one we’ve seen is when you go to do a domain migration. This method simplifies things tremendously.
Adding a group from the NETID domain to a domain local group in your domain is fairly simple. Here are the steps required:
- Create the domain local group. Using Active Directory Users and Computers, choose select the container where you’d like to locate the new domain local group.
- In the Action menu, select New, select Group.
- In the resulting ‘New Object – Group’ window, fill in an appropriate and meaningful name, select Domain Local in the Group Scope section, and ensure that the Group Type is Security. Then click OK.
- Add the NETID group. Open the properties of the domain local group.
- Select the Members tab. Click the Add button.
- In the resulting ‘Select Users, Contacts, Computers, or Groups’ window, click the Locations button.
- In the resulting ‘Locations’ window, select netid.washington.edu and click OK.
- If you know the name of the group you want to add, type it in, and click the Check Names button.
- You will likely be prompted to enter a user account and password with permissions in netid.washington.edu. Use your uwnetid and password. If the name you typed exists in the NETID domain, then it will resolve, otherwise a ‘Name Not Found’ window will guide you through the process of choosing another group name. Once you’ve got a resolved group name, click OK twice more.
- If you don’t know the name of the group you want to add, in the ‘Select Users, Computers, Or Groups’ window click the Advanced button. Use the resulting ‘Select Users, Computers, Or Groups’ window (yes, this is a second window with the same name) to query the netid.washington.edu domain for the group you are looking for.
As an example, let’s say you know you want to add a Math course group from the Autumn quarter of the academic 2006/7 year, but you’ve forgotten the course number and suspect you would be able to pick it from a list. The NETID Groups document tells you the naming format of course groups in the NETID domain. Armed with that knowledge, you can search for groups with a name that starts with ‘course_2006aut-math’. This will give you a list of all the Math courses offered that quarter to pick from. Select it and click OK. And click OK twice more.
I’m having problems connecting to the NETID domain controllers (or some other system). What do you suggest?
In general, you need to verify two things: DNS resolution and connectivity. Reviewing the Firewalls with the NETID domain document may be a good idea up front if you have firewalls.
To verify DNS resolution, you can use the nslookup tool that comes with Windows.
But before you jump to nslookup, first verify your DNS resolver configuration. Your DNS resolver configuration is the set of DNS servers your computer is configured to use to resolve DNS names to IP addresses. Run “ipconfig/all”. Verify that your DNS servers are 128.95.120.1 and 128.95.112.1. If not, there may be some problems. Those are the recommended DNS servers when on UW networks.
Next, use a command prompt to verify you can resolve the NETID domain controllers (or whatever other system). The following picture shows what that should look like.
If you can’t resolve the NETID domain controllers, then you know your problem is DNS based. Focus on solving that.
Assuming all is good to here, your next step is verifying connectivity. Or more specifically, the ability to establish the network connection you need to make. Microsoft makes an excellent free tool called portqry.exe for this (see download.microsoft.com). There are other tools. Get one. I’ll be using portqry.exe in this walkthrough. The following picture shows what that should look like.
TCP ports 445 and 389 are required for most Windows domain interactions, so are good ones to check. If you are verifying connectivity to some other system, you’ll need to identify the right network port and test that instead. Portqry.exe will report “FILTERED” or “NOT LISTENING” if you can’t connect. If you can’t connect to the NETID domain controllers, then you know your problem is network based. “FILTERED” is caused by a firewall of some kind between your system (possibly on your system) and the NETID DCs. Focus on solving that.