What You Need To Know First
Prior to joining your first computer to a delegated OU, you will need to know a couple things.
Know the computer naming guidelines
These guidelines are detailed in the OU Practices document, but in a compact form, the MI computer naming guidelines are:
- You own any name inside your recognized namespace(s), and we strongly encourage you to use names within that namespace
- First come, first serve for any name outside a recognized namespace. Names that infringe on a namespace aren’t permitted.
- You can’t use a DNS suffix of netid.washington.edu, and we suggest that you continue to use whatever DNS zone you currently use. For more details, see these FAQs:
- You can optionally use our DDNS for your workstations
- If you need custom SPNs, send in a request and we’ll make it happen
How can I add a computer account without a computer in the NETID domain?
You might be caught in this dilemma on your first computer. See our advice in the OU Admin Tools and Tips document.
Automated Creation
A PowerShell script is available to pre-create one or more new computer objects. It is available from:
/wp-content/uploads/2016/05/New-UWWIComputer.zip
Additional information and usage instructions are available from Using New-UWWIComputer.ps1 or via the built-in help system in PowerShell.
Manual Creation
Pre-create a new computer account via Active Directory Users & Computers (ADUC) or your preferred computer account creation tool in the desired OU within your delegated OU. NOTE: By default, only members of u_msinf_<yourOU>_ouadmins or u_msinf_<yourOU>_computerjoiners can create computer accounts in your OU.
When creating the computer account, please use a name within your computer namespace reservation(s).
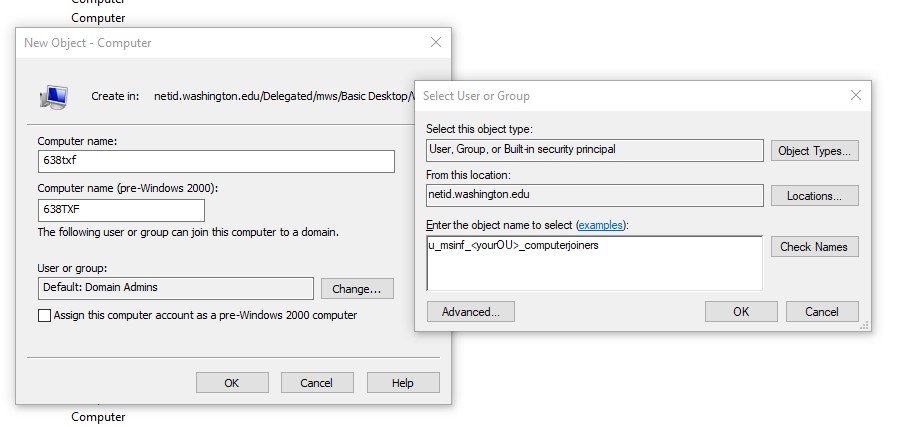
If you use ADUC to pre-create the account, you can specify which user accounts are allowed to join a computer with the same NetBios name as the pre-created computer account. We suggest you specify u_msinf_<yourOU>_computerjoiners, so that all your computer joiners can join the computer to this computer account. See picture below for this control.
Join the computer
In general, there is a multi-step process to join using Control Panel → System → Advanced System Settings → Computer Name (or Start → Run → sysdm.cpl):
- Join the Domain
- Click the “Change” button on the System Properties window
- Check the Domain radio-button and enter “netid.washington.edu” into the Domain edit box, click OK
- A window pops up asking for an account with permission to join the domain; enter the name and password of an account that is in your u_msinf_delou_<yourOU>_computermanagers group
- Click OK on the “welcome to the domain” window; ignore the “Changing the Primary DNS” error if it occurs and click OK
- Click OK on the “You must restart” window
- Click Close on the System Properties window and reboot
- Change the computer’s DNS suffix
- After the reboot, reopen System Properties and click the Change button
- Click the “More” button
- Uncheck ‘Change primary DNS suffix when domain membership changes’
- Change primary DNS suffix to a value that is NOT netid.washington.edu (e.g. clients.uw.edu), click OK, OK
- Reboot – This is important!
- It may take another reboot for group policies to be completely applied
For step #1, use the System control panel or any other viable method (e.g. automated methods) to join the computer to the NETID domain. Upon reboot, your computer will recognize that it is in your delegated OU and apply any applicable group policy. Keep in mind that some computer group policy settings require more than one reboot to take effect. However, the approach of pre-creating the computer account in the OU you want the computer to ultimately be in should result in the appropriate group policy being applied sooner than the traditional method of joining then moving the computer account to the destination OU.
For steps #2, please see /tools-services-support/it-systems-infrastructure/msinf/other-help/faq/ou-guidance/#dnsSuffixConfig for help.
NOTE: Unless you granted u_msinf_<yourOU>_computermanagers per our recommendation above, only the account which created the computer account will be able to do step #1c.
If you don’t pre-create the computer account, upon domain join, you will be subject to the Unclaimed Computers OU Group Policy settings which are not pleasant.
NOTE: There is a bug in Windows 7 such that trying to join the domain and change the DNS suffix in one operation may result in a broken computer (a domain user login failure with the “domain trust relationship” error). For more info see http://support.microsoft.com/kb/2659158. It will join the domain but the DNS suffix will not be updated on the domain computer object and/or the SPNs will not contain the correct DNS suffix. That is why we recommend doing it in two steps. It appears that this bug was fixed in Windows 8.