- Overview
- Open Zoom app in Canvas
- Layout of Zoom app in Canvas
- Hold classes in Zoom
- Hold office hours
- Record class sessions and store in cloud
- Help students learn with Zoom
- FAQs
See also:
- Video: Using Zoom in Canvas (from the UW Information School)
- Online Zoom trainings for instructors and students
- UW Canvas Teaching Remotely course
- UW Center for Teaching and Learning Teaching Remotely page
Overview
Zoom video conferencing inside your Canvas course functions as a virtual classroom — for live, interactive class sessions, pre-recorded or live lectures, office hours, and small group work. The Zoom app in Canvas makes it easy to schedule and start your online class sessions from within your Canvas course. Students can access links to class sessions and any recordings you have made when they go to the Zoom app in Canvas.
Notes:
- The Zoom app in Canvas is designed for convenience; not all Zoom meeting settings are available in the Zoom app in Canvas. Additional meeting settings are available in the UW Zoom web portal at washington.zoom.us.
- Important: Meetings necessitating HIPAA protections should not be schedule or held using the Zoom app in Canvas.
- Personal Meeting ID cloud recordings will not display for students. Avoid using your personal meeting ID for your course meetings.
Synchronous vs. Asynchronous Learning
When thinking about moving your class online, one choice to consider is which activities or assignments require you and your class to meet together (synchronous learning), and how much can students do on their own at different times (asynchronous learning). The following guide emphasizes synchronous learning.
You can do a lot with Zoom, but you don’t have to do it all at once. If you’re new to Zoom, you might want to focus on just learning how to schedule and start meetings for now. Leave more advanced features (administering a poll, setting up breakout rooms for small group work, etc.) for later, when you’ve become more comfortable using Zoom.
Open Zoom app in Canvas
When you log into your Canvas course, look for Zoom in the Course navigation. Click Zoom to open the app.

In your Canvas course, Zoom may appear at the bottom of the course navigation. If you want Zoom to appear higher up the list, go to the course Settings, then click Navigation. You can drag and drop the Zoom item wherever you want it in the list. Make sure that you scroll down the page and click the Save button to save your changes.
Layout of Zoom app in Canvas
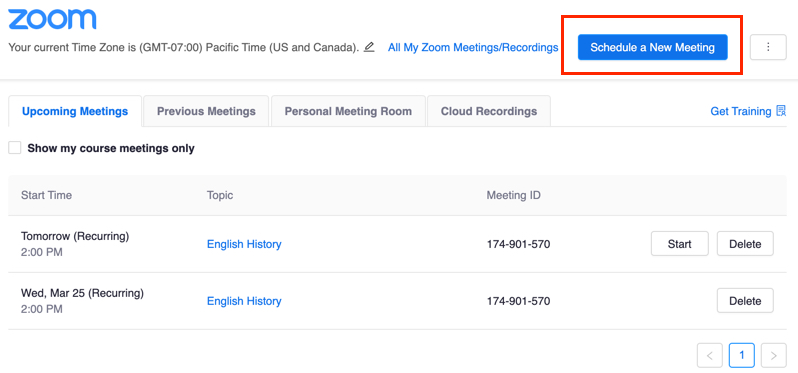
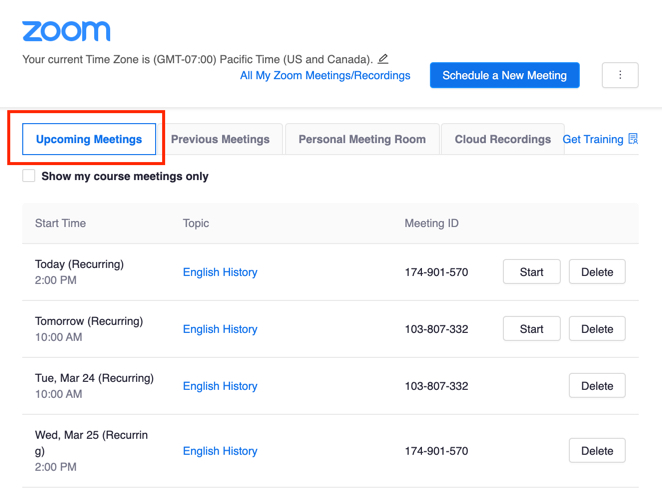
In the Canvas course navigation, click Zoom to open the Zoom app in Canvas. On the right you’ll see the blue Schedule a New Meeting button. Below that button you’ll see tabs for Upcoming Meetings, Previous Meetings, Personal Meeting Room and Cloud Recordings. The image below shows a list of upcoming meetings, with start time, topic, meeting ID and buttons for starting or deleting meetings.

Hold Classes in Zoom
To hold classes in Zoom, the first thing you will do is schedule a Zoom meeting. When you schedule meetings in the Zoom app in Canvas, those meetings will appear to both you and your students on the Upcoming Meetings tab. The meetings are also added automatically to the Canvas course calendar. Consider giving students a few reminders to visit the Canvas course calendar to find the link to the Zoom class session.
IMPORTANT: Your students will see only the sessions that you schedule using the Zoom app for Canvas. If you schedule sessions using the Zoom web portal (washington.zoom.us) or desktop app, they will not see the sessions in their list of Upcoming Meetings or receive an email notification. However, if you have already scheduled meetings using the Zoom web portal, you can import those meetings to the Zoom app for Canvas.
You can schedule a quarter’s worth of class sessions at once by setting up your meeting as recurring.
Schedule a class session
In the Zoom app in Canvas, click Schedule a New Meeting.
The Schedule a Meeting screen will appear.
- Enter a meeting topic and description. By default, the meeting topic is the title of your course.
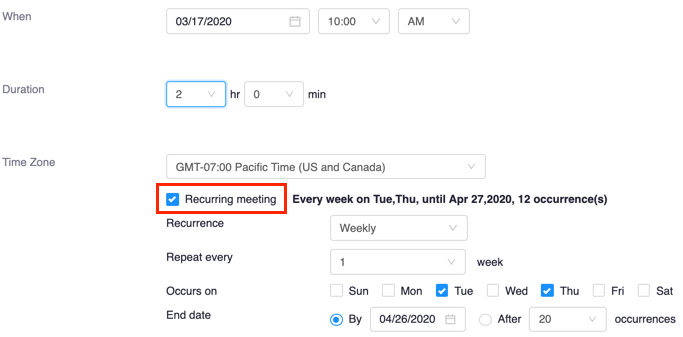
- Enter date and time and duration. By default, your local time zone is selected.
- To schedule all your class sessions for the quarter, select the Recurring meeting checkbox. This feature is also useful for setting up online office hours.
Note: If you create or edit the date and/or time for a Zoom meeting outside of the Zoom app in Canvas (e.g. through washington.zoom.us), these changes may not initially be reflected in the Canvas calendar for the course to which that Zoom meeting is assigned. The Canvas calendar can be brought up to date by having the meeting host edit and then save the meeting in the Zoom app in Canvas.
Only the meeting owner can fix this for each of their meetings. The meeting owner does not need to make any changes to the meeting when editing – simply open the meeting within the Zoom App in Canvas, then click Save to confirm the existing settings. The process of saving the meeting within the Zoom app in Canvas should carry the most up-to-date scheduling information over to the Canvas calendar for the course.
Continue configuring your meeting settings.
Registration
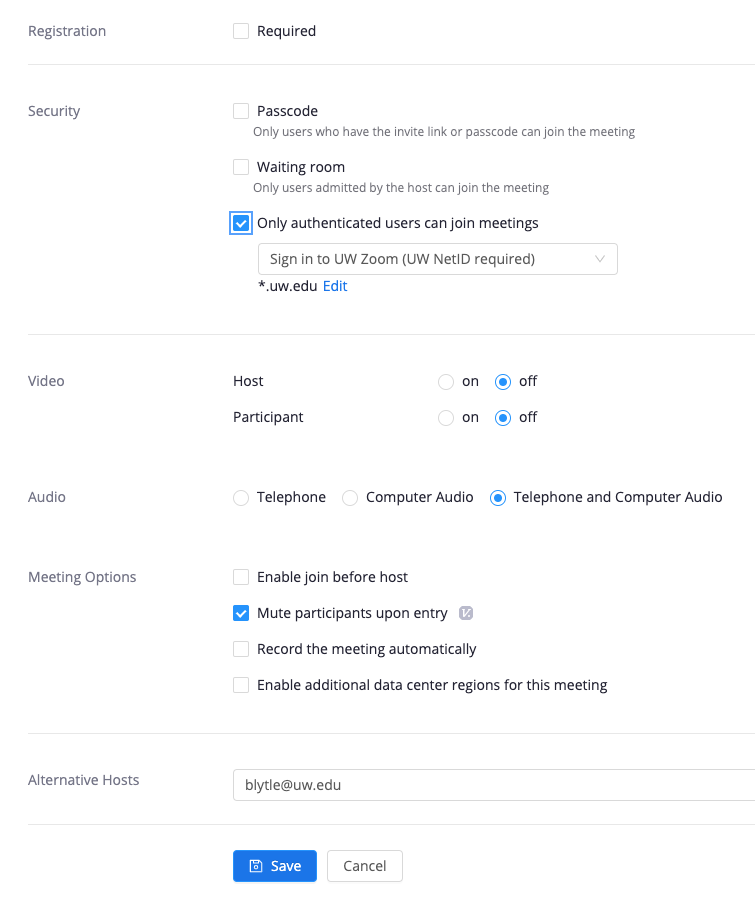
Enabling registration requires participants to register with their e-mail, name, other questions, and custom questions. If you are using Zoom for teaching classes and office hours, do not select this option.
Security
- Require meeting password: If you are using Zoom to teach classes or hold office hours, you are unlikely to need a password and can leave this option unchecked.
- Enable join before host: By selecting this option, you allow participants to join the meeting without you or before you join. Select this option if you want to give students an opportunity to chat or compare notes before the session begins.
- Only authenticated users can join: UW-IT strongly recommends that instructors require students to sign in with their UW NetID and password prior to joining meetings. Turning on this setting prevents unauthorized users from gaining access to class sessions held in Zoom.
Video
- Host: Choose if you would like the host video on or off when initially joining the meeting. Either way, the host (you or another teacher in your course) will have the option to start or stop their video after joining the call.
- Participant: Choose if you would like the participants’ videos on or off when they initially join the meeting. You may want to choose “off” to give students time to prepare to be on camera. Either way, the participants will have the option to start or stop their video after joining the call.
Audio
Choose whether to allow users to call in via Telephone only, Computer Audio only, or Both. We recommend selecting Both to give students options.
Meeting Options
-
- Mute participants on entry: By selecting this option, participants joining the meeting before the host will be muted when they first join. Participants can unmute themselves after joining the meeting. We recommend selecting this option to reduce the background noise as people join the session.
- Enable Waiting Room: The Zoom Waiting Room feature allows you to control when a participant joins the meeting. You can admit attendees one by one or hold all attendees in the Waiting Room and admit them all at once.
- Record the meeting automatically: Select this option if you want the meeting to be automatically recorded. We recommend recording to the cloud (instead of your local computer) if you want the recording to be freely available to students. Cloud recordings are available in the Zoom app in Canvas from the Cloud Recordings tab, meaning you don’t have to upload or link to them manually. See Record class session in this guide for more information about recording class sessions.
- Enable additional data center regions for this meeting: This option is not critical to normal Zoom meeting functionality. Click here to learn more about this setting.
Alternative hosts
This field is automatically populated when Teaching Assistants and co-instructors listed in your Canvas course go to the Zoom Canvas page. Alternative hosts can start the meeting in your place, manage activity in Chat, and lower Raised Hands after questions have been answered. In the Zoom app in Canvas, this field is grayed out; you do not need to manually add co-instructors or Teaching Assistants. Instead, the UW NetIDs of your co-instructors or Teaching Assistants will appear in this field once they open their Zoom app in Canvas. You can manually add alternative hosts by going to settings in the web portal. Canvas roles eligible for Alternative host are: Instructor, Designer, Guest Teacher and Teaching Assistant.
When you have finished setting the meeting options, at the bottom of the screen, click Save.
Breakout rooms setting in the Zoom web portal
Scheduling a meeting in the Zoom app in Canvas is designed for convenience; not all Zoom meeting settings are available in the Zoom app in Canvas. Additional meeting settings are available when you sign into the Zoom web portal at washington.zoom.us.
When scheduling a meeting in the web portal you can Pre-assign students to breakout rooms. Rather than manually assigning students at the time of the meeting, you can upload a file to Zoom and students will be assigned to breakout rooms for you. This 10-minute video from the UW Information School demonstrates the steps for pre-assigning people to breakout rooms.
Open a meeting from the Canvas calendar
After you setting meeting options and clicking Save, the meeting will appear on your Canvas calendar. To confirm, in the Global Navigation at the left, click Calendar. This opens the Canvas Calendar, where you should see the meeting you just scheduled.
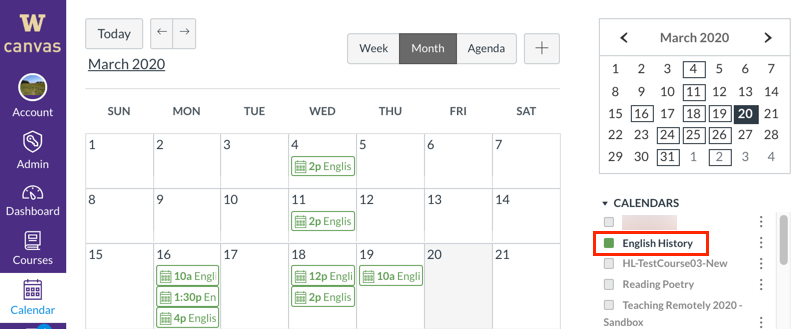
If you do not see the meeting you scheduled, check the list of calendars in the right sidebar and make sure that the relevant calendar is selected.
Note: If you copied over course content from your previous quarter to your current course, the Zoom meeting calendar events associated with the previous quarter will also be imported to your current course. This could cause confusion for your students as they also see these scheduled Zoom meeting events on their Canvas calendar. To remove the imported calendar events from your course calendar, you will need to manually delete each event. To prevent importing the Zoom meeting calendar events when copying over course content, please see the FAQs
When you click the event, a link appears that you can click to open Zoom and join the class session.
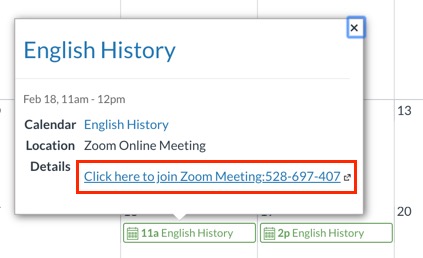
You and your students can also access the meeting link via the Upcoming Meetings tab in the Zoom app in Canvas.
Start a class session
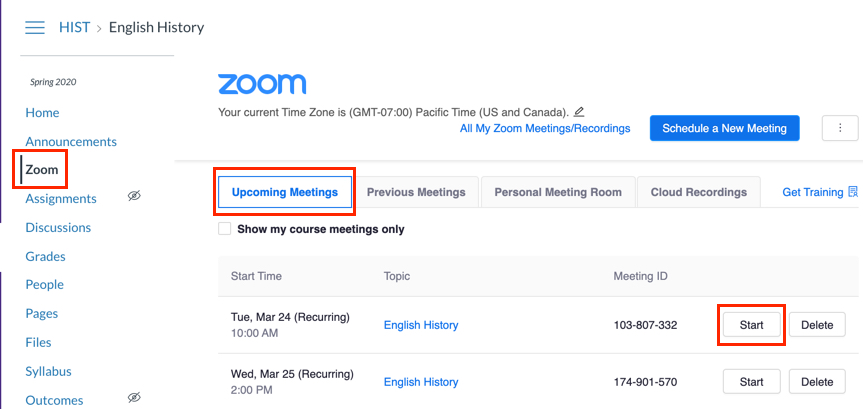
To start a class session, go to your Canvas course. In the course navigation, click Zoom. Select the Upcoming Meetings tab. Find your meeting and click Start. Your Zoom meeting will open.
Alternatively, you can open Canvas and go to the Canvas calendar. Click the relevant event and then click the link that appears. Your Zoom meeting will open.
Next, check to make sure that your microphone and camera are on.
To share your computer screen, on the bottom of the Zoom screen, find the green Share Screen button on the bottom of the Zoom screen, then click it. A window will open showing several options for sharing. By default, your desktop will be selected. Choose what you want to share. At the bottom of the window, click Share.

Interact with students in Zoom
If you are looking to have interactive virtual class sessions, please consider using the following features to interact with students during your Zoom meetings:
Text-based, In-Meeting Chat gives students a chance to pose questions or share thoughts without competing for the chance to speak out loud during the meeting.
By default, participants can send private chats to individuals in the meeting. If you want to turn this off, please go to Settings > In Meeting (Basic) > Private Chat and toggle off this setting.
Nonverbal Feedback and Meeting Reactions
Students have the ability to provide nonverbal feedback or react during a meeting by clicking on Reactions from their Zoom meeting panel. Students can use the nonverbal feedback icons to respond to simple questions from the meeting host with: yes, no, go slower, go faster, and raise hand if they have questions.
Note: You can toggle access to Chat and/or the ability for participants to provide nonverbal feedback and reactions in your UW Zoom account settings at washington.zoom.us.
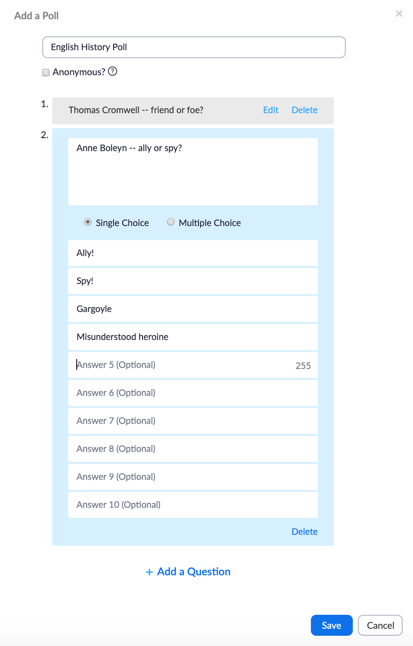
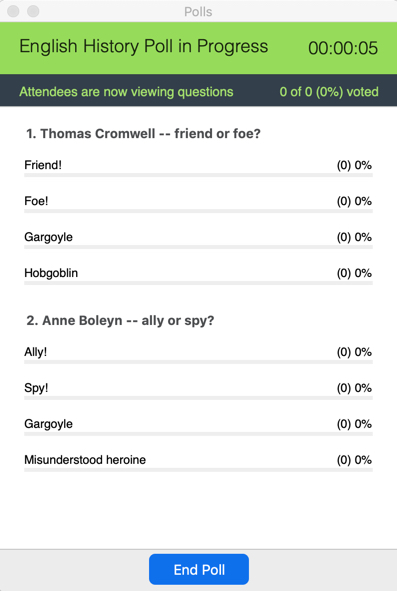
Polling can be used to check for understanding and encourage engagement. The Zoom polling feature allows you to create single choice or multiple choice polling questions for your Zoom sessions. You can launch the poll during your class, gather responses, and share results with the class in real time. You can also download a report of polling after the meeting. Polls can also be conducted anonymously.
The image on the left shows a poll as it is being created. The image on the right shows a poll as it is being administered live in class.
Small group work
Even though class is online, you can still have students collaborate in small groups for discussion and project work with Zoom’s Breakout Rooms. You enable Breakout Rooms in Settings in the Zoom web portal at washington.zoom.us. You can either assign students to breakout rooms manually as you start the meeting, or upload a CSV file with student UW NetIDs to assign people in advance.
This video shows you how to pre-assign people to breakout rooms by uploading a .CSV file.
Hold office hours
Zoom’s Appointments feature in Canvas allows instructors to create schedules for virtual office hours. Once an instructor sets the schedule, students can book appointments from within the Zoom page in Canvas. See Zoom’s guide for scheduling virtual office hours using the Appointments feature in Canvas.
To hold online office hours using Zoom:
- Go to your course in UW Canvas.
- Click Zoom in the left-navigation menu.
- Click the Appointments tab.
- Begin scheduling appointment time slots.
Record class sessions and store in the cloud
If you want to record your class sessions, when scheduling the meeting, under Meeting Options, select Record Meeting Automatically. You can pause or stop the recording from the Zoom meeting toolbar at any time during the class session. Students joining the session will receive an audio notification that the session is being recorded. If you want to prompt participants to consent to being recorded, you can configure a setting in the Recording settings in the web portal at washington.zoom.us.
Student Privacy
Remember to protect student privacy when recording. We recommend not recording office hour sessions in order to protect student privacy. The UW Privacy Office advises that if a meeting would not be recorded when in-person then it should not be recorded when working remotely. The UW Privacy Office is consulting with the UW Division of the Attorney General’s Office to evaluate the legal and data ethic issues for recording meetings.
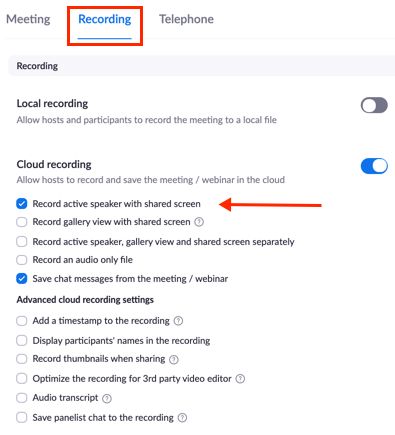
You can limit what will be recorded by choosing to record only the active speaker plus the shared screen. If students will be speaking, the camera will record them as active speakers. One workaround for this is to pause the recording while they are speaking.
To configure recording settings, go to the Zoom web portal at washington.zoom.us. Sign into your account, go to Settings, click the Recording tab and then select the settings you want to configure.
Zoom automatically creates captions for sessions recorded to the cloud. Recordings can be downloaded for up to 120 days after recording. After that, they are deleted. If you need longer term storage of your Zoom content, you can download to your machine or consider using the Panopto-Zoom integration.
You will receive an email when the recording becomes available. The time this takes may vary, depending on Zoom usage. To make recordings available to students, you need to publish the recordings on the Cloud Recordings tab. When you publish a recording, it will appear to students in the Zoom app in Canvas on the Cloud Recordings tab. Personal Meeting Room cloud recordings will not show for students. Avoid using the Personal Meeting Room for course meetings.

Change sharing permissions on recordings
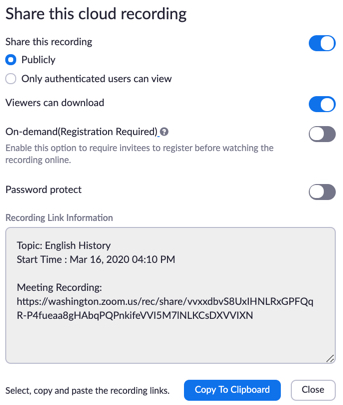
By default, anyone who has a link to the recording can view it. If you want to change settings on sharing recordings, sign in to the Zoom web portal at washington.zoom.us. In the left navigation, click Recordings. To the right of a recording, click Share. The Share this cloud recording dialog box appears.
Help students learn with Zoom
You can ensure an optimal classroom experience by taking time to set expectations and help students get comfortable meeting in Zoom.
Note: Students can see class sessions and office hours that you schedule in Canvas. At the current time, they cannot schedule meetings (e.g., study groups) with the Zoom app in Canvas. However, they can access Zoom outside of Canvas. If they want to schedule online study groups, they can log into the Zoom web portal at washington.zoom.us.
- If this will be the first time they have used Zoom, encourage students to go to the meeting URL in advance of the class start time. They will need a few minutes to download Zoom software before they can enter the Zoom meeting.
- Make sure that students know how to attend class in Zoom; they will click the meeting URL that you share with them. Remind students to use the Canvas calendar or the Zoom app in Canvas to access the link to the meeting.
- Encourage students to choose an appropriate space for joining your virtual classroom (a quiet place where they can focus and won’t be disturbed). However, please note that these conditions may not be available to all of your students.
- Suggest that they coordinate with roommates to minimize noise and competition for internet bandwidth while they are attending class online.
- Spend a few minutes at the beginning of the first class you hold in Zoom reviewing the interface for the benefit of people who are new to Zoom. Share your screen and demonstrate to students how to:
- Toggle their microphone and camera on and off.
- Open the Chat and Participants windows.
- Raise their hands and/or use Reactions if you are using those features.
- Encourage students to mute themselves when they are not speaking.
- If some students in your class are more experienced with Zoom, see if they are willing to answer questions from students who are new to Zoom.
- If your class is a large one, suggest to students who do not have a camera that they identify themselves when speaking.
FAQs
How can I teach my large course with my UW Zoom Account? It’s limited to 300 participants.
If you are teaching a course with more than 300 students, you can deliver your lectures using Panopto live streaming. Or record your lectures in advance, and have students view them asynchronously. You can use Zoom to host sessions for 300 or less for synchronous activities, such as office hours, small-group discussions, or Q&A.
I set up my class meetings with Zoom before the app was available in Canvas. How can I make them visible in my course?
You can import meetings that you previously scheduled using your account at washington.zoom.us into your Canvas course. Note: Meetings can only be associated with a single course.
- Sign in to your Zoom account at washington.zoom.us, and copy the meeting ID from the meeting page.
- Log in to Canvas at http://canvas.uw.edu
- Go to your course, and then click Zoom in the course navigation.
- Click the three-dot menu to the right of the blue Schedule a New Meeting button.
- Select Import meeting.
- Enter or paste the meeting ID into the space provided, and click Import.Your scheduled meeting will appear in the Upcoming Meetings tab, and on the Canvas calendar, and your students will receive a notification.
Students are telling me that they don’t see the class session(s) on their Canvas calendar
If you create or edit the date and/or time for a Zoom meeting outside of the Zoom app in Canvas (e.g. through washington.zoom.us), these changes may not initially be reflected in the Canvas calendar for the course to which that Zoom meeting is assigned. The Canvas calendar can be brought up to date by having the meeting host edit and then save the meeting in the Zoom app in Canvas.
Only the meeting owner can fix this for each of their meetings. The meeting owner does not need to make any changes to the meeting when editing – simply open the meeting within the Zoom App in Canvas, then click Save to confirm the existing settings. The process of saving the meeting within the Zoom app in Canvas should carry the most up-to-date scheduling information over to the Canvas calendar for the course.
How do I import a previous course to my new course shell without copying over the Zoom meeting Calendar events?
When copying a course, click the Select Specific Content option from the Import Canvas Course page. When choosing course content to import to your current course, make sure not to select “Calendar Events.”
Why can’t students access my class recordings?
The student is not signed into their UW Zoom account. Students who are signed into a non-UW Zoom account may see an error message that says “You cannot view this recording. No permission.”
Solution:
- Students should make sure to sign out of any personal Zoom accounts in their browser and desktop Zoom application before attempting to access a UW Zoom recording.
- They can then visit washington.zoom.us to sign into their UW Zoom account. Once they are signed into their UW Zoom account, they should be able to access the recording.
The recording is unpublished in the Zoom app in Canvas. The cloud recording may be visible to the instructor in Canvas, but students report that it does not appear in the list of Zoom recordings.
Solution:
- The instructor or TA who hosted the class meeting can publish the recording in the Zoom app in Canvas.
- To see which cloud recordings are published: From within the corresponding Canvas course, visit the Zoom Page. At the top-right corner, select the Cloud Recordings tab.
- To publish a recording, click the Publish toggle switch next to the desired recording. Recordings with a blue toggle switch that is flipped to the right are visible to students.
The recording is stored outside of Zoom’s Cloud Recording system. If you opted in to the Panopto Zoom integration, your recording will be transferred to the Panopto folder associated with your course rather than in the Zoom app in Canvas. Additionally, you may have recorded your meeting locally to your computer. As a result, the recording will not appear in the list of recordings that you can publish in the Zoom app in Canvas.
Solution:
- If your recordings have been moved to Panopto, make sure to provide instructions to your students on how to view Panopto Recordings in Canvas.
- Upload any locally recorded meetings you need to share with your class to Panopto.
The recording has been deleted. Zoom Cloud recordings are automatically deleted 120 days after creation. Deleted recordings can be recovered from the Trash folder for 30 additional days before the recording is removed permanently from the Zoom’s servers. These recordings may be still listed in Canvas after deletion, but clicking the link will result in an error message stating that “This recording does not exist.”
Solution:
- If the recording was deleted fewer than 30 days earlier, the user who hosted the meeting can visit their Trash folder in the Zoom web portal and click Restore next to the recording to restore access.
- If the recording was deleted 30 or more days earlier, it has been permanently deleted and cannot be restored.