When you connect to Husky OnNet, you can choose between two different connection configurations. They are for accessing different kinds of online resources. They are “UW Campus Network Traffic Only”, and “All Internet Traffic”. The table below illustrates what resources can be accessed using various connections and Husky OnNet configurations.
| Using just an internet connection | Using an internet connection with Husky OnNet active | ||
| Husky OnNet not connected | “UW Campus Network Traffic Only” option selected | “All Internet Traffic” option selected | |
| Any public internet site
(e.g., www.google.com) |
Y | Y | Y |
| Resources accessible only from the UW network
e.g., printers, desktops, file servers |
Y | Y | |
| Off-campus resources accessible only to users from the UW network
e.g., various subscription-based services |
Y | ||
For most Husky OnNet users, the “UW Campus Network Traffic Only” option is all that is needed. This option allows access to most necessary UW network resources without routing all internet use through the Husky OnNet service.
Only users who need to access resources that are not located on the UW campus, but are restricted to connections from the UW networks, need to use the “All Internet Traffic” option. These resources may include UW Libraries databases and e-journals.
If you find that you cannot successfully access an online resource with the UW Campus Network Traffic Only configuration, try the All Internet Traffic options instead.
Server Addresses
If you are using the default Husky OnNet service on Windows or macOS, the UW Campus Network Traffic Only and All Internet Traffic servers already exist in your client application and are ready to connect. However, if you:
- Have accidentally deleted the default servers and would like to add them back, or
- Use Husky OnNet on Linux or a mobile device, or
- Use Husky OnNet with a sponsored UW NetID, or
- Use a Husky OnNet – Departmental (HON-D) service
You will need to add server addresses to the client application.
Server addresses for default Husky OnNet:
- UW Campus Network Traffic Only: https://huskyonnet.uw.edu/
- All Internet Traffic: https://huskyonnet-ns.uw.edu/
Server addresses for Husky OnNet for sponsored UW NetIDs:
If you use Husky OnNet with a sponsored UW NetID, use these server addresses instead of the default Husky OnNet addresses. For more information, visit the Husky OnNet for Sponsored UW NetIDs page.
- UW Campus Network Traffic Only: https://dept-huskyonnet.uw.edu/spon
- All Internet Traffic: https://dept-huskyonnet-ns.uw.edu/spon
Server addresses for Husky OnNet – Department (HON-D):
To get server addresses for your departmental Husky OnNet service, consult with your departmental IT. For more information, visit the Husky OnNet – Department (HON-D) page.
Take note of the server addresses above that you would like to add to your client application, then follow one of the sections below to configure the servers on your device.
To select or add a Husky OnNet server on Windows:
- Open BIG-IP Edge Client.
- Click Disconnect if Husky OnNet is already connected.
- Click Change Server.
- To select an existing server:
- Use the dropdown on the pop up window to select either UW Campus Network Traffic Only, All Internet Traffic, or any other added server.
- To add a new server:
- Clear out the existing text in the dropdown.
- Enter the new server address.
- Click Next.
- Click Connect to connect to the newly selected server.
To select or add a Husky OnNet server on macOS:
- Open BIG-IP Edge Client.
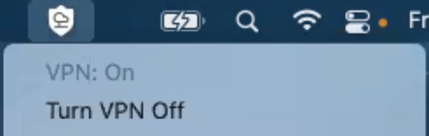
- If Husky OnNet is connecting or already connected, click on the
 Edge Client icon in the system status bar and click Turn VPN Off.
- To select an existing server:
- From the same menu, select either UW Campus Network Traffic Only, All Internet Traffic, or any other added server.
- To add a new server:
- From the same menu, click Manage VPN Servers…
- On the Manage VPN Gateways window, click + to add the new server address. Enter a name for the new server, e.g. “Sponsored All Internet Traffic”.
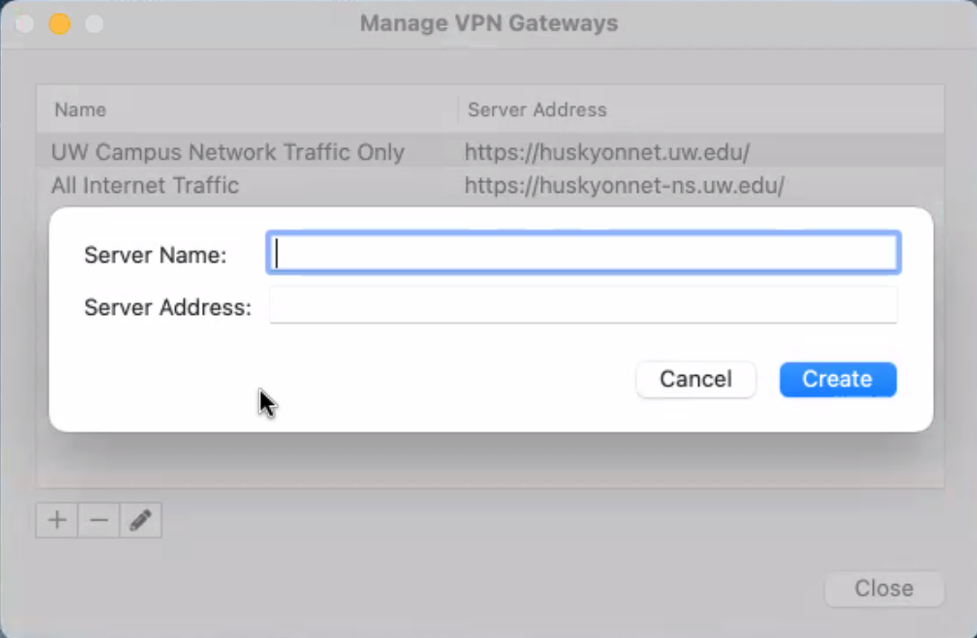
- Click Create to add the new server to the list.
- If you want to add multiple servers, repeat step 4, then click Close to save added servers.
- From the system status bar menu, select a server to connect to.
- From the same menu, click Turn VPN On.
To select and connect to a Husky OnNet server, after installing the F5 Helper Application, connect to Husky OnNet by browsing to the server address in Firefox. Follow these steps:
- The UW NetID login page should appear. Log in with your UW NetID.
- If you see an error message or log out message instead, try following the link on the left of the page to open a new session.
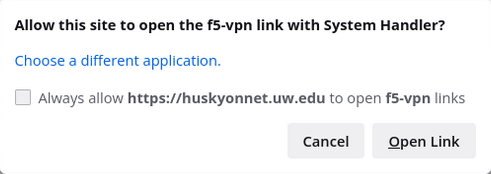
- Firefox may prompt to open a f5-vpn link with System Handler. Click Open Link.
- The F5 Helper Application will launch. On the Security Warning pop-up, click either Always allow VPN connection from this site or Allow VPN connection only for this session to connect to the server.

Once connected to Husky OnNet, a pop-up showing your VPN session status will appear. You can minimize this window and remain connected, but closing this window or browser completely will terminate your VPN session.
To select or add a Husky OnNet server in the F5 Access app on iOS:
- Open the F5 Access app.
- Tap Configuration.
- Tap Add Configuration.
- Enter a name for the new server, e.g. “UW Campus Network Traffic Only”.
- Enter the server address.
- Turn Web Logon to ON.
- Tap Save.
- To select an added server, tap on it. A check mark will appear on its left.
To connect to the selected Husky OnNet server:
- Tap on the Connection tab at the bottom.
- Turn Connect to ON.
- Sign in with your UW NetID.
To select or add a Husky OnNet server in the F5 Access app on Android:
- Open the F5 Access app.
- Tap CONFIGURE SERVER.
- Enter a name for the new server, e.g. “UW Campus Network Traffic Only”.
- Enter the server address.
- Tap Next.
- Ensure Web Logon is checked, then tap the check mark in the top-right corner to save the server.
To connect to the selected Husky OnNet server:
- Tap Connect.
- F5 Access may request permission to make and manage phone calls. If you want F5 Access to be able to identify your device in diagnostic reports for support purposes, allow access. Otherwise you may deny access; the app should still work.
- Tap Activate this device admin app.
- Sign in with your UW NetID.