Husky OnNet provides UW students, faculty, and staff with a secure connection to the UW network from off-campus. Learn more about Husky OnNet on the Husky OnNet main page.
To get started using Husky OnNet, you will:
- Download and install the Husky OnNet client software.
- Run the Husky OnNet client software to connect to the server.
- Test your connection with the Husky OnNet test server.
Downloading and Installing Husky OnNet
UW provides Husky OnNet client applications for Windows, macOS, and Linux devices. Other operating systems such as Android and iOS can use F5 Access by F5 Networks in appropriate app stores. UW-IT cannot provide support for these applications; however, users who can successfully install and use them under the Husky OnNet Terms and Conditions are welcome to do so.
- First, review the Terms and Conditions for Husky OnNet.
- If you agree to the Terms and Conditions, click “I Agree” to proceed to the download page and download the client installer for Windows.
- To install the client, find and run the downloaded installer. Follow the instructions in the installer.
Once installed, you can find the client in the Start Menu under the name of BIG-IP Edge Client with a F5 Networks icon, as shown below:

- First, review the Terms and Conditions for Husky OnNet.
- If you agree to the Terms and Conditions, click “I Agree” to proceed to the download page and download the client installer for Macintosh.
- To install the client, find and run the downloaded installer. Follow the instructions in the installer.
- First, review the Terms and Conditions for Husky OnNet.
- If you agree to the Terms and Conditions, click “I Agree” to proceed to the download page and download the .rpm or .deb installer for Linux.
- To install the client, find the downloaded installer and install it with your package manager.
- Once installed, you can find the client under the package name of f5vpn.
To use Husky OnNet on your iOS device, install the F5 Access mobile app.
- First, review the Terms and Conditions for Husky OnNet.
- If you agree to the Terms and Conditions:
- If your device runs iOS 12 or above, install the F5 Access app from the App Store.
- If your device runs iOS 9 to iOS 11, install the F5 Access Legacy app from the App Store.
To use Husky OnNet on your Android device, install the F5 Access mobile app.
- First, review the Terms and Conditions for Husky OnNet.
- If you agree to the Terms and Conditions, install the F5 Access app from Play Store.
To use Husky OnNet on your Chrome OS device, install the F5 Access mobile app.
- First, review the Terms and Conditions for Husky OnNet.
- If you agree to the Terms and Conditions, install the F5 Access app from Chrome Web Store.
Connecting to Husky OnNet
Once you have installed the Husky OnNet client on your device, you can connect to Husky OnNet with your UW NetID. Follow these instructions to connect to Husky OnNet on Windows or macOS.
UW-IT does not offer support for Husky OnNet clients on Linux, iOS, Android, or Chrome OS. Please refer to in-client documentation and online help for F5 Access.
- To start the client, search for “big” in the Start Menu to find BIG-IP Edge Client. Click on the client to open it.

- The client will launch and begin connecting to the server.
If it does not automatically do so, click on the Connect button.

- Log in with your UW NetID on the pop-up window.
- Husky OnNet is now connected. You can now access resources on the UW network.
- To disconnect from Husky OnNet, click on the Disconnect button.

- To start the client, search for “big” in Spotlight to find BIG-IP Edge Client. Click on the client to open it.

- The client will launch and begin connecting to the server.
- Log in with your UW NetID on the pop-up window.
- Husky OnNet is now connected. You can now access resources on the UW network.
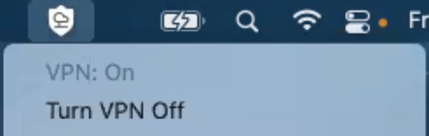
- To disconnect from Husky OnNet, click on the
 Edge Client icon in the system status bar and click Turn VPN Off.
Selecting a Husky OnNet Server
The default configuration of Husky OnNet allows you to access non-public UW network resources. When you are off-campus, you may need to use a different Husky OnNet configuration to access off-campus websites like subscription-based online journals. To access these off-campus resources, follow the instructions in Selecting a Husky OnNet Server.
If you use Husky OnNet with a sponsored UW NetID, the default configurations are not available to you. You need to add and connect to sponsored UW NetID servers. Follow the instructions in Selecting a Husky OnNet Server, using server addresses for sponsored UW NetIDs. To learn more about Husky OnNet for sponsored UW NetIDs, visit Husky OnNet for Sponsored UW NetIDs.
If you are trying to connect to a departmental Husky OnNet service, consult with your departmental IT for your departmental Husky OnNet server addresses, then follow the instructions in Selecting a Husky OnNet Server to add and connect to your servers. To learn more about departmental Husky OnNet, visit Husky OnNet – Department.
Testing Your Connectivity
To test if your connection to Husky OnNet is successful, go to the Husky OnNet test website. If you have successfully installed and connected to the UW network with Husky OnNet, you will see a “Congratulations!” message.
If you see the “not connected” message instead, you are not connected to Husky OnNet. Follow the sections above to make sure that the Husky OnNet client is installed, running, and connected.
If you need help, you can find documentation and support for using Husky OnNet on your device on the Husky OnNet main page or online.
Uninstalling Husky OnNet
To uninstall Husky OnNet on Windows:
- Open Windows Settings and go to Apps.
- Under Apps & features, select BIG-IP Edge Client and click Uninstall.
- If other BIG-IP apps remain after uninstallation completes, uninstall them as well.
- Go to Settings Home, then go to Network & Internet.
- Click the Dial-up tab on the left.
- Select APM Network Access and click Remove.
- If you see a connection with a name that starts with _Common_huskyonnet-split_na_res, delete it as well.
To uninstall Husky OnNet on macOS:
- Open the BIG-IP Edge Client application.
- From either the F5 dock icon (right click for menu) or F5 system status bar icon (click for dropdown menu), click Preferences.
- At the top of the Preferences window, next to General, click Advanced.
- You will see an uninstall option for two components. Click ONLY the uninstall button for the BIG-IP Edge Client. This will remove all the application components from your machine.
- Note: There is no SSL VPN Plugin installed with Husky OnNet; selecting uninstall for this component may freeze the application, requiring you to quit and restart the application.
To uninstall Husky OnNet on Linux:
- Use the package manager of your Linux distribution (e.g. apt, yum, zypper, or dnf) to remove package f5vpn.
To uninstall Husky OnNet on iOS, Android, or Chrome OS:
- Remove the F5 Access app from your device.