- On This Page
- What Hardware Do I Need to Use the UW Wireless Network?
- Connecting Your Device to the UW Wireless Network
- How to find the Wi-Fi MAC address for your device
- How to delete a Wi-Fi network from your device
- Apple iOS Devices Connecting to UW Wireless Networks
- Help
At the University of Washington, we provide 802.11n (Wi-Fi 4), 802.11ac (Wi-Fi 5) or 802.11ax (Wi-Fi 6) connectivity at all locations with wireless coverage. Our wireless infrastructure is capable of both 2.4GHz and 5GHz connection options with 5GHz being the favored frequency.
What Hardware Do I Need to Use the UW Wireless Network?
To use UW wireless services you should have a device that supports the 802.11ax or 802.11ac and we strongly recommend 802.1X for eduroam support. The UW wireless network also supports 802.11n, 802.11a and 802.11g however we do not recommend its use. We no longer support 802.11b. We are introducing Wi-Fi 6E to campus which supports the new 6GHz band and highly recommend new devices have support for this protocol.
Wireless hardware that supports 802.11ax or 802.11ac will ensure you have the best overall wireless service on campus, primarily due to the inclusion of 2.4GHz and 5GHz transmission capabilities and higher data-rates. Wireless hardware the supports Wi-Fi 6E(6GHz) will further increase speed and security while on the UW Network where it is supported.
It is also recommended that your device has Wi-Fi Alliance Certification to ensure its compatibility.
Connecting Your Device to the UW Wireless Network
You’re able to connect your device to the UW wireless network via the “eduroam”, “UW MSPK” or “University of Washington” SSIDs.
It is recommended for all students, faculty and staff to use the eduroam network due to its extra security and mobility options. We consider the “University of Washington” network to be the last resort for UW faculty, staff, and students.
You can learn more about how to connect to either Wi-Fi services at the Using Wi-Fi at the UW page of IT Connect.
The following are recommended network settings for using the UW wireless services:
| Setting | Recommended Value |
|---|---|
| TCP/IP address | Acquire address dynamically with DHCP |
| DNS Servers | Dynamically acquire DNS server addresses. This will result in use of default DNS servers. |
How to find the Wi-Fi MAC address for your device
Sometimes you might need to know the MAC address of your device for troubleshooting purposes with UW-IT. A MAC address is a unique identifier that a network adapter has in order to communicate on a wired or wireless network.
- Select the Wi-Fi symbol along the top menu bar and click on Open Network Preferences at the bottom of the drop-down menu.
- Click on Wi-Fi in the menu on the left and click Advanced on the right.
- Look for the item that says Wi-Fi MAC Address: — This is your MAC address.
- Tap Settings > WLAN.
- Locate the Wi-Fi network to which you’re connected and tap the ⓘ icon.
- Locate WLAN Address. This is your MAC address.
- Click the Windows Start icon.
- Type Wi-Fi Settings to search for the menu item.
- Click Wi-Fi Settings.
- Click Hardware properties.
- Locate Physical address (MAC):. This is your MAC address.
- Open the Windows menu and click the gear icon to open Windows Settings.
- Click Network & Internet.
- On the left, click Wi-Fi.
- Click Hardware properties.
- Locate Physical address (MAC):. This is your MAC address.
- Go to your Applications menu
- Tap Settings.
- Tap Network & Internet.
- Tap Wi-Fi.
- Tap the Wi-Fi network your device is connected to.
- Expand the Advanced option.
- Locate the Device MAC address or Randomized MAC address field. This is your MAC Address.
How to delete a Wi-Fi network from your device
Sometimes you may need to remove a Wi-Fi network from your device during troubleshooting with UW-IT. Each Wi-Fi network you connect to generates a unique Wi-Fi profile that contains special settings and configurations.
When Wi-Fi is enabled, your device is constantly searching for all the different Wi-Fi profiles your device has saved. Due to this, you should delete Wi-Fi network profiles from your devices which you no longer use as this can cause connection delays.
- Select the Wi-Fi symbol along the top menu bar and then, at the bottom of the drop-down menu, click Open Network Preferences.
- Click on Wi-Fi in the menu on the left and click Advanced on the right.
- Select the Wi-Fi network you want to delete.
- Click the – icon.
- Click Remove.
- Tap Settings > WLAN.
- Locate the Wi-Fi network to which you’re connected and tap the ⓘ icon.
- Tap Forget this Network.
- Click the Windows Start icon.
- Type Wi-Fi Settings to search for the menu item.
- Click Wi-Fi Settings.
- Click Manage known networks.
- Click Forget on the Wi-Fi network
- Open the Windows menu and click the gear icon to open Windows Settings.
- Click Network & Internet.
- Click Wi-Fi on the left.
- Click Manage known networks.
- Select the Wi-Fi network you want to delete and then select Forget.
- Go to your Applications menu.
- Tap Settings.
- Tap Network & Internet.
- Tap Wi-Fi.
- Tap and hold the network entry you want to delete. A prompt will appear on your screen giving you the option to tap the Forget button.
Apple iOS Devices Connecting to UW Wireless Networks
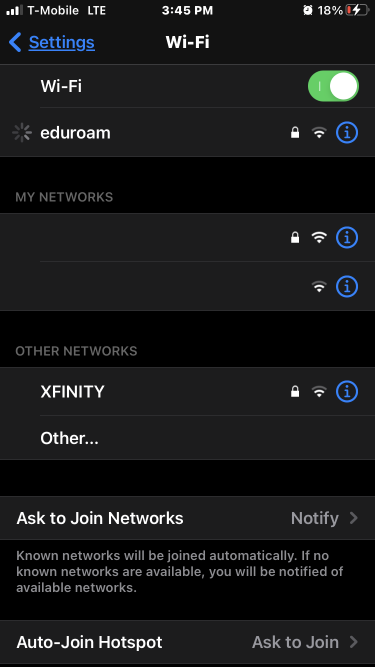
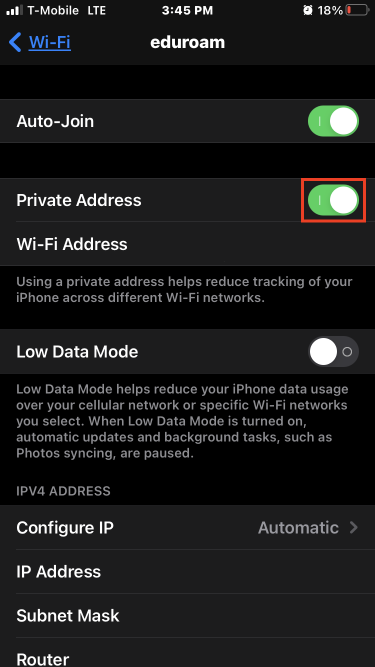
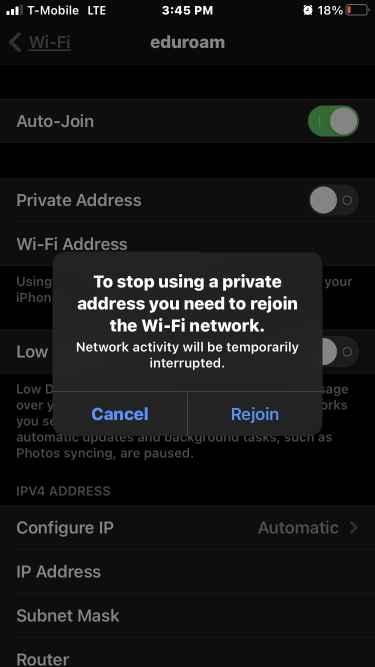
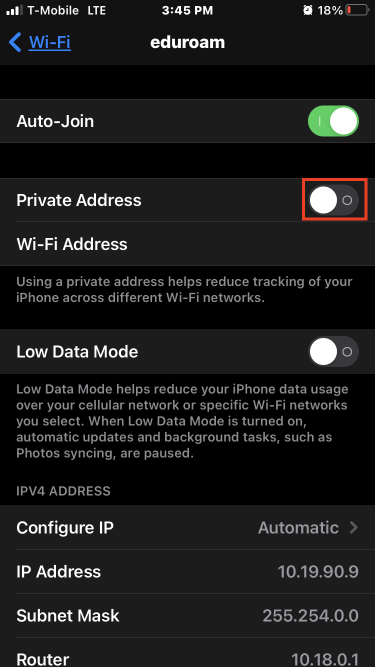
Apple’s release of iOS14 brought some changes to the way your device identifies itself to Wi-Fi networks.
This change causes the device to create a Private MAC Address for each new Wi-Fi profile created. This complicates any troubleshooting support UW-IT can provide and also causes two-factor authentication via Duo to fail.
To turn its function off, follow the steps below.
Help
If you are still having problems configuring your wireless device to work on the UW wireless network, contact your device vendor or the UW-IT Service Center.


