This page helps users resolve the most common questions about working with the Enterprise Data Warehouse (EDW). If your question isn’t answered here, please contact edw-help@uw.edu.
Table of Contents
-
- Data Load Status
- Access
- Server and Database Information
- Connection Assistance
- How do I connect to the EDW using:
- Query Assistance
- Troubleshooting
Data Load Status
Trying to find out when Production or Test EDW data loads? If so, this has been moved to the EDW Data Load Status page.
Access
Not sure if you have access to EDW data and tools? Or want to find out what kind of access you have? Any UW employee can use ASTRA to view their EDW access.
-
-
- Navigate to ASTRA
- Click on “View My Authorizations“
- Login using your UW NetID and password
- ASTRA will display a list of authorizations:
-

-
-
- Look under the Application column – you have access to EDW data, reports, cubes, and visualizations if you see EDW listed. The data you can access is governed by the role to which you have been assigned. In the example above, the user has been assigned to the EDW Administrator role. Note: you may have been granted access to more than one role.
- If you need to request new or different access to EDW, visit the Request Access page
-
For more information on EDW security, visit the Data Security page.
Server and Database Information
Each Database has 2 Environments available as follows:
| Environment | SQL Server | Notes |
|---|---|---|
| Production (PROD) | edwpub.s.uw.edu |
|
| TEST | edwtestpub3.s.uw.edu |
|
All EDW Databases, including current state are as follows. Some databases have customer resources available that you can access by clicking on the link:
| Database | Description | State |
|---|---|---|
| CoreData | A database that includes a cross-section of source-similar reference data from multiple domains, which is designated by the UW Data Governance Steering Committee as essential to UW core business. This data is managed to guarantee uniformity and usage in support of UW functions. | Current |
| EDWPresentation | the presentation layer includes integrated financial, research, and academic data designed for easy queries and analysis, with certified definitions and documented business rules. The presentation layer is optimized for commonly requested queries and analyses of institutional data.
Predefined reports, dashboards, and cubes based on EDWPresentation data are available in the BI Portal. |
Current |
| EFECSDataStore | This database is a copy of some Management Accounting & Analysis (MAA)-related tables from the eFECS EffortReport database. | Scheduled to be frozen 10/13/2023 with the retirement of FAS and introduction of Workday. |
| IBS | The Institutional Base Salary (IBS) database is the operational database for School of Medicine salary data downloaded from ADP. | Current |
| UWODS | The UWODS is a database which reflects the Foundation Data Model (FDM), the technical framework that organizes HR/Payroll and Finance data in UW’s implementation of Workday.
This database supports reporting for the following:
|
Current |
| UWSDBDataStore | A relational database that provides data from the central mainframe Student system which includes student demographic information, course schedule and student enrollment information, student degrees, student majors, registration and transcript information, and many other topics and tables in the area of academics. | Current |
| WDFinDataMart | A Finance Data Mart introduced as part of UW Finance Transformation (UWFT) and provides the following data from Workday:
|
Current |
| AnalyticInteg (AIDB) | A sandbox environment that was created to give data users across campus the ability to work with and explore PNBDB data structures in a SQL context. AIDB was built in collaboration with the Office of Planning and Budgeting (OPB) to serve as a proof of concept for consolidating academic and finance data. |
|
| FinancialSumMart | A relational database that is organized to meet various administrative needs including annual financial auditing, UW organizational financial reporting, and budgeting analysis. The data covers the university business domains of budget, expenditures, revenue, gifts and endowments, as well as some grant information. | Frozen as of 7/27/2023 with the retirement of FAS and introduction of Workday Finance. (See UWODS and WDFinDataMart for current data) |
| FRDataMart | Archive (from the ODS) of one year payroll check register detail, and gross pay control totals used for verification. | Frozen as of 7/27/2023 with the retirement of FAS and introduction of Workday Finance |
| GLDataMart | A General Ledger Data Mart. This database contains GL transactions including payroll cash detail and use tax detail for the current biennium and prior three biennia. | Frozen as of 7/27/2023 with the retirement of FAS and introduction of Workday Finance. (See UWODS and WDFinDataMart for current data). |
| HumanResources | An integration database for HR/Payroll data | Frozen as of 7/27/2023 with the retirement of FAS and introduction of Workday Finance (See UWODS and WDFinDataMart for current data). |
| ODS | A relational database based on data that was originally captured in the central mainframe financial system (FAS) and the Human Resources/Payroll system (Workday). This database includes financial transactions, a variety of paid and unpaid employment information, academic relationships, details about positions at the UW, and many other topics and tables in the area of Finance and HR/Payroll. | Frozen as of 7/27/2023 with the retirement of FAS and introduction of Workday Finance. (See UWODS and WDFinDataMart for current data). |
| RAD | Relational database that provides Research Administrative data related to research activities. | Frozen as of 7/6/2023 with the retirement of FAS and introduction of Workday Finance. (See UWODS and WDFinDataMart for current post-Award data. Contact grantrp@uw.edu for pre-Award data. |
Connection Assistance
Are you attempting to connect to connect to the EDW remotely and having difficulty? If so, continue reading this section. If you log into your computer using your UW NetID credentials in a native UW environment and are looking for instructions on connecting via specific program, please skip to the next section.
If you’re trying to connect to the EDW remotely (i.e. from an off-campus computer), you must log on to the UW network using the Husky OnNet VPN software. Note: In general, UW Medicine locations are considered “off-campus” and also require Husky OnNet.
Regardless of what query tool you use with the EDW, you must connect with your UW NetID credentials. If you do not log into your computer in a native UW NetID environment, you will need to use a special command to open your query tool with your NetID credentials.
Windows Instructions
The “RunAs” command allows you to open and operate programs using different credentials than the credentials you use to log in to your computer. Instructions to create your “RunAs” command vary depending on the operating system, the program you want to use, and the program’s path. These examples work for standard Managed Workstation Service computers. If your computer is not managed by MWS, check with your department’s IT staff to modify these instructions for your computing environment.
In order to open your query tool using UW NetID credentials via RunAs, you’ll follow two steps:
Step 1: Build the RunAs command
In this step, you’ll build a RunAs command specific to you and the query tool you will be running.
The “RunAs” command has two basic parts, as shown below:
-
-
- First part: RunAs /netonly /user:yournetid@netid.washington.edu – this tells your computer to open the tool using your UW NetID credentials, where you replace yournetid with your UW NetID. The /netonly option of the command maintains your access to your local and network drives and printers.
- Second part: Program path – in other words, the location on your hard drive where the tool program is stored. This can vary based on operating system and tool version.
-
Example:
RunAs /netonly /user:yournetid@netid.washington.edu “C:\Your\Program\File\Location.exe”
-
-
- The first part of the RunAs command is as follows (replacing yournetid with your UW NetID):
RunAs /netonly /user:yournetid@netid.washington.edu
Note: we suggest you copy and paste this string so you have the included spaces. - Create the second part of the command by finding the path for the program you want to run:
- Click Start > All Programs, and navigate to the program you want to open
- Right click on the program icon and choose Properties
- If the contents of the Target field resemble the image on the left below, you now have the program path. If the contents resemble the image on the right, skip to Step 3 below.
- Copy the contents of the Target field on the Shortcut tab, including the double quotes. Add this to the first part of the command, to get a full command that looks similar to this:RunAs /netonly /user:yournetid@netid.washington.edu “c:\program files\microsoft office\office15\excel.exe”
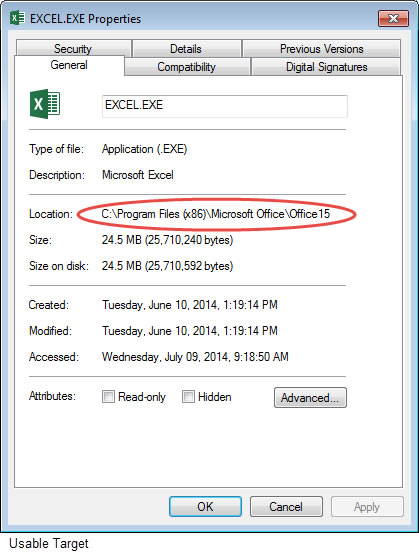
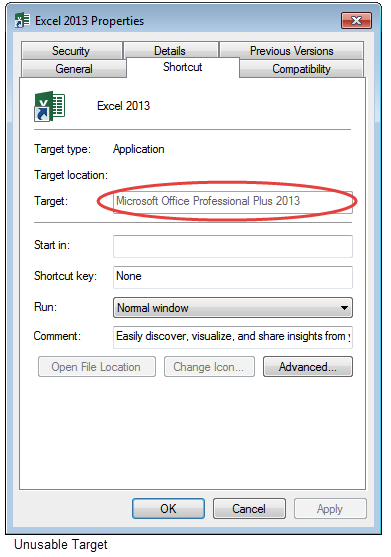
- (Optional) If the contents of the Target field resemble the “Unusable Target” image on the right above, you will need to create the target by hand by finding the path of the program’s .exe file.
- Search your computer for the appropriate file name (see the table for examples)
Program File Name Access msaccess.exe Excel excel.exe Tableau tableau.exe SQL Data Tools* devenv.exe SSMS** 2012 ssms.exe * Formerly known as BIDS – Business Intelligence Development Studio, aka Visual Studio
**SSMS – SQL Server Management Studio - Create the program path to get to the original executable file
- Search your computer for the appropriate file name (see the table for examples)
- The first part of the RunAs command is as follows (replacing yournetid with your UW NetID):
-
Step 2: Execute the RunAs command
Now that you’ve built your RunAs command, there are two recommended ways to execute it:
Option 1: Issue the “RunAs” command through the Run dialog box
-
-
- Bring up the Run dialog box by pressing the Windows and R keys together
- To the right of Open: in the Run dialog box, paste the command for your query tool and click OK
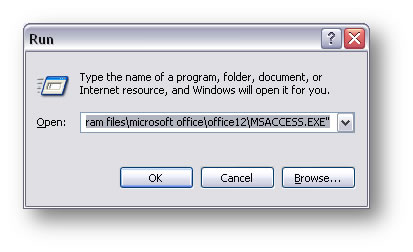
- When prompted, enter your UW NetID password
-
Option 2: Script the “RunAs” command in a batch file
Another way to use the RunAs command is through a batch file with the extension .bat. You can double click the .bat file icon and supply your password to open the tool you would like to use.
To create a .bat file:
-
-
- Open Notepad
- Paste in the command that we created above:
- RunAs /netonly /user:yournetid@netid.washington.edu “C:\Your\Program\File\Location.exe”
- Hit Enter, and type in the word pause without quotes
- Click File > Save As and save the batch file
- Change Save as type to All Files
- Name the file with a .bat extension. Do not save the file with a .txt extension. The example below is named Excel.bat
- Repeat the batch file creation process for each tool you use
-

MacOS Instructions
In order to connect to the EDW using MacOS, you will need to update (or create) your Kerberos configuration file (krb5.conf). The krb5.conf file contains Kerberos client configuration information that will be necessary to connect to the EDW. This file should be located in your /etc/ directory.
Step 1: Navigate to the /etc/ directory
Navigate to the /etc/ directory on your MacOS machine. Please note that this directory is hidden by default. To navigate to this directory, open Finder and press Command + Shift + G. In the popup, enter the path to the folder we want to access: /etc/.
Step 2: Create your krb5.conf file
Now that you are in the /etc/ directory, you will need to create your Kerberos configuration file (krb5.conf). Using your preferred text editor, create a new file titled krb5.conf in the /etc/ directory. Note that you should only need to do this step once. This file consists of information that tells your OS what Kerberos realm it needs to be using. We suggest copying and pasting the below example into your new file:
[libdefaults]
 default_realm = NETID.WASHINGTON.EDU

[realms]
NETID.WASHINGTON.EDU = {
  admin_server = _kerberos._tcp.netid.washington.edu
  kdc = ezra.netid.washington.edu
  kdc = ahsoka.netid.washington.edu
  kdc = leia.netid.washington.edu
  kdc = kanan.netid.washington.edu
  kdc = obiwan.netid.washington.edu
  default_domain = NETID.WASHINGTON.EDU
}

[domain_realm]
  netid.washington.edu = NETID.WASHINGTON.EDU
  .netid.washington.edu = NETID.WASHINGTON.EDU
  .s.uw.edu = NETID.WASHINGTON.EDU
Step 3: Run the kinit command
In order to run your preferred EDW querying program as your UW NetID, you will need to run the kinit command. Open a terminal window, and run the following (adjusting yournetid to be your UW NetID):
kinit yournetid@NETID.WASHINGTON.EDU
Enter your UW NetID password when prompted.
Step 4: Open your Querying Program
Once you have completed creating your krb5.conf file and you have run the kinit command, you will now be able to use Kerberos authentication for the querying program of your choice. See the Excel (MacOS) section for an example of this.
Connection Guides
Note: The screenshots below are taken from SSMS 2012; the instructions can be applied to later versions of SSMS as well.
First, ensure you’re running SSMS with your UW NetID credentials. Then:
-
-
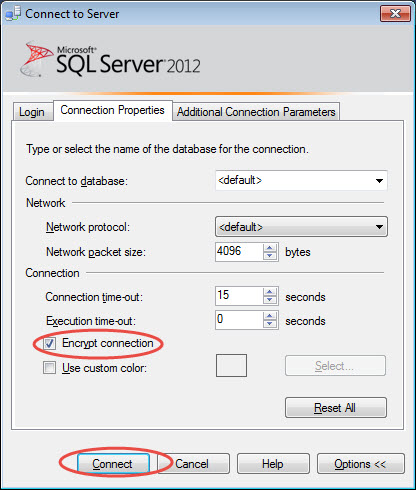
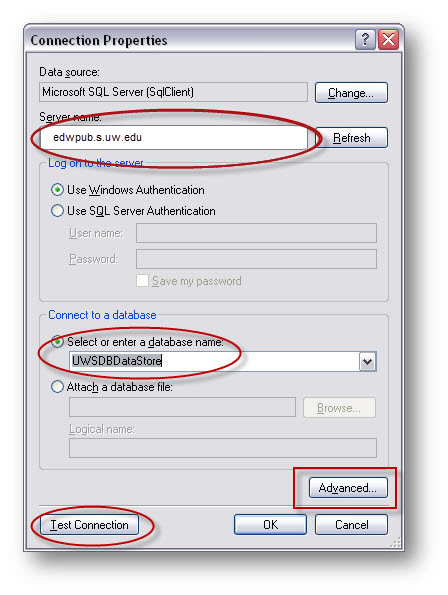
- When opening SSMS, you will be prompted for a server name. Enter edwpub.s.uw.edu. Some users may also need a port number. See the Servers and Databases section for that information. Select the Options button. Note: When connecting from an off-campus computer, you may not see your NETID displayed in the User name section. If you know that you’re running SSMS with your UW NetID credentials, please continue onto the next steps.
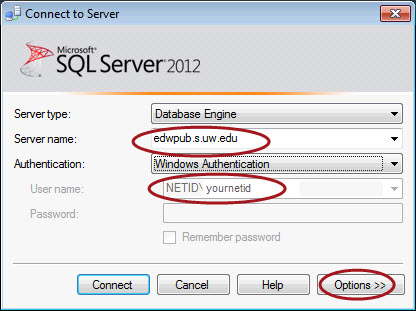
- Select Encrypt Connection to secure the data as it moves between the server and your computer. Select Connect.
- That server now appears in the Object Explorer pane. If the Object Explorer pane is not visible on your screen, click View > Object Explorer from the menu.
- Navigate to the database you’re interested in and open the Views folder. Here you will find the secured views available for querying.
- When opening SSMS, you will be prompted for a server name. Enter edwpub.s.uw.edu. Some users may also need a port number. See the Servers and Databases section for that information. Select the Options button. Note: When connecting from an off-campus computer, you may not see your NETID displayed in the User name section. If you know that you’re running SSMS with your UW NetID credentials, please continue onto the next steps.
-
How do I connect to the EDW using Excel for Windows?
First, ensure you’re running Excel with your UW NetID credentials. Then:
-
-
- Open a new blank workbook in Excel
- Under the Data tab, select From Other Sources, then From SQL Server
- In the Data Connection Wizard window,
- Server name : edwpub.s.uw.edu
- Log on credentials
- Use Windows Authentication if you followed the above instructions to run Excel with your UW NetID credentials
- You may need to select the Use the following User Name and Password option when you connect and enter your own NetID and password as shown below:
- yournetid@netid.washington.edu
- yourpassword
-
How do I connect to the EDW using Excel on Mac OS?
First, ensure you’re running Excel with your UW NetID credentials Then:
-
-
- Open Excel and click the “Data” tab at the top.
- Choose “New Database Query” and select “SQL Server ODBC”
- A connection wizard window will open. In the Authentication section you’ll type:
- Server: type your server connection “edwpub.s.uw.edu”
- Database: This field is optional
- Method: Choose “Kerberos”
- Kerberos ID: Choose “Create ID”
- User Name: [yournetid]@netid.washington.edu
- Password: [your netid password]
- Select “Connect”
- Now you’re connected to the EDW and can query the databases.
-
How do I connect to the EDW using ODBC and/or MS Access?
The steps below describe how to create an ODBC connection using Microsoft Access. The examples provided are for the ODS, but will work for all EDW servers and environments.
First, ensure you’re running Access with your UW NetID credentials. Then follow these steps:
Step 1: Prepare Microsoft Access
- From MS Access, open the database in which you want to work – either a new database or an existing one.
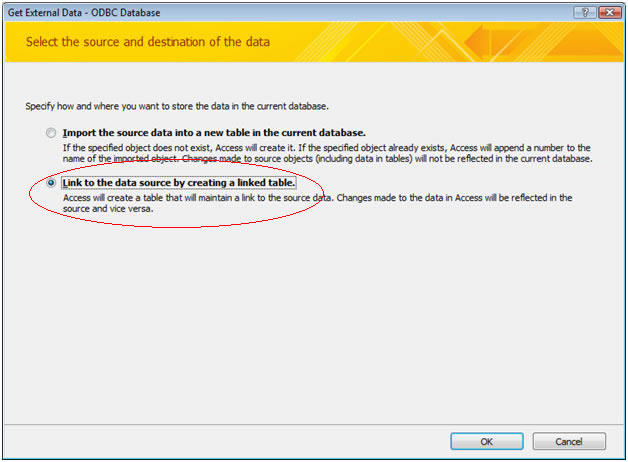
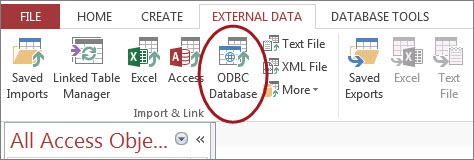
- On the External Data tab, choose ‘ODBC Database’
- Select Link to the data source by creating a linked table.
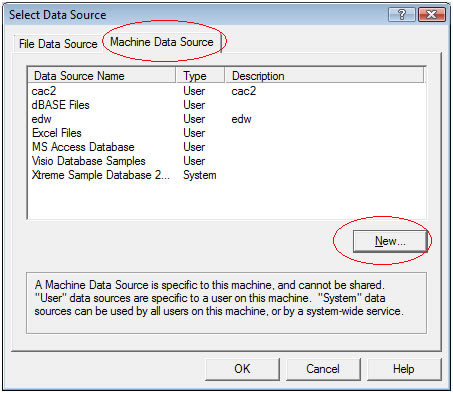
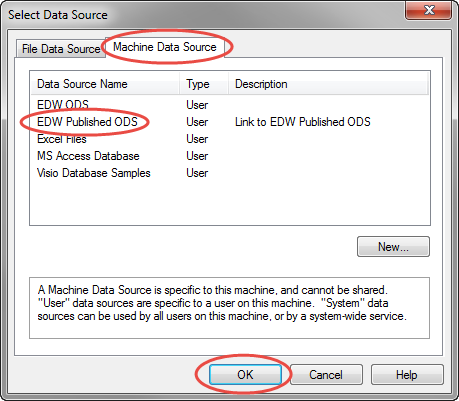
- Select the ‘Machine Data Source‘ tab.
- If the data source you want is in the list, select it and skip down to Step 3: Choose tables. Otherwise, press ‘New’ and continue.
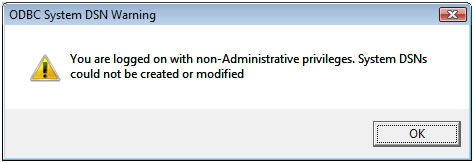
- This warning is for information only. Press ‘OK‘ to proceed if you encounter it.
Step 2: Create a new data source
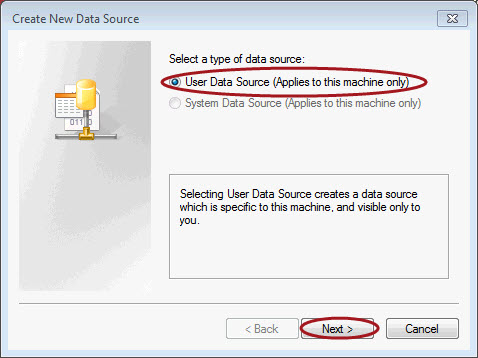
- Select ‘User Data Source (Applies to this machine only)’, then select Next.
- You have to make a choice here. For the best experience with EDW data, we recommend Option 1.
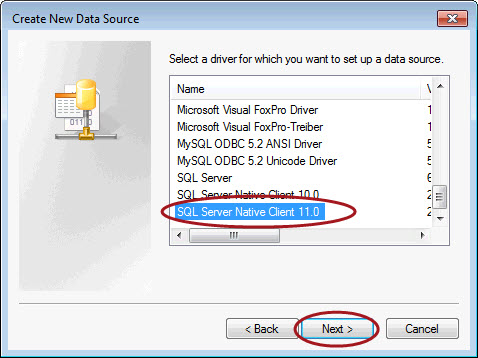
- Option 1 (recommended)- Choose “SQL Server Native Client xx.x”, where xx.x is the version number. This driver provides improved functionality (learn more), but requires you to install additional software (download site) in order to take advantage of that functionality. For example, the generic driver (Option 2) does not support Date. The SQL Native Client translates this format in Microsoft Access as a date, while the generic driver translates dates into strings.
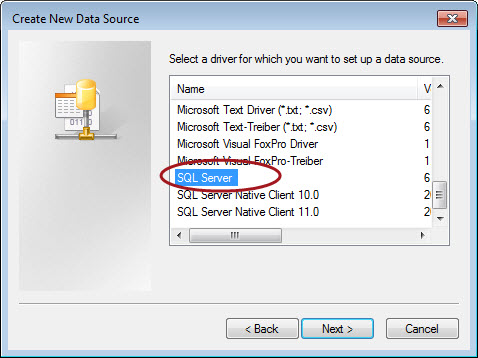
- Option 2 – Choose “SQL Server” from the list of drivers. A known issue with this option is that the driver will translates dates into strings.
- Option 1 (recommended)- Choose “SQL Server Native Client xx.x”, where xx.x is the version number. This driver provides improved functionality (learn more), but requires you to install additional software (download site) in order to take advantage of that functionality. For example, the generic driver (Option 2) does not support Date. The SQL Native Client translates this format in Microsoft Access as a date, while the generic driver translates dates into strings.
- Verify your selections and select Finish if satisfied.
- Choose a name and description that describes the data source you want to connect to. This example connects to the database called ODS (modify accordingly for the database of your choice). Select Next.

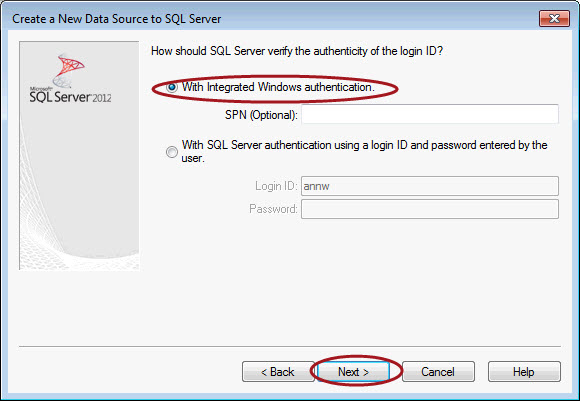
- Choose ‘With Integrated Windows authentication’, then select Next
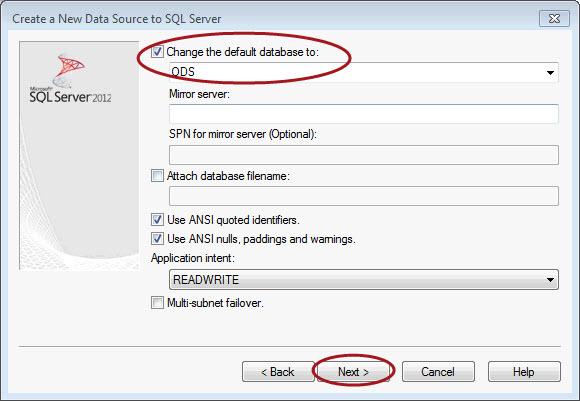
- Change the default database to ODS for this example, then select Next.
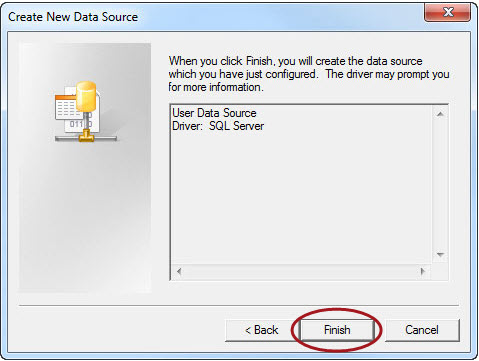
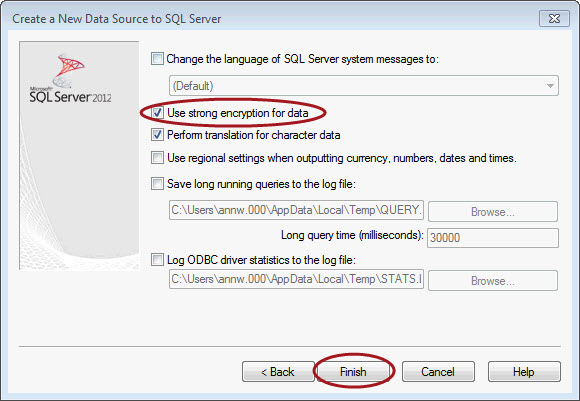
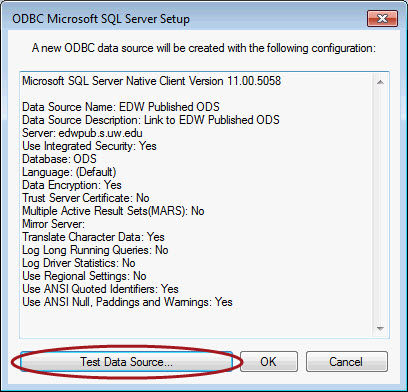
- Choose options as noted below, then select Finish.
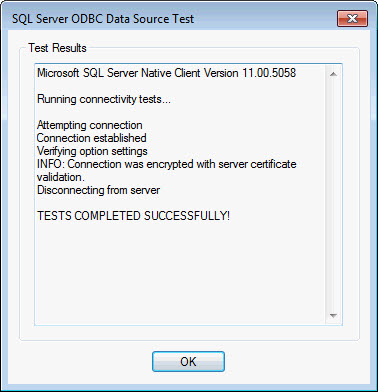
- To make sure the connection is working, click ‘Test Data Source’.
- This is what you should see.
- Select OK until you see the Link Table dialog box, then skip to Step 3: Choose tables. If you’re using MS Access 2016, continue.
- Select the ODBC Database icon again
- Select Link to the data source by creating a linked table, then selectOK
- Select the Machine Data Source tab, then EDW Published ODS, then OK
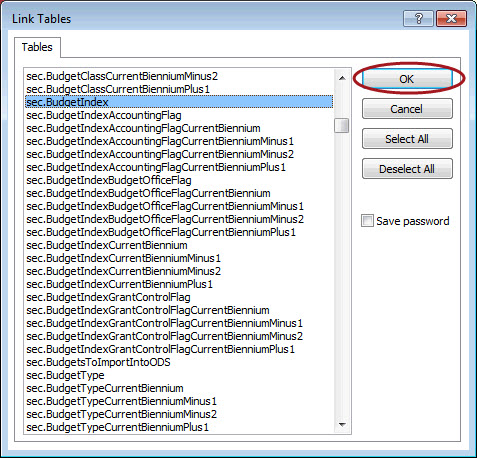
Step 3: Choose tables
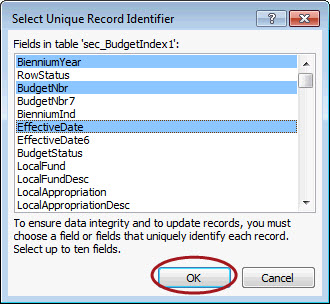
The list of secured views available from the selected data source are listed on the Link Tables dialog box. Select the view you need and then select OK.
- MS Access prompts for unique key identification.
The tables you linked to will now be available in the Tables list in MS Access. You are ready to build queries in MS Access.
How do I connect to the EDW using Visual Studio?
Note: These instructions are for BIDS 2008
First, ensure you’re running Visual Studio with your UW NetID credentials. Then:
-
-
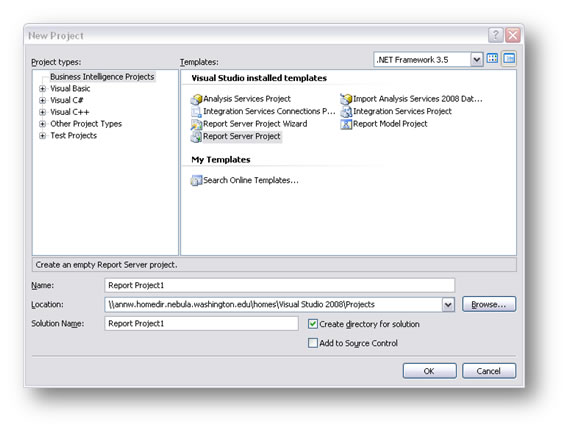
- Open an existing project, or start a new project by clicking on File > New > Project
- Select the kind of project you want – this example selects a Report Server Project – and click OK
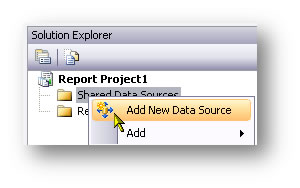
- In the Solution Explorer pane, right click on Shared Data Source and select Add New Data Source. If the Solution Explorer pane is not visible, click View > Solution Explorer from the menu.
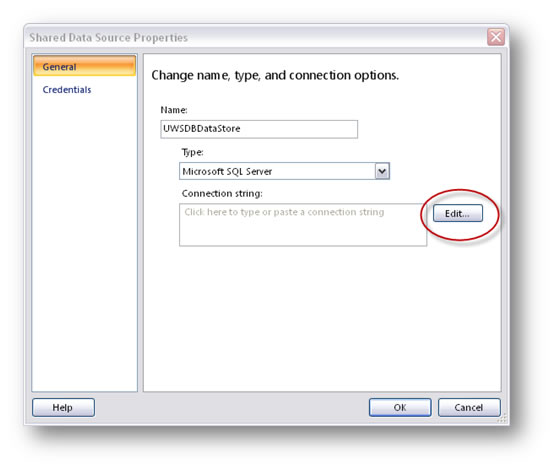
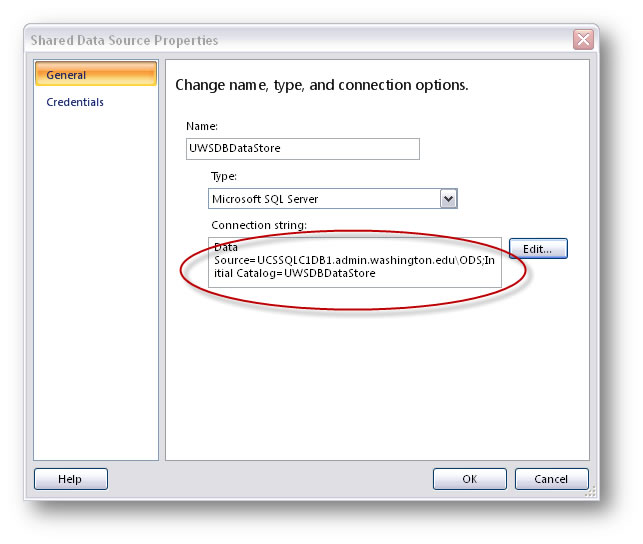
- In the Shared Data Source Properties window, enter the name of the database to which you are connecting, then click the Edit button.
- In the Connection Properties dialog box:
- Enter the server name.
- Under Select or enter a database name, use the drop down box to select your database.
- Click the Test Connection button to make sure the connection is working, then click OK twice to return to the Share Data Source Properties window.
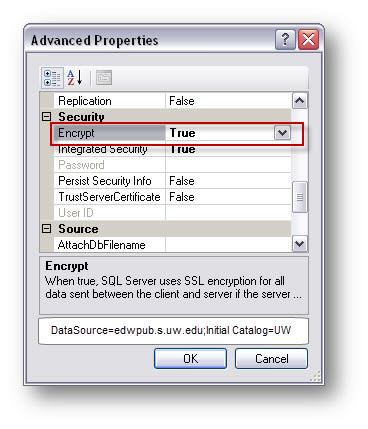
- Finally, click the Advanced button to turn Encryption on, then click OK to return to the Connection Properties window.
- Note the Share Data Source Properties window now shows the Connection string information populated. Click OK to finish creating the data source.
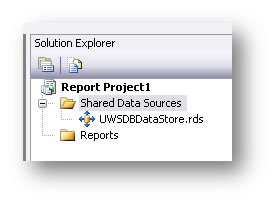
- The new data source now appears in the Solution Explorer. You can begin writing queries and reports against this data source.
-
How do I connect to the EDW using Tableau?
Note: These instructions are for Tableau Desktop for Windows. If you are using Tableau Desktop for Mac, you can connect if you are running Windows on your Mac. For more information on connecting to Tableau with a Mac, please visit our Tableau-specific FAQ! To find out more about the BI team’s Tableau report offerings, or how to request licensing please visit the Data Dashboard: Tableau page.
First, ensure you’re running Tableau Desktop with your UW NetID credentials. Then:
-
-
- Make sure you’re connected to the VPN and open Tableau Desktop.
- From the ‘To a Server’ section, select Microsoft SQL Server
- On the Microsoft SQL Server window, enter the following, and then click Sign In:
- Server: edwpub.s.uw.edu.
- Database: Optional – Choose a specific database that you want to connect to. For example, WDFinDataMart.
- Authentication: Use Windows Authentication (preferred)
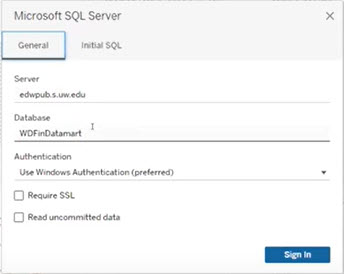
- You are now connected to the EDW server. Tableau’s Connecting to Databases video shows you how to select tables and manage joins.
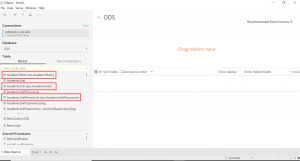
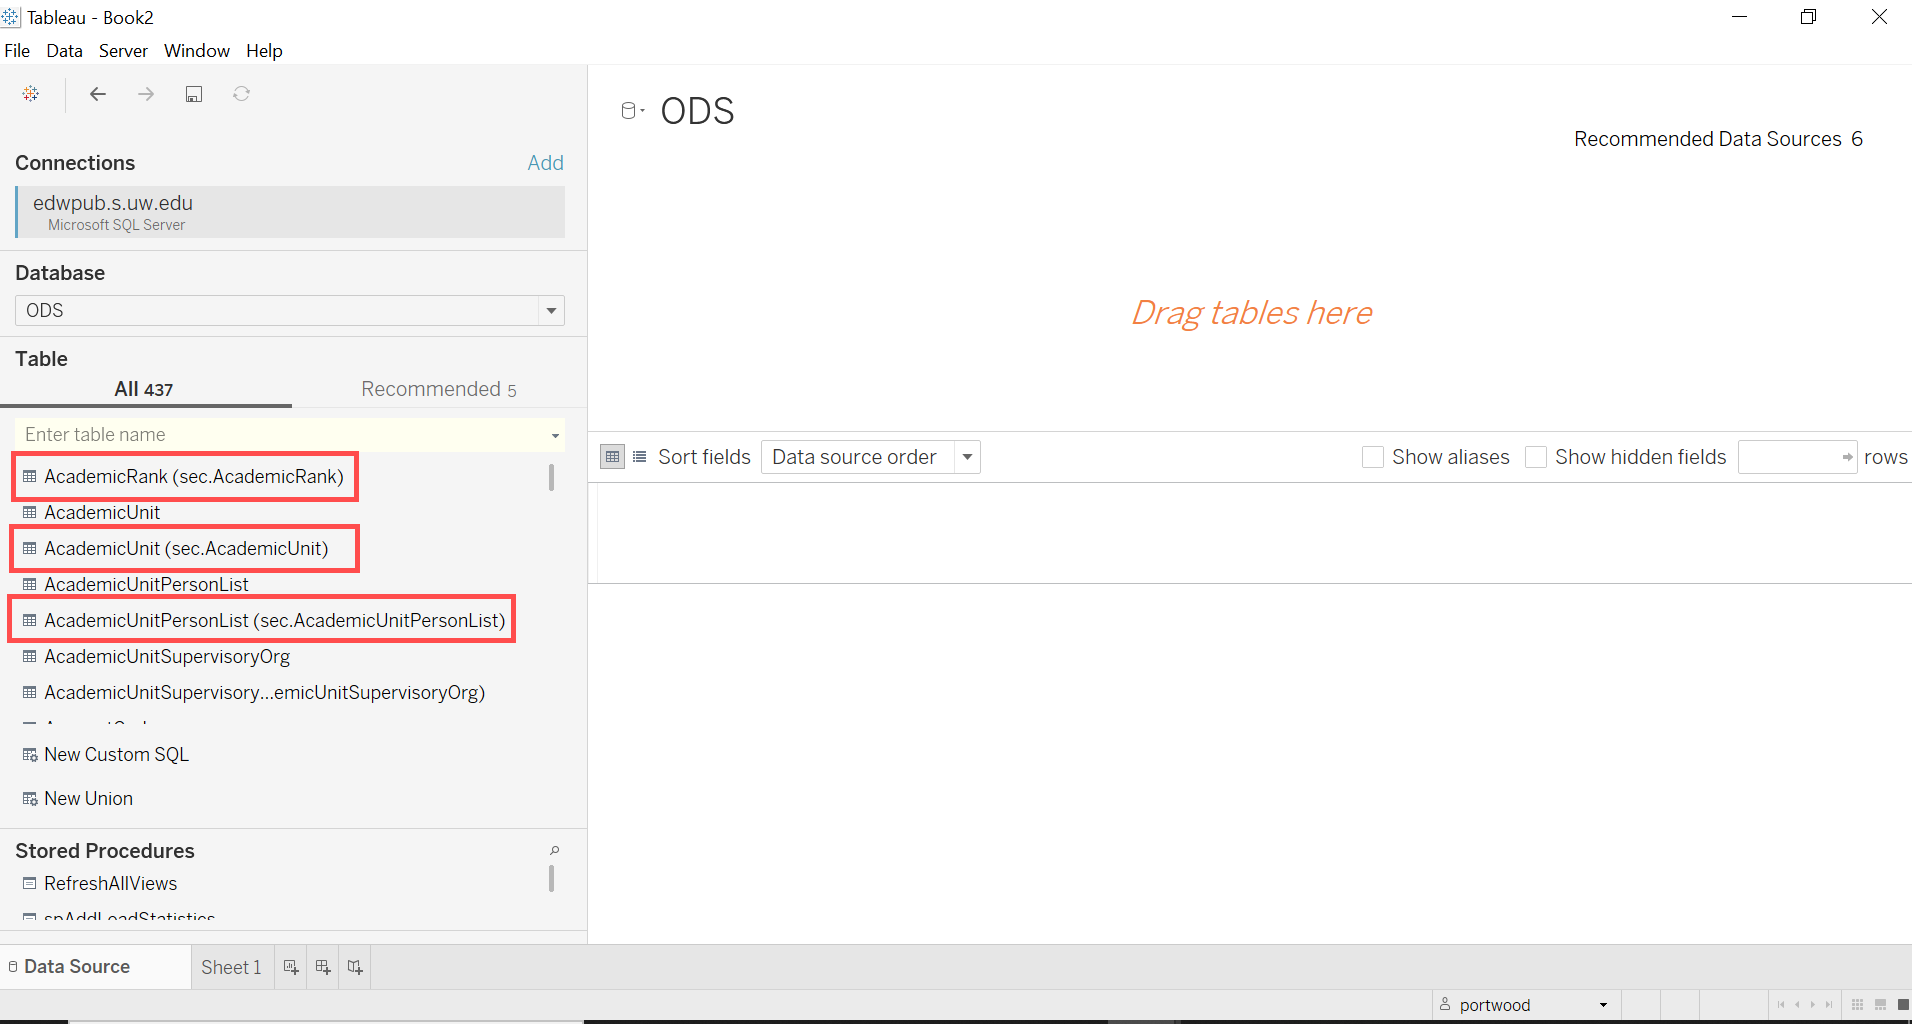
- It’s very important that you only try to query EDW secured views. Secured views are prepended with “sec.” in front of the object name. You will not be able to connect to non-secured tables.
-

How do I connect to a Data Cube?
A data cube is a powerful analysis tool, which allows you to quickly and easily slice and dice data across multiple dimensions, in a single view. To learn more about cubes, including their benefits over traditional analysis tools, such as reports, refer to the What is a Cube introductory video. To find out how to connect to a cube using a specific software, please continue reading the Connection Guides section.
Note: You must be logged into Husky OnNet (VPN) in order to access this video. For more information, refer to Husky OnNet.
Connection Guides:
Note: You do not need to request new access to use cubes if you already have access to run EDW reports and query data. If you need to request access, you can do so at the Request Access page. Access for cubes is managed the same as data in the Enterprise Data Warehouse (EDW) and/or BI Portal. To find out how to verify your access, please see the Access section of this help page.
The following steps outline how to connect to a cube. If you would prefer to receive this information in an alternate format, we also have a simplified Quick Reference Guide (PDF format) and a Getting Started with Cubes: How to Get Connected video.
A template is an Excel Workbook with an established connection to a specific cube; it already has a pivot table (which is what allows you to work with the cube); and it has been populated with one measure.
- Refer to the Templates/Base Workbooks section of the following resource pages for available templates:
- Do one of the following:
If… Then… A template is available… - Download the template to your computer. A popup may also display to prompt you to open the file.
- Open the workbook and explore. If prompted for authentication, enter your UW NetID and password.
A template is not available… Follow the steps under Connect WITHOUT a template or base workbook below.
- Open Microsoft Excel on your computer and start a new blank workbook.
- Display the Data Connection Wizard:
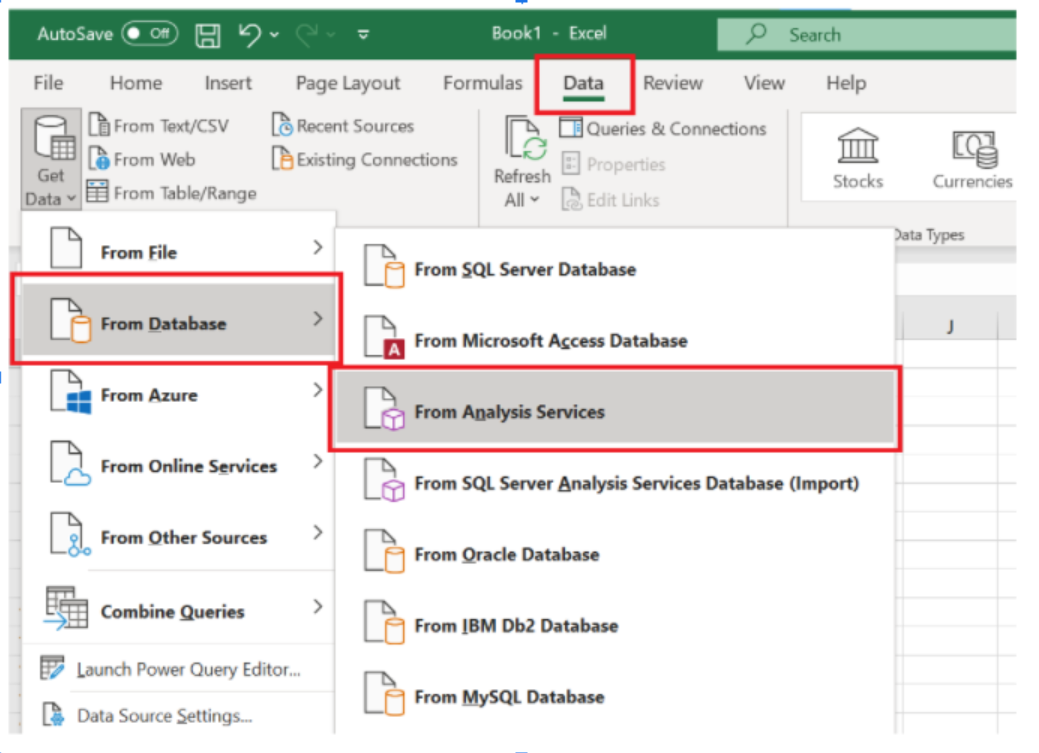
If using… Then… Excel 2016 Select the Data tab, then From Other Sources, and then From Analysis Services. 
Selecting “From Analysis Services” in Excel 2016 Excel 365 Select the Data tab, then Get Data, then From Database, and then From Analysis Services. 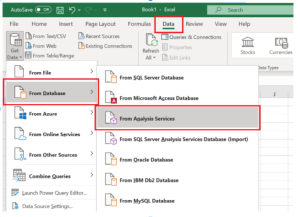
Selecting “From Analysis Services” in Excel 365 -
Field Description Server Name Enter cubes.uw.edu. Log on credentials Select Use Windows Authentication.
Tip: If this does not work, select Use the following User Name and Password, and then enter the following:- User Name: Enter netid\your UW NetID
- Password: Enter your password.Populate the Connect to Database Server window as follows and then click Next.
- Select the cube:
If using… Then… Excel 2016 From the database dropdown, select the applicable cube, then select Model, and then click Finish. Excel 365 From the database dropdown, select the applicable cube, and then click Finish. A dialog to import the data should display.
- Select where you want the table to be located on the worksheet (for example, cell A1) and then click OK.
You are now connected to the cube. You only need to perform these connection steps once per cube. To access this connection when opening a new workbook, select the Data tab, and then click Existing Connections.
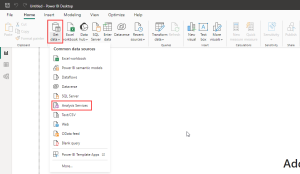
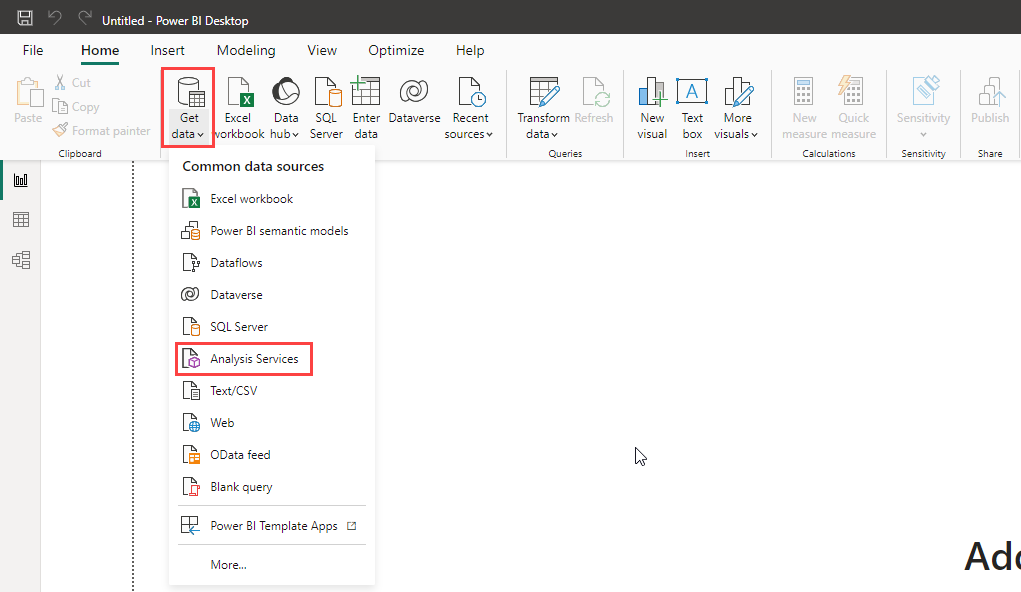
- Open Power BI Desktop.
- On the Home ribbon, select Get Data, then Analysis Services.
Selecting “Analysis Services” in Power BI - Populate the SQL Server Analysis Services database window as follows and then click OK.
Field/Button Description Server Enter cubes.uw.edu. Radio button Select Connect live. - On the Windows tab of the Access SQL Server Analysis Services window, select Use my current credentials, and then click Connect.
- In the left pane of the Navigator window, expand the cube you want to select, select the model or view (if applicable), and then click OK.
You are now connected to the cube. You only need to perform these connection steps once per cube. To access this connection when opening a new workbook, select the Data tab, and then click Existing Connections.
For more information, refer to Connect to Analysis Services tabular data in Power BI Desktop.
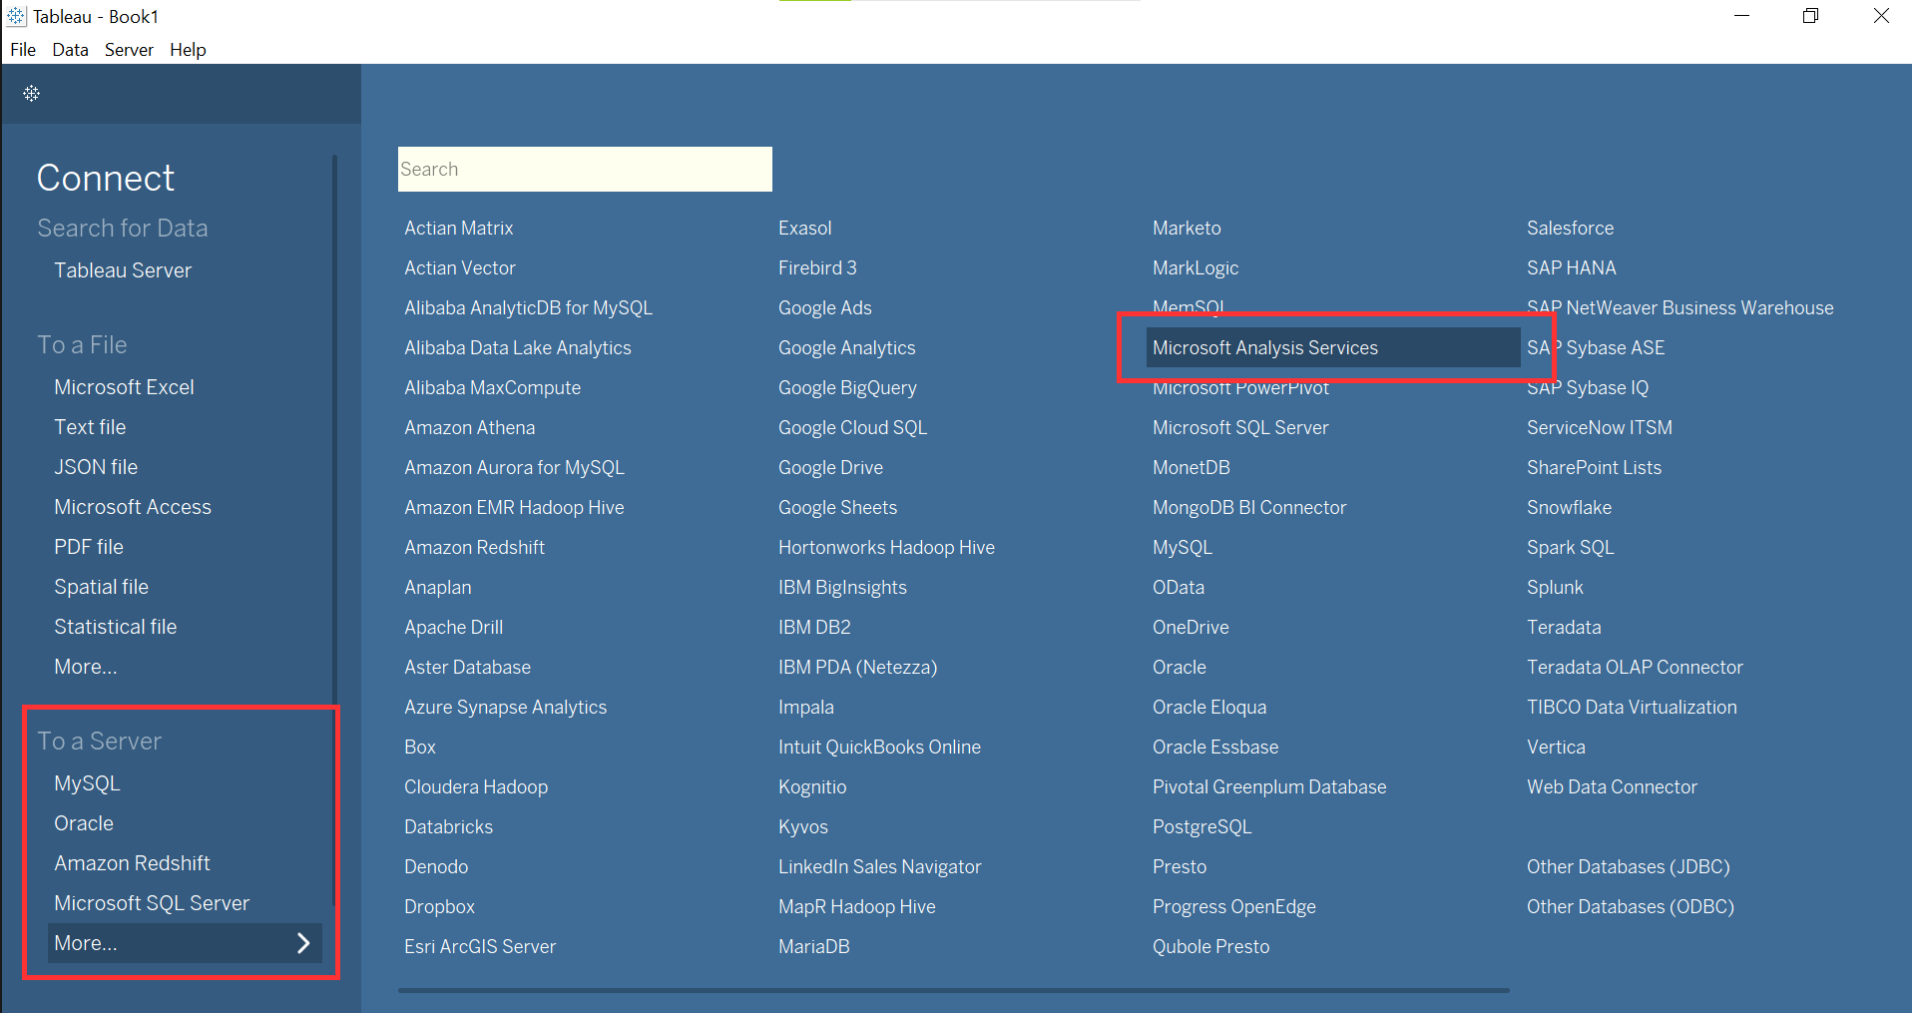
- Open Tableau Desktop.
- From the “To a Server” section, select More, and then Microsoft Analysis Services.

Selecting “Microsoft Analysis Services” in Tableau - On the Microsoft Analysis Services window, select the following, and then click Sign In:
- Select Server and enter cubes.uw.edu into the text field.
- Select Windows Authentication.
- Now that you are connected to the server, choose the Database and Cube you want to explore.

An example of a cube selection The next time you open Tableau and choose Microsoft Analysis Services, it will default to these connection details.

Query Assistance
How should I structure my query to work with secured (.sec) views?
EDW data is structured in “secured views” which secure the data per the rules applied by the UW Data Domain Councils. Once you have created a connection to the data using your UW NetID credentials, you will need to know where the data is housed and the specific query syntax needed to access the data.
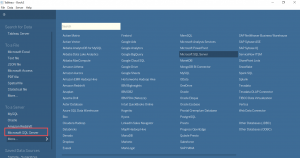
In the following screenshot, notice that there are several databases listed on the EDW server. The databases in the red box are available for querying; the rest are for system management. The Servers and Databases section provides a complete list of available databases.

The data in these databases are secured via views in the Data Access Control (DAC) database. When you query the EDW, you must query the DAC views rather than tables.
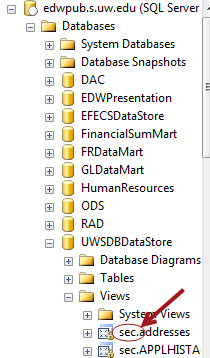
The secured views are denoted by the “sec” schema prefix. The naming convention is sec.TableName, where sec. represents the schema name and TableName represents the original table name.
Sample SQL Query
In the image above, sec.addresses is the view name, and is used in a SQL query as follows:
SELECT *
FROM sec.addresses
WHERE …
Are you trying to find context around the data that you are seeing in the EDW and would like to know more about their meanings? If so, we highly recommend checking out the Knowledge Navigator: Knowledge Navigator V2 (uw.edu). Knowledge Navigator allows you to explore key concepts and definitions from subject areas such as Student, Finance, HR, and Research. KN also visually demonstrates how concepts are related to physical data objects (databases, web services) and business intelligence tools (B.I. Portal, UW Profiles, Data Cubes).
Troubleshooting
What are some basic troubleshooting steps?
If you are having trouble connecting to EDW data, follow the steps below.
-
-
- Verify that you have been granted access to EDW data here: Do I have access to the EDW?
- Be sure to connect using the fully qualified address of the server to which you are connecting. See a list of EDW servers and databases.
Example: The main data server address is edwpub.s.uw.edu. If you cannot connect to that address, use the server’s port number with the name: edwpub.s.uw.edu,1433
* Note: port numbers are not the preferred method of connection. If the port changes, users’ connections break. (Technical details: port numbers have been needed by some users to connect to named instances residing on clustered servers.) - If you are connecting remotely (off-campus), check to make sure you are connected to the VPN using Husky OnNet.
- If you used a RunAs command to open your query tool and connect to the EDW, modify the command to remove /netonly from the string. You may need to cycle through the steps above again.
- Check that your computer is trusted by the UW Services CA Root Certificate. (The user’s error message may refer to an SSL Security error). See more about the CA Root Certificate.
-