UW Spend Cube Now Available
The UW Spend cube is now available. This story will prepare you to connect to and analyze UW Spend data! Jump to a section to learn more:
What is the UW Spend Cube?
The UW Spend cube is a powerful and flexible data and reporting tool that helps you easily access and analyze UW Spend data. Beginning in Summer 2020, the UW-IT Business Intelligence Team partnered with the Finance DATAGroup to prototype, build, and publish the “UW Spend Cube.” The DATAGroup had 2 cubes: a spend cube and a diversity cube. This project consolidated the two cubes into one using data available in the Enterprise Data Warehouse (EDW).
This work was made possible by the prior efforts of the DATAGroup and the EDW Team to add Spend data to the EDW (IT Connect News Story). The data currently available in the EDW and consequently in the UW Spend Cube is from FY2017, i.e. July 1, 2016. For the older data, you may find that not all suppliers are in the EDW. This is because purchases from these suppliers were paid using Procard and the spend activity is attributed to Procard rather than an individual supplier. Starting with July 20, 2017, using the TIN (Tax Identification Number) matching, the spend is attributed to the individual suppliers.
Who Should Use It?
The UW Spend Cube was built for anyone who needs to access UW spend data to do their work. This includes, but is not limited to Fiscal Techs, Departmental Administrators, and the UW Procurement Office.
During development we received feedback and input from campus stakeholders representing:
- UW Finance DATAGroup
- Research Compliance and Operations
- Procurement Services
- Office of Vice Provost Research
- UW Facilities
Thank you to all of our campus stakeholders for your feedback, testing, and contributions!
How to Connect to the UW Spend Cube:
Unlike a report which you can run in the browser, you have to connect to a cube with an analysis tool (like Excel or Tableau). To connect to a data cube you must be connected to the UW network, either physically in the office or through a VPN (Virtual Private Network). We recommend the UW-IT supported Husky OnNet VPN. You can learn more about how to download and use this VPN on IT Connect: Download and use Husky OnNet
Connecting with Excel 2016:
These are the most common instructions for Excel users. However, if you’re using a different version of Excel, and you don’t see these options, then we have alternative steps below!
- First, open up a new Excel workbook
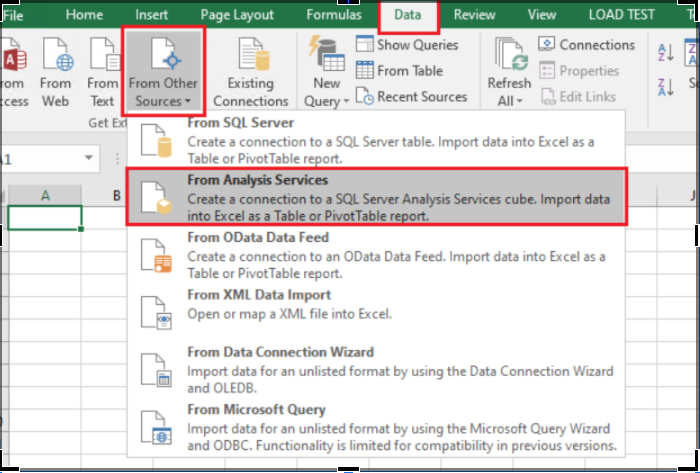
- On the top header click “Data.”
- On the Data ribbon, choose “From Other Sources.”
- Select “From Analysis Services” from the drop-down menu.
- A pop-up, “Data Connection Wizard,” should appear on your screen with the first dialog box – Connect to Database Server:
- For Server Name, copy and paste: cubes.uw.edu
- Use Windows Authentication. If this does not work, select “Use the following User Name and password” and fill in your user name and password as follows:
- User Name: netid\your UW NetID
- Password: your password
- Click “Next.”
- On the “Select Database and Table” dialog box, select “UW Spend Cube” from the drop-down menu at the top. Click “Next.”
- On the “Save Data Connection File and Finish” dialog box leave everything as is and click “Finish.”
- You should now have a pop-up to import the data. Select where you want the table to be located on the worksheet (e.g. cell A1) and you can press “OK.”
Now you’re connected! Congratulations, the hardest part is over!
Connecting with Excel 365
- First, open up a new Excel workbook:
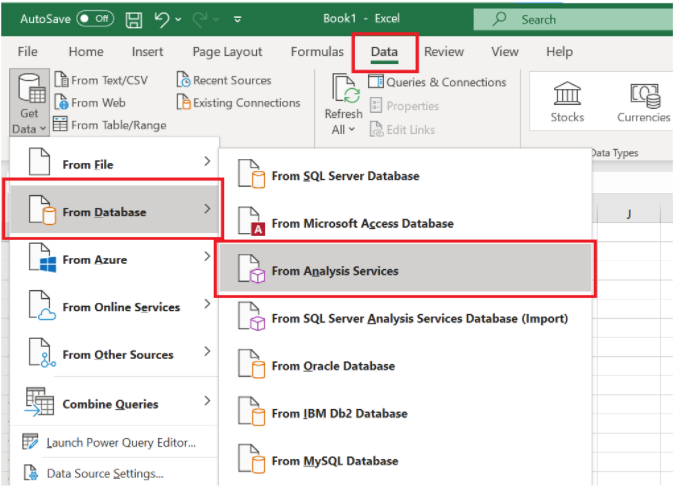
- On the top header, go to “Data.”
- On the Data ribbon, click “Get Data.”
- Choose “From Database,” then select “From Analysis Services.”
- A pop-up, Data Connection Wizard, should appear on your screen with the first dialog box – Connect to Database Server:
- For Server Name, copy and paste: cubes.uw.edu
- Use Windows Authentication. If this does not work, select “Use the following User Name and password” and fill in your user name and password as follows:
- User Name: netid\your UW NetID
- Password: your password
- Click “Next.”
- On the “Select Database and Table” dialog box, select “UW Spend Cube” from the drop-down menu at the top. Click “Next.”
- On the “Save Data Connection File and Finish” dialog box leave everything as is and click “Finish.”
- You should now have a pop-up to import the data. Select where you want the table to be located on the worksheet (e.g. cell A1) and you can press OK.
That’s it! You’re connected and can begin dragging, dropping, and analyzing UW Spend data.
How to Learn More
If you’ve ever used an Excel Pivot table then we’re confident that you can learn the cube technology. But if you need help getting connected, understanding data definitions, or doing basic analysis, we have a solution for that!
Please visit our Reporting and Analytics Training space for self-service training content including:
- How to Videos for tools like our Financial Activity Cube
- Or consider joining us for one-on-one help at our Office Hours: Enterprise Reporting and Analytics!
You can also explore data definitions and business term definitions here in the Knowledge Navigator: UW Spend Cube Data Definitions
Finally, if you need help from someone on our team or if you’d like to request a demonstration for your department, please write to us at help@uw.edu and include “UW Spend Cube” in your subject line!