This information applies to: Old Mailman
On This Page
- Starting a Mailman list
- Distinguishing list owners from moderators
- Maintaining your Mailman list
- Changing owner configuration options
- Additional Information for List Owners
See also Mailman policies.
Starting a Mailman list
To start a Mailman list, fill out the Standard Mailman List Request form. Mailman lists may take up to two business days to be created, and Instructor Class Lists take an additional day to have the students automatically subscribed. Note: Internet Explorer versions 9 and earlier are not supported; instead of using the form, email your list request to help@uw.edu.
Mailman lists for classes
Use the My Class Resources section in MyUW to request class lists. These class lists are created at the time they are requested and will be ready to use the following day. For cross-listed courses or combinations of courses where the instructor wants a single list and cannot request one through MyUW, submit a request for a class list by filling out the Class Mailman List Request form.
Review list configuration
Once you have your list set up, review the list’s settings.
- To review your list’s configuration settings, go to https://mailman.u.washington.edu/mailman/admin/listname/
(where listname is replaced with the actual name of your list).- For example, if the name of your list is uwsports, you would go to
https://mailman.u.washington.edu/mailman/admin/uwsports/
- For example, if the name of your list is uwsports, you would go to
- To log in with your UW NetID and password, click log in.

- Once you are logged on to the administration site for your list, you should see the Configuration Categories at the top of the page.
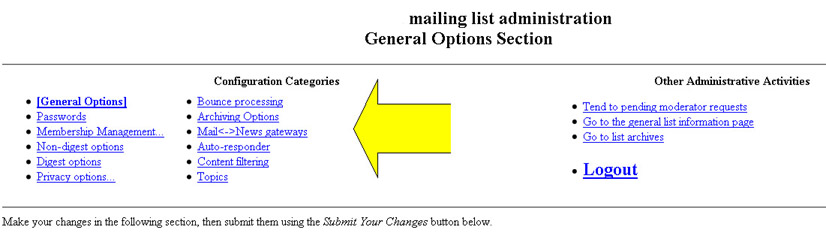
- Sub-categories for Membership Management and Privacy Options can be accessed when you enter each of those categories. Browse through the available configuration screens to become familiar with the options.
- Click on each option for more information. The List Configuration Options page gives you additional information.
Get the list ready for use
Once you have familiarized yourself with your list’s configuration and options, you will want to set up an info file, welcome message, and goodbye message. All of these options can be found in the General Options section of the administration pages.
-
Info file
The info file should be a brief introductory description about the list. It will be included at the top of your list’s information page at
http://mailman.u.washington.edu/mailman/listinfo/listname/
where listname is replaced with the actual name of your list. -
Welcome message
The welcome message will be added to the generic welcome message from Mailman and will be sent to all new subscribers if you choose that option. See the welcome_msg and send_welcome_msg settings.
-
Goodbye message
The goodbye message is similar to the welcome message except that, as its name implies, it is sent to subscribers who are leaving the list. See the goodbye_msg and send_goodbye_msg settings.
Subscribe yourself
When you establish a Mailman list, you are not automatically added as a subscriber. This means that you must subscribe yourself if you want to receive messages that are posted to the list. To add yourself to your list, go to the Membership Management section of your list’s administration pages and choose the Mass Subscription category. Now is a good time to test your welcome message so make sure that the “Send welcome messages to new subscribers” option is marked “Yes” and put your address in the box. If you are just subscribing yourself, you probably don’t need to send a notification of the new subscription to the list owner so you can mark that option “No”. When finished, don’t forget to click on the “Submit Your Changes” button.
Of course, you do not need to subscribe yourself to your list if you do not want to. Keep in mind, however, that some lists are configured to only allow subscribers to post messages. If you are an owner of such a list and do not subscribe yourself, your posts will not be accepted by the list.
Get subscribers
As you might imagine, mailing lists need subscribers to be worthwhile. How you get them will depend on what your list is for. If it is for a class or small group of people, then you can probably tell people about the list in class, email them, or even add them yourself. Learning how to add subscribers is easy.
If your list is intended for a larger body of subscribers, you might want to post information about your list to a Usenet newsgroup, or mention it on a Web page.
Subscribers will generally want to know the following information:
- Name of the list
- Purpose of the list
- Restrictions on the use of the list
- How to subscribe
- How to unsubscribe
You’re set!
Once you’ve done the above, that’s pretty much it. The only times you’ll really need to be active as a list owner are:
- If your list is a private or moderated list
- If and when you receive error messages
- If you have a problem subscriber or spammer
To learn how to deal with these issues, click on the related links. These subjects, as well as others, are all covered in Maintaining a Mailman List. And if all else fails, you can send email to help@uw.edu as a last resort.
Enjoy your list!
List owners and list moderators
Each Mailman list has at least one owner. Some lists also have a moderator. The moderator is appointed by the owner to be in charge of list subscriptions and postings.
List owner
Each list must have an owner who is responsible for configuration, maintenance, and operation of the list. The list owner may establish other owners, and may optionally have others take roles such as moderating the discussion or managing subscription requests. List owners can execute commands for their subscribers, including adding and deleting subscribers. List owners receive all requests for moderation from the server that moderators receive, so even with a moderated list, it is not necessary to specify a moderator. Each list must have at least one owner who is a current student, faculty, or staff at the University of Washington.
List moderator
List moderators are optional. They are assigned by the owners and can manage list subscriptions and postings. Moderators do not have access to the administration pages and cannot make changes to configuration settings.
Accessing Mailman web pages
Owners and moderators may have different authentication methods for accessing the Mailman Web pages.
- All list owners will click on the log in link to log in with their UW NetID and password on the administration pages at https://mailman.u.washington.edu/mailman/admin/listname/ (where listname is replaced with the actual name of your list).

- Moderators can log in at https://mailman.u.washington.edu/mailman/admindb/listname/

- The list moderator has two options for authentication.If the moderator is listed with their @u.washington.edu address, they should use the “log in” link on the moderator page to log in with their UW NetID and password (the same way the list owner does above).If the moderator is listed with a non-UW address (or a departmental UW address), a moderator password must be set by the list owner and that password should be entered into the List Moderator Password box on the moderation page. After entering the password, click on the Let me in button.

For information about how to specify a list moderator, assign a moderator password, and configure your list as a moderated list, see the Managing Private and Moderated Lists.
Maintaining a Mailman list
Accessing your list administration screen
When your list is created and you are designated the “owner” (or “administrator”), you receive a welcome message that:
- Informs you that your list is active
- Gives you the URL to use to handle list administration
If you do not keep this email message or can’t remember the URL, just follow the steps below.
To access your list administration features:
- Go to your list’s administration page at
https://mailman.u.washington.edu/mailman/admin/listname/
where listname is replaced with the actual name of your list. For example, if the name of your list is “foobar”, your list’s administration page would be at
https://mailman.u.washington.edu/mailman/admin/foobar/ - Click on the “Log in” link to log in with your UW NetID and password.
Navigating your list administration pages
After you log in to your list administration page, you will see a number of Configuration Categories links at the top of the page.
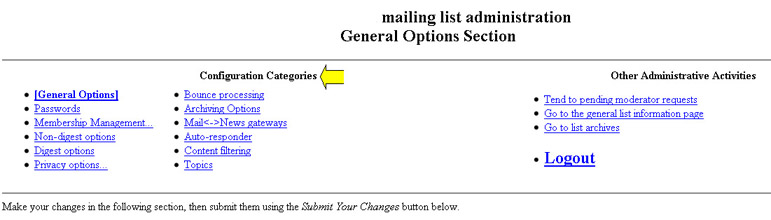
You can follow each link to access all of your list settings. For more information on the available settings, see the List Configuration Options page.
Changing maximum message size
Mailman can place a limit on the size of a message that it accepts for list postings. The owner can change the limit to try to restrict or allow attachments to be sent to the list.
To change the maximum message size limit
- Log in to the list’s administration page at https://mailman.u.washington.edu/mailman/admin/listname/
(where listname is replaced with the actual name of your list) with your UW NetID. - Go to General Options.
- Near the bottom, locate the “Maximum length in Kb of a message body” field.
- Change the limit to something suitable, or enter “0” for the maximum server limit of 10 MB.
- When finished, click the “Submit your changes” button. Your changes are now in effect.
Note: If you have a message that is larger than 10 MB, you will not be able to send it to your list. We recommend breaking up the attachment into multiple smaller attachments and sending them separately or posting the attachment on a Web page and sending only the URL to the list.
Managing private and moderated lists
You can configure your list to require approval by the list owner or moderator before someone can subscribe, unsubscribe, or post a message to the list. Here’s how:
To specify a list moderator who is not the list owner
- Log in to the list’s administration page at https://mailman.u.washington.edu/mailman/admin/listname/
(where listname is replaced with the actual name of your list) with your UW NetID. - Go to the General Options configuration category and specify a moderator address. If adding more than one moderator, type each address on a separate line. When finished, submit your changes at the bottom of the screen.

- If your moderator does not have an @u.washington.edu email address, go to the Passwords configuration category and assign a moderator password.
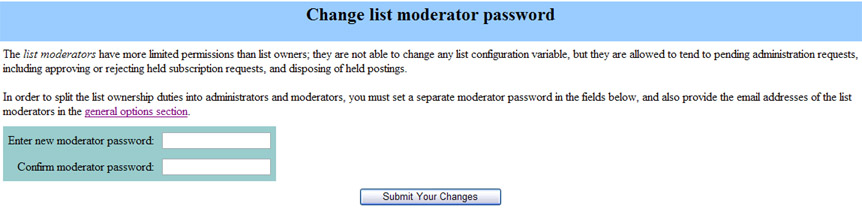
Note: If your moderator does have an @u.washington.edu email address, he will be able to log in to the moderation page with his UW NetID and password.
To require approval by the list owner or moderator before someone can subscribe or unsubscribe
- Log in to the list’s administration page at https://mailman.u.washington.edu/mailman/admin/listname/
(where listname is replaced with the actual name of your list) with your UW NetID. - Go to the Privacy options configuration category.
- To require approval to subscribe, set the subscribe_policy setting to “Require approval” or “Confirm and approve” (the latter requires that subscribers using non-@u.washington.edu addresses confirm their subscription once you have approved it).

- To require approval to unsubscribe, set the unsubscribe_policy setting to “Yes”.

Note: It is not recommended to require approval for unsubscribing. - When finished, click the Submit Your Changes button.
To require approval of postings to a moderated list
- Log in to the list’s administration page at https://mailman.u.washington.edu/mailman/admin/listname/
(where listname is replaced with the actual name of your list) with your UW NetID. - Go to the Sender filters configuration category under Privacy options.
- Set the default_member_moderation setting to “Yes” and select the desired moderation action in the member_moderation_action setting. This will affect future subscribers. To update moderation settings for current subscribers, go to Step 4.

Note: There are also settings for messages coming from non-member addresses. You can choose to automatically accept, hold, reject or discard messages from all non-member addresses by setting the generic_nonmember_action setting. You can also add specific non-member addresses or domains to the accept_these_nonmembers, hold_these_nonmembers, reject_these_nonmembers and discard_these_nonmembers settings.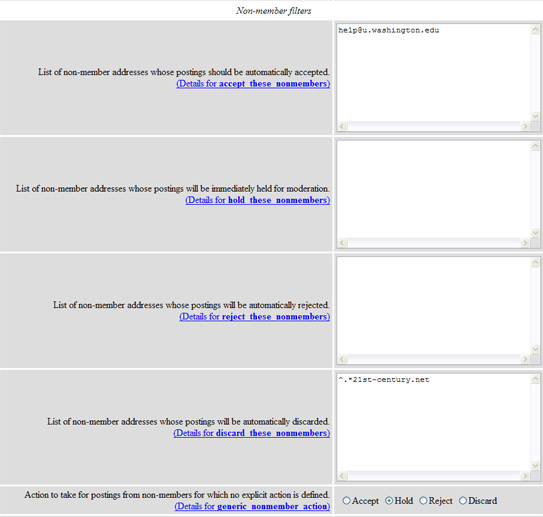
- To update moderation settings for current members, go to your Membership Management page.
- Under Additional Member Tasks, find the option to “Set everyone’s moderation bit, including those members not currently visible.”

- Set this option to “On” and click the “Set” button. (All of the addresses in your Membership list should then have a check mark in the “mod” [moderate] column.)
- When finished, click the “Submit Your Changes” button.Note: If your list has been set up as a moderated list, only those messages you approve are delivered to list members. Whenever a new message arrives for a moderated list, a notice is sent to the list owner and the list moderator (if there is one). You can control when you receive the moderation notification (immediately or once daily) by setting the admin_immed_notify setting in the General Options configuration category.

To view the requests requiring approval by the list owner or moderator
- Log in to the list moderator page at https://mailman.u.washington.edu/mailman/admindb/listname/
(where listname is replaced with the actual name of your list). - Owners and moderators using their @u.washington.edu address should follow the log in link to log in with their UW NetID and password.

- Moderators not using an @u.washington.edu email address should enter their moderator password in the box provided and click the Let me in button.

- View the summary list of subscription requests, unsubscribe requests, and postings being held for approval.
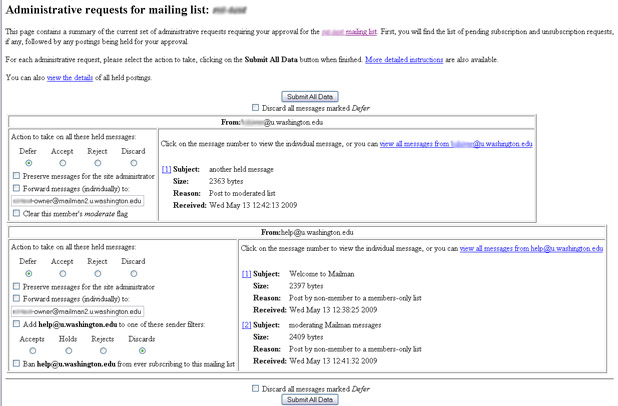
- Follow the More detailed instructions link towards the top of the page for an explanation of each option (i.e., Defer, Accept, Preserve, etc.).
- You can add a filter to always treat message from the sender in the same way, for example, always reject messages from the sender.
- You can click on the view the details link to view the message body of all of the held messages click the view all messages from link to view the message body of all messages sent from a single address.
- Or use the numbered links next to each Subject line to view individual messages.
- Each of those screens will allow you to act on the pending requests.
- After you have acted on all of the pending requests, click the Submit All Data button.
Email messages from owners and moderators are treated the same as all other messages for the list. For more information about giving owners and/or moderators permission to post to the list, see the “Why are messages from the list owner moderated?” in the Mailman FAQ.
If messages are being held for moderation and you don’t understand why, see the “Why am I getting moderation requests for my unmoderated list? in the Mailman FAQ.
Handle bounce error messages
When email to a subscriber is bouncing, Mailman tries to interpret the bounced message and act accordingly. When a bounced message is received, Mailman attempts to extract two pieces of information from the message:
- The email address of the subscriber whose email is bouncing.
- The severity of the problem causing the bounce.
If no email address for the subscriber can be extracted from the bounce, then the bounce is usually discarded.
The severity of the problem can be labeled as either hard (meaning a fatal error) or soft (meaning a temporary error occurred). When in doubt, a hard severity is assigned.
Each subscriber is assigned a bounce score and every time Mailman encounters a bounce from this member, the score goes up. Hard bounces increase the score by 1, while soft bounces increase the score by 0.5. However, bounce scores are only increased once per day so even if ten hard bounces are received for the same subscriber in one day, that subscriber’s score will increase by only 1 for that day.
To adjust settings regarding bounced messages
- Log in to the list’s administration page at https://mailman.u.washington.edu/mailman/admin/listname/
(where listname is replaced with the actual name of your list) with your UW NetID. - Look under the Bounce Processing configuration category to adjust the following bounce settings:
- Score threshold: For each list, the list owner can set a bounce score threshold. When a member’s bounce score exceeds the list’s bounce score threshold, the subscriber’s subscription is automatically disabled. Once disabled, the subscriber will not receive any postings from the list until their membership is explicitly re-enabled (either by them or the list owner). However, they will receive occasional reminders that their membership has been disabled, with information about how to re-enable it.
- Reminders: The list owner can control both the number of reminders the subscribers will receive and the frequency with which the reminders are sent.
- Info stale: After a certain period of time during which no bounces from the subscriber’s address are received, the bounce information is considered stale and discarded.
Note: By adjusting the “bounce_score_threshold” and “bounce_info_stale_after” setting, you can control how quickly members with bouncing email are disabled. You should set both of these to the frequency and traffic volume of your list.
- When finished, click the Submit Your Changes button.
If Mailman cannot interpret a particular bounced message error, it will be forwarded on to the list owner. The hardest thing to do upon receiving the error message is to interpret it – especially if Mailman was unable to! Error messages consist, for the most part, of email techno-garbage that you’d need to be some sort of email expert to understand completely. You can ignore much of the message as long as you know what’s important to focus on. Look for a line that says something like:
Mail could not be delivered to:
followed by an email address. If you find such a line, you’re in luck. Now you know whose email is bouncing and you may even know why (it will sometimes say the reason right after the email address).
What you’ll need to do is decide whether the reason is temporary or permanent. Sometimes the best way to make that decision is to wait a few days or a week and see if you are still receiving error messages from the same subscriber. If so, you’ll probably want to remove that subscriber from your list. (See Adding and Deleting Subscribers below for more information.)
If all else fails and you can’t figure out the errors you’re getting, don’t hesitate to seek assistance by forwarding a copy of the error message to help@uw.edu
Getting a list of your subscribers
To see who is subscribed to your list
- Log in to the list’s administration page at https://mailman.u.washington.edu/mailman/admin/listname/
(where listname is replaced with the actual name of your list) with your UW NetID. - Go to Membership Management.
- View a list of your current subscribers as well as their mail options. Click on the “Click here to include the legend for this table” link just above the table of members to view more information about the different mail options.Note: If there are 30 or more addresses subscribed to your list, Mailman will display them alphabetically on separate pages. To view them all on a single page, scroll down to the Additional Member Tasks section on the Membership List page. Increase the number in the Set a threshold of the number of members before split up alphabetically setting and click the Set button.
Adding and deleting subscribers
To add subscribers to your list
- Log in to the list’s administration page at https://mailman.u.washington.edu/mailman/admin/listname/
(where listname is replaced with the actual name of your list) with your UW NetID. - Go to the Membership Management section.
- Go to Mass Subscriptions.
- Select the option of subscribing addresses or inviting them to subscribe. Subscribing them will add them to the list immediately. Inviting them to subscribe will send them an email message and they will have to confirm that they want to be added to the list.
- Choose whether or not to send a Welcome message to the addresses that you are adding.
- Choose whether or not to send notifications of new subscriptions to the list owner.
- After choosing your preferred options, enter the email addresses (one per line) in the box provided. If you want to include a name with each address, make sure each line is in the following format: name <email_address>
Note: Remember to include the brackets around the email addresses. For example: Joe User <joeuser@u.washington.edu>
You can also choose to upload a file that contains your subscribers. The file must be plain text. The names and email addresses should be in the same format specified above. Do not upload a Word or Excel file. It is also not a good idea to copy and paste addresses from Word or Excel into the subscription box as this often results in hidden space characters being included at the end of the address, causing the email address to be invalid.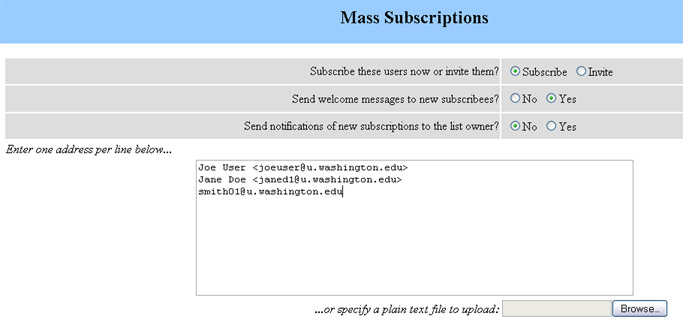
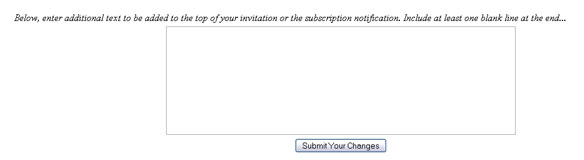
- If you want to include additional text to be added to the top of your invitation or the subscription notification (welcome message), include it in the box provided. The text will be added above any custom text specified in the welcome_msg setting under General Options.
- When finished, click the Submit Your Changes button.
Deleting subscribers
To remove one or more addresses from your list
- Log in to the list’s administration page at https://mailman.u.washington.edu/mailman/admin/listname/
(where listname is replaced with the actual name of your list) with your UW NetID. - Go to the Membership Management section.
- Click in the box in the first column (the unsub column) next to the address of each subscriber you want to delete.
- When finished, click the Submit Your Changes button.
OR
- Log in to the list’s administration page at https://mailman.u.washington.edu/mailman/admin/listname/
(where listname is replaced with the actual name of your list) with your UW NetID. - Go to the Membership Management section and then to the sub-category Mass Removal.
- Choose whether or not to send acknowledgement of the removal to the user being removed.
- Choose whether or not to send a notification of the removal to the list owner.
- Enter the email addresses you want to remove (one per line) in the box. Do not include names with the email addresses.

- When finished, click the Submit Your Changes button.
Note: If you wish to remove all subscribers from your list, there is that option on the Mass Removal page. That option only works if you choose not to notify the users and owners.
Dealing with problem subscribers
It is possible that someday a person will use your list inappropriately by sending irrelevant messages, large numbers of messages, or demeaning messages. If this happens, you have several options:
- Post a statement of appropriate use and conduct to the list.
- Unsubscribe the offending user (see the Deleting subscribers section above). If your list is set up so that only people who are subscribed to the list can post messages to it, this method will effectively exclude them from the list. [Note: If your list is set up to allow open subscriptions, the person could simply resubscribe.]
- If the offending user is a UW student, faculty, or staff, report the inappropriate use to UW Information Technology by sending an email message to help@uw.edu describing the situation and including samples of the offending messages. Unethical use of University computing resources can be grounds for disciplinary action, including loss of computer accounts.
- Add the person’s email address to the list of addresses which are banned from membership on your list.
To ban someone from your list
- Log in to the list’s administration page at https://mailman.u.washington.edu/mailman/admin/listname/
(where listname is replaced with the actual name of your list) with your UW NetID. - From the list of configuration categories, select Privacy Options. This will default to the Subscription Rules sub-category.
- Add the offending user’s email address to the ban_list setting.
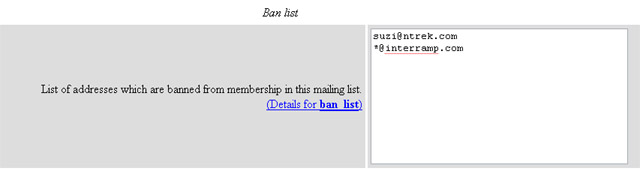
- When finished, click the “Submit Your Changes” button.
You may also want to review the Mailman owner and usage Policy section (above) and Etiquette Guidelines for Posting Messages.
Adding or deleting list owners
To add or delete owners
- Log in to the list’s administration page at https://mailman.u.washington.edu/mailman/admin/listname/
(where listname is replaced with the actual name of your list) with your UW NetID. - Under General Options, you will see an owner setting where all of the current owners are listed.

- Edit this list to add or remove owners. All owners must have a valid UW NetID. [Note: It is a good idea to double-check the spelling of the owner addresses.]
- When finished, click on the Submit Your Changes button.
Deleting Your List
If you decide that you no longer need your Mailman list, fill out the Mailman List Deletion Request Form or send email to help@uw.edu and ask to have the list deleted.
Changing owner configuration options
Mailman performs lots of functions in addition to distributing messages to subscribers. It allows you to do a task, like subscribing to a list or changing how a list works, by going to a specific Web address.
- Owners can go to the list administration page at
https://mailman.u.washington.edu/mailman/admin/listname/where listname is replaced with the actual name of the list. - List owners and moderators can go to their list’s moderation page at
https://mailman.u.washington.edu/mailman/admindb/listname/when there are subscription requests or messages to be moderated.List owners should use their UW NetID and password to authenticate to the administration and moderation pages. Each of those pages will have a “log in” link to allow access via UW NetID. There is an optional Moderator Password that can be set by the list owner for moderators who do not have a UW NetID.
Additional information for list owners
You can find more information about list configuration options on the List Configuration Options page.
If you are looking for more information about using regular expressions with Mailman, see the Regular Expressions in Mailman page.