Sorting Data
When you have finished entering your data into your spreadsheet, you may want to sort the data so that it is easier to view and search. For example, you can put a list of names in alphabetical order, or order number entries in numerical order. You can sort data in a column either in ascending or descending order.
To sort data in a column:
- StepsActions
- Select the column you want to sort by clicking the column letter.
- Click the Home tab.
- Click the Sort and Filter button from the Editing group.
- Click
 if you want to order the data in ascending order, or click
  if you want to order the data in descending order.
Complex Sorts
You may need to sort your data by more than one column. For example, if you have assigned team projects to your undergraduate class, you could have a column for the project names and a column for the student names, as shown below.

You can first sort all the student names into the project groups, and then put the student names in alphabetical order within each project group. To sort by multiple columns:
- StepsActions
- Select all the columns that you want to sort.
- Click the Home tab.
- In the Editing group, click Sort & Filter.
- Click Custom Sort. The Sort dialog box opens.
- From the Column dropdown menu, select the first column you want to sort.
- From the Order dropdown menu, select A to Z if you want to sort in ascending order, or Z to A if you want to sort in descending order.
- You will now need to add new levels for the remaining columns you want to sort. You can add a new level by clicking the Add Level button, and choosing which level you want to sort from the Then by dropdown menu.
- Enter the columns and values for each of the columns you want to sort.
- Click OK.
Autofill
The Autofill feature allows you to quickly fill cells with repetitive or sequential data such as repeated text, or chronological dates and numbers.
Autofill Dates
To autofill a sequential series of dates:
- StepsActions
- Enter the first date of the series into a cell.
- Click the handle in the bottom-right corner of the cell and drag it down as many cells as you want to fill.
Autofill Numbers
To autofill a sequential series of numbers:
- StepsActions
- Enter the first number of the series into a cell.
- Enter the second number of the series into the adjacent cell.
- Select both cells by clicking and dragging the mouse over them.
- Click the handle in the bottom-right corner of the second cell and drag it over as many cells as you want to fill.
To autofill the same number or text into a column or row of cells:
- StepsActions
- Enter the number or text into a cell.
- Click the handle in the bottom-right corner of the cell and drag it over as many cells as you want to fill.
Alternating Text and Numbers with Autofill
You can use the autofill feature to fill multiple cells at once. For example, to make a repeating list of the days of the week, type the seven days into seven adjacent cells in a column or row. Highlight the seven cells, click the handle in the bottom-right of the last cell, and drag it over as many cells as you want to fill.
Autofill Functions
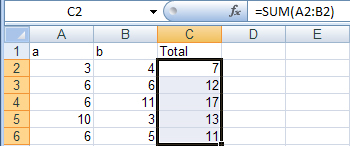
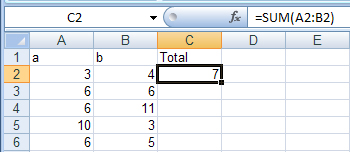
Autofill can be used to copy functions. In the example below, column A and column B contain lists of numbers and column C contains the sum of columns A and B for each row. The function in cell C2 would be “=SUM(A2:B2)”. To copy this function to the remaining cells of column C, follow these steps:
- StepsActions
- Select the cell that contains the function you want to copy. In the example below, cell C2 is selected.
- Click the handle in the bottom-right corner of the cell and drag it down as many cells as you want to fill. In the example below, the sum of columns A and B can now be found in column C for each of the rows selected.