Much More Than a Pen
The Pen tool is probably the most powerful tool in Adobe Illustrator. It allows the artist to create shapes with freeform curves, and with time and skill, most curves found in the “real world” can be duplicated using the Pen tool.
Before you start using the Pen tool, there are some things to note in that it doesn’t work the way you think it would. It does not draw wherever you drag, like the Paintbrush or Pencil tools. Notice if you click and drag immediately, all it seems to do is make a straight line with dots at each end. Before you can understand the Pen tool, you need to know what that line is: a path. (The following information was obtained from the Illustrator online help).
About Paths
A path is made up of one or more straight or curved “segments.” The beginnings and ends of each segment are marked by “anchor points,” which work like pins holding a wire in place. You change the overall shape of a path by editing its anchor points, and control a curve by dragging the “direction points” at the end of the “direction lines” that appear at anchor points.
A path is either open, like an arc, or closed, like a circle. For an open path, the starting and ending anchor points for the path are called its “endpoints.”
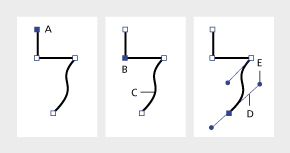
A. Selected (solid) endpoint
B. Selected anchor point
C. Curved path segment
D. Direction line
E. Direction point
Paths can have two kinds of anchor points”corner points” and “smooth points.” At a corner point,”a path abruptly changes direction. At a smooth point, however, path segments are connected as a continuous curve. You can draw a path using any combination of corner and smooth points. You can always change point types if need be.
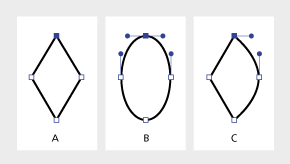
A. Four corner points
B. Same point positions using smooth points
C. Same point positions combining corner and smooth points
Don’t confuse corner and smooth points with straight and curved segments! A corner point can connect any two straight or curved segments, while a smooth point always connects two curved segments.

A corner point can connect both straight segments and curved segments.
Drawing Straight Segments
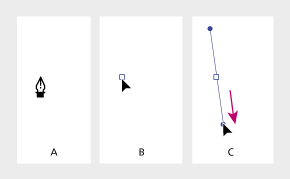
The main thing to keep in mind when you want to draw straight segments is to not drag the mouse after you click. An anchor point appears wherever you click with the Pen tool and, as we learned above, anchor points join line segments. So you need to click at least twice in order to create a line segment.
You can continue to make additional line segments by clicking. To complete your path, you can either close the path or leave it “open.” To close a path, position the Pen tool over the first anchor point you made (you should see a small loop appear next to the Pen tool when you are positioned over the first anchor point) and click once. To leave a path open, simply do one of the following: a) select a different tool, b) press the button, c) – or -click on the artboard away from all objects, or d) choose Edit > Deselect All.
Drawing Curved Segments
You create curves by using the Pen tool to add anchor points where a curve changes direction, and to drag the direction points that shape the curves.
Curves are easier to edit and your system can display and print them faster if you draw them using as few anchor points as possible. Using too many points can also introduce unwanted bumps in a curve. Instead, draw widely spaced anchor points, and practice shaping curves by adjusting the length and angles of the direction lines.
To draw a curved segment:
- StepsActions
- Select the Pen tool (
 ).
). - Position the pen tip where you want the curve to begin. Hold down the mouse button. The first anchor point appears, and the pen tip changes to an arrowhead (
 ).
). - Drag to set the slope of the curve segment you’re creating. In general, extend the direction line about one third of the distance to the next anchor point you plan to draw. -drag to constrain the direction line to multiples of 45 degrees.
A. Positioning Pen tool
B. Starting to drag (mouse button pressed)
C. Dragging to extend direction lines
- Release the mouse button, but note that the first segment will not be visible until you draw the second anchor point.
- Position the Pen tool where you want the curve segment to end, and then do one of the following:
- To create a C-shaped curve, drag in a direction opposite to the previous direction line.
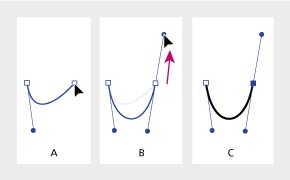
A. Starting to drag second smooth point
B. Dragging away from previous direction line, creating a C curve
C. Result after releasing mouse button - To create an S-shaped curve, drag in the same direction as the previous direction line.
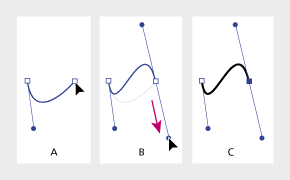
A. Starting to drag new smooth point
B. Dragging in same -direction as previous direction line, creating an S curve
C. The result after releasing the mouse button
- To create a C-shaped curve, drag in a direction opposite to the previous direction line.
- Continue dragging the Pen tool from different locations to create additional smooth points.
- Complete the path by doing one of the following:
- To close the path, position the Pen tool over the first (hollow) anchor point. A small loop appears next to the pen tip when it is positioned correctly. Click or drag to close the path.
- To leave the path open, -click (Windows) or -click (Mac OS) anywhere away from all objects, choose Edit > Deselect All, or select a different tool in the toolbox.
Fixing Your Lines
Often, your lines will not look like you planned. Rather than starting over, just fix your lines as necessary!
Closing Paths
To close a path, use the Pen tool. First select one of the two points you want to join, then select the other point. When you are hovering over the first point, the Pen tool will have a slash next to it. When you are hovering over the second point, it will have an O next to it.
Changing Points
If you wish to change a point from a smooth point to a corner point, just click on the Convert Anchor Point button in the Control palette and click on the point you want changed. Doing so will convert the selected anchor point to the opposite point type.
Adding or Removing Points
To add or remove a point on a path, just select the Pen tool with a plus sign (to add) or minus sign (to subtract) next to it and click where you want the point added or removed.
For a challenge, try recreating the following outline using only the Pen tool and the Add Point, Subtract Point, and Convert Point tools mentioned above.