Share teaching resources to Canvas Commons
Thank you for contributing to UW’s Canvas Commons. Your contributions help build a robust, valuable repository that benefits other UW instructors and students.
What can I share?
You can share an entire Canvas course or specific learning resources within a course, such as quizzes, presentations, images, videos, documents or files.
Prepare your resource for sharing
Some content is removed automatically when you share a course or resource to Commons — such as homework submissions and other content provided by students, including posts to discussion boards.
However, you should review content for any of the following and remove it before sharing:
- Links to any restricted content such as Panopto videos, Google or OneDrive docs, etc.
- Content that contains specific dates, including a specific course schedule or syllabus with specific due dates
- Content, such as course materials, that is subject to data retention policies
- Files you have uploaded that contain student data, such as student group assignments, or videos that feature or capture student images
- Content that you used for testing or building a learning resource, including filler text
Choosing who to share your resources with
When sharing a resource to Commons, you will need to choose who you want to share your resource with.
Four sharing options are available:
- Share to all Canvas Commons users
- Share to all of the University of Washington
- Share to a group
- Share to yourself — making a resource private and visible only to you
- Go to http://canvas.uw.edu.
- Navigate to the resource you want to share.
- Prepare the resource for sharing (strip out any date or student-specific content, any content you created for testing/building the course such as lorem ipsum text, etc.)
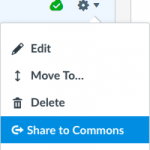
- Click the Settings icon and then click Share to Commons.
- To share your resource with all groups at the UW, select the All of University of Washington check box. The resource will be shared to all groups within the UW (including groups you may not belong to). You can also select specific groups to share with, share a resource with yourself, or share with all Canvas Commons users. Learn more.
- Choose a Licensing option. The most conservative option, Copyright, is selected by default. To explore other options, click Help Me Choose. Learn more about licensing your content.
- To help others assess the resource you are sharing, fill out fields under Metadata.
Title: The title of your content is the first thing users see when searching Commons. Make it descriptive. Include “UW” or “University of Washington” to make it easier for peers to find. Groups or departments may want to consider using a naming convention, such as including “- [Department Name]” at the end of titles.
Description: There is no way to easily preview content in Commons, so users depend on your description to understand what is being shared. Provide details about what you have included (especially for an entire course), suggested uses, and best practices.
Tags: Tags help determine which items show up in a search. Add descriptive and relevant tags to help users find your content. Each tag must be between 3 and 100 characters in length, can contain spaces and does not include hashtags. Consider using “University of Washington,” the name of your department or school, the name of your program, “undergraduate” or “graduate,” subject area and any other terms that would make your resource easy for your peers to find.
Image: A thumbnail image is required for all content. You can upload a representative image or choose from a Flickr search (which will provide a starter search with text from the title or tags). Groups or departments may want to use a branded or custom image. Identify the intended audience for your content using the Grade/Level slider or drop down menus.At the bottom of the screen, click Share. Your shared content will appear in a few minutes in Canvas Commons. - To ensure that the upload was successful, in Commons, at the top of the screen, click Shared.

To update resources once you have uploaded them, see these support documents from Instructure: