All of Your Basics and More
Illustrator’s menu and toolbox layout is consistent with its other siblings in the Adobe Suite. If you have ever used Photoshop or PageMaker before, using Illustrator should feel intuitive. If you have never used any Adobe product before, however, the interface can be a bit dizzying.
Illustrator’s interface can be easily broken down into small categories which can be more easily understood. We will first begin with the main toolbox on the left-hand side of the screen and from there we will work our way around the workspace.
The key components we will be covering are the following:
- The toolbox
- The Color palette
- The Transparency palette
- The Stroke palette
- The Gradient palette
- The Layers palette
Some of the following information was obtained from “Illustrator 10 for Windows and Macintosh (Visual Quickstart Guide),” a book by Elaine Weinmann and Peter Lourekas.
The Toolbox
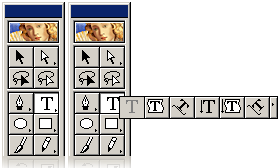
The main toolbox is located on the left-hand side of the screen by default. The toolbox holds most of the tools that you will use. Illustrator has a total of 53 tools to choose from, but not all of them are immediately visible. Tools marked with a little triangle in the lower right-hand corner of their icon have additional, related, tools available. To access these related tools, click and hold on a tool’s icon. Please note that the exact location of these tools does change from version to version of Adobe Illustrator, but tools never disappear.

Selection Tools

The first set of tools we’ll discuss is the Selection tool set. These tools allow you to manipulate only the objects you need and not every other object on the artboard.
The primary Selection tool (the “black arrow” tool) is used for choosing whole objects on the artboard. These objects are usually created by one of the Draw tools. Once the object is selected, it can then be manipulated. When selecting an object using this tool, you will normally find the object enclosed in a rectangle called a “bounding box.”
Then there is the Direct/Group Selection tool (the “white arrow” tool). Almost every object created in Illustrator is made up of “anchor points.” These anchor points are basically dots in a plane that make up a line, with the caveat that these anchors also help define the way the line will bend. The Direct Selection tool allows you to manipulate one or more of those anchors to change your object to achieve a desired shape.
The last two Selection tools are both “lasso” tools and work exactly the same as their “arrow” counterparts. The only difference is that they are able to select more arbitrary shapes, rather than just rectangles and squares, when selecting objects and anchors.
Drawing Tools


The first tool in this tool set is the Pen tool. Do not let its name fool you! The Pen tool does draw lines, but in a unique manner. The Pen tool is one of the most useful, yet complicated, tools to use in Adobe products. Marking two points on the artboard with the Pen tool creates a straight line, but you can also adjust the line to create a curve by manipulating the anchor points. The expanded Pen tools allow you to add and subtract anchor points for an object. The “caret arrow” converts a corner point to a curve or vice versa.
The second Draw tool is the Type tool. It allows you to place text somewhere on the screen, but the expanded Type tools offer many more possibilities for positioning text. The first expanded tool constrains the text within an object that you have created. The second causes text to follow a path that you have created. The path can be anything from a simple square to a curvy line dancing all around the artboard. The final three expanded Type tools do the same things as the previous three, except that the resulting text is vertical instead of horizontal.
The third Draw tool set is the set of Shape tools. Clicking and dragging while using these tools creates the indicated shapes immediately, while clicking once brings up a list of options that can be changed to create an object more to your specifications.
The last two Draw tools are Paintbrush tool and the Pencil tools. These tools draw lines on the artboard. The Paintbrush tool is used for calligraphy, scatter art, or patterned brushstrokes. The attributes for the Paintbrush tool can be changed by double-clicking on its icon. The Pencil tool is for freestyle line drawing (as opposed to the Pen tool). The expanded Pencil tools offer further options: the Smooth smooths out edges in an object and the Erase tool erases sections of an object’s path.
Manipulation Tools


The first Manipulation tool we’ll go over is the Rotation tool, which rotates an object around its axis of rotation. The expanded Rotation tool is the Twirl tool, which stretches and spins shapes into unique designs.
The second tool is the Scale tool. Scaling changes the size of an object (you can constrain the new object to the original proportions, or not, as you see fit). The expanded Reshape tool reshapes objects by adding or subtracting anchor points.
The Reflect tool reflects an object over an axis. The expanded Skew skews an object.
The Free Transform tool rotates, scales, reflects, shears, distorts, or changes perspective for an object. This tool is a freely manipulable way to affect objects in all of the ways that the above tools do, all in one convenient location.
The Blend tool blends two or more objects, and their colors, to achieve effects that are otherwise hard to create. The Trace tool traces silhouettes.
The last Manipulation tool we’ll discuss is the Graph. This tool is not really a manipulation tool per se, and in fact in later versions of Adobe Illustrator, it doesn’t even appear in the Manipulation tool section. Rather obviously, the Graph tool and its expanded options allow you to insert a variety of graphs into your document.
Other Tools


Other tools include the Eyedropper tool, which allows you to sample a color from anywhere on the artboard and reuse that color somewhere else, and the Paint Bucket, which fills objects with the currently selected color. The Scissors tool in Illustrator is not for cutting and pasting, as normal! Instead, the Scissors tool cuts object paths into two; the Knife tool is very similar to the Scissors tool in that it cuts up objects into two rather than splitting a single path. The Hand tool lets you move your current location on the artboard, the Page tool defines the printable area for your artboard, and the Measure tool measures the distance between any two points.
Color Tools

The last tool we’ll discuss is the Color Picker control. The solid square shows the current fill color, while the framed square indicates the current stroke color. The tiny black and white squares in the lower left reset the Color Picker to default colors.
The bottom three icons indicate whether the chosen colors will be solid, gradients, or transparent.
The Palettes
The Color Palette

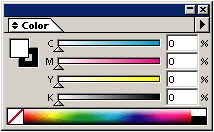
The Color palette is used for defining fill and stroke colors. A different Color palette will be displayed, depending on which color scheme you pick (RGB or CMYK). The example Color palette is for the CMYK color scheme. Colors can be chosen from the color spectrum or defined exactly by numerical values in the right-hand fields. As with the Color Picker, the fill color is represented by the solid square in the upper left corner while the stroke is represented by the framing square beneath the solid one.
The example Color palette does not display an “Out of Web” or “Out of Gamut” warning. “Out of Web” means that the color you are trying to use is not capable of being displayed on the Web. If you are concerned about Web-safe colors, you can click on a small cube that will show up, and use the dialog that appears to choose the closest Web-safe substitute. “Out of Gamut” means that the color will not be printed in the exact same shade as it appears on the screen. A triangle icon with an exclamation mark will appear to allow you to choose a proper substitute.
The Transparency Palette

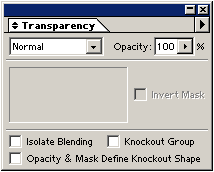
The Transparency palette is used to change the blending mode and opacity of individual objects, groups, or layers.
The Stroke Palette
The Stroke palette is used to manipulate stroke thickness for objects.
The Gradient Palette
The Gradient palette helps with creating gradients within an object or adjusting a current gradient. The default colors for the gradient are black and white, but they can be adjusted by dragging colors from the Color palette to the Gradient palette’s slider. Which way the gradient comes falls and how far colors extend can also be manipulated.
The Layers Palette

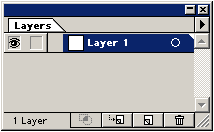
The Layers palette in Illustrator acts the same as Layers palettes do across the entire Adobe Suite. You can add or delete, select, restack, hide or show, lock or unlock, change view, or dim an individual layer, sublayer, group, or individual object.
